Help & Tutorials
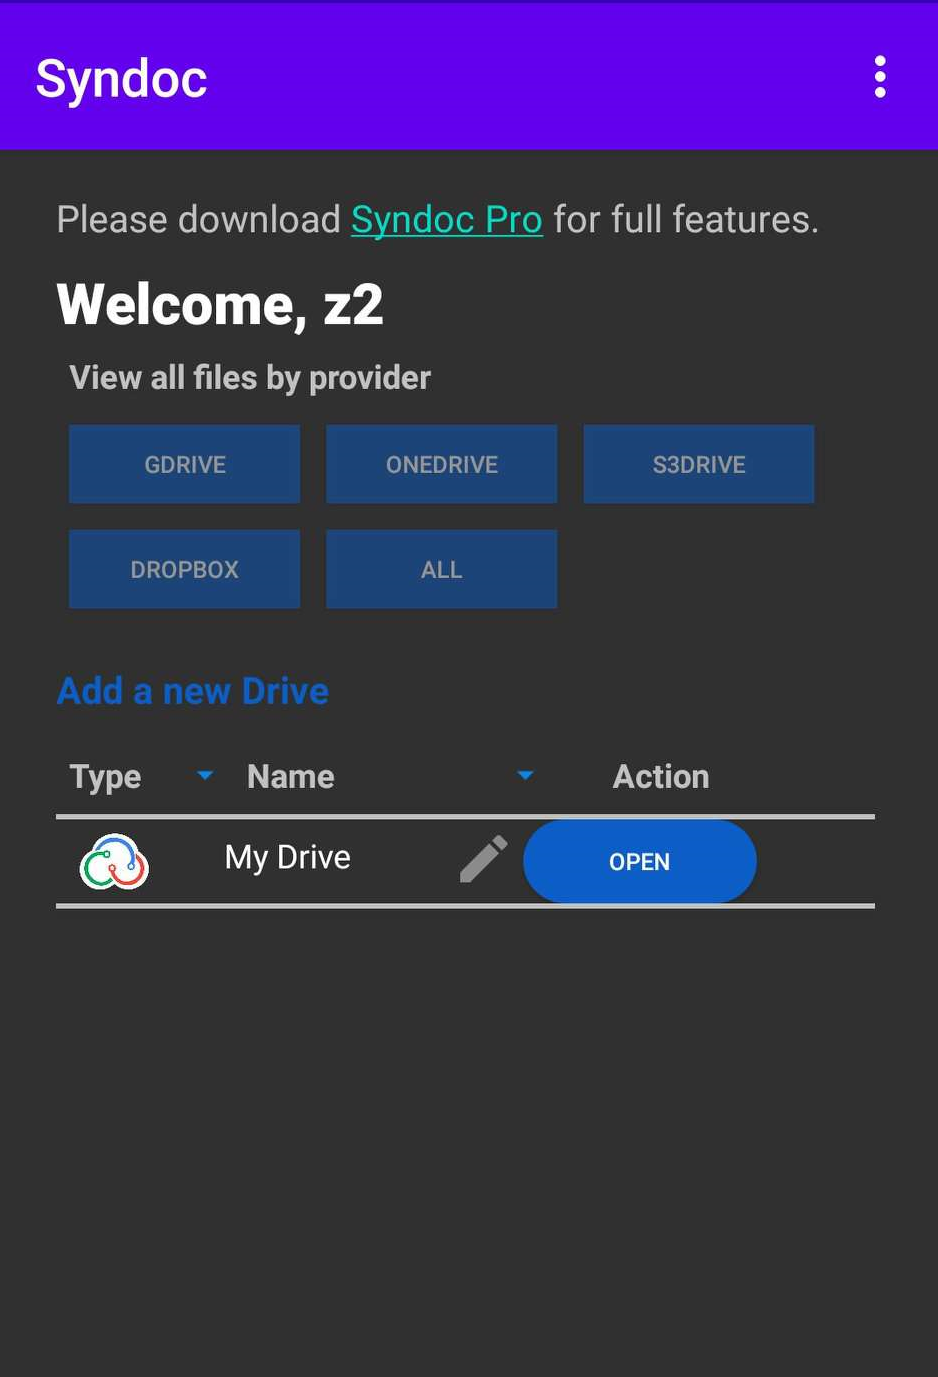
Syndoc supports cloud management and also has its own storage
drive "My drive" - providing 5GB free space. It is designed for
people managing multiple cloud service accounts in one interface
easily. To use Syndoc to help you manage several cloud drives,
such as Google Drive, Dropbox, Amazon S3, OneDrive and Box, you
should add these cloud storage services to Syndoc first.
To add a cloud drive to Syndoc follow below steps:
To add a cloud drive to Syndoc follow below steps:
- Sign Up and Sign in to Syndoc.
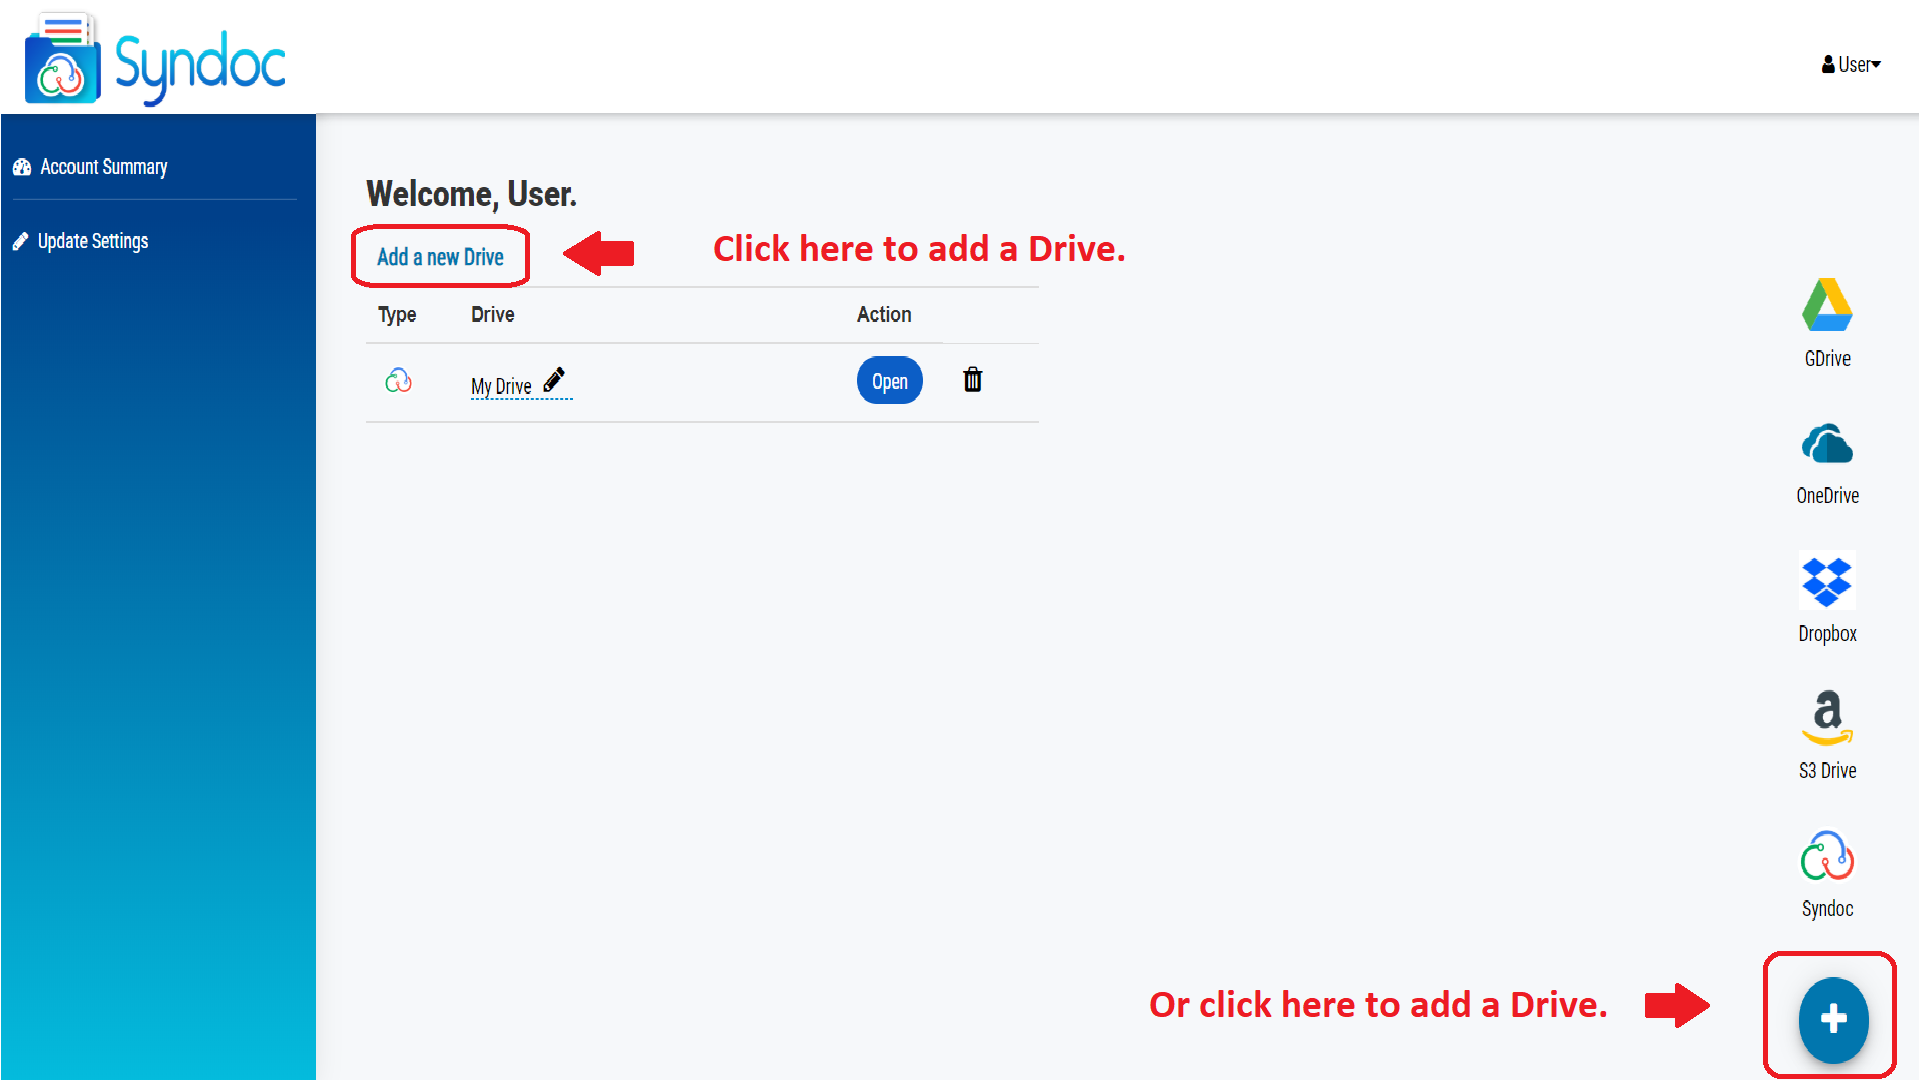
- You will see the account summary page as shown in
below picture,where you can click on "Add a New drive"or
click on "+" button on lower right corner to start
adding your cloud drives.
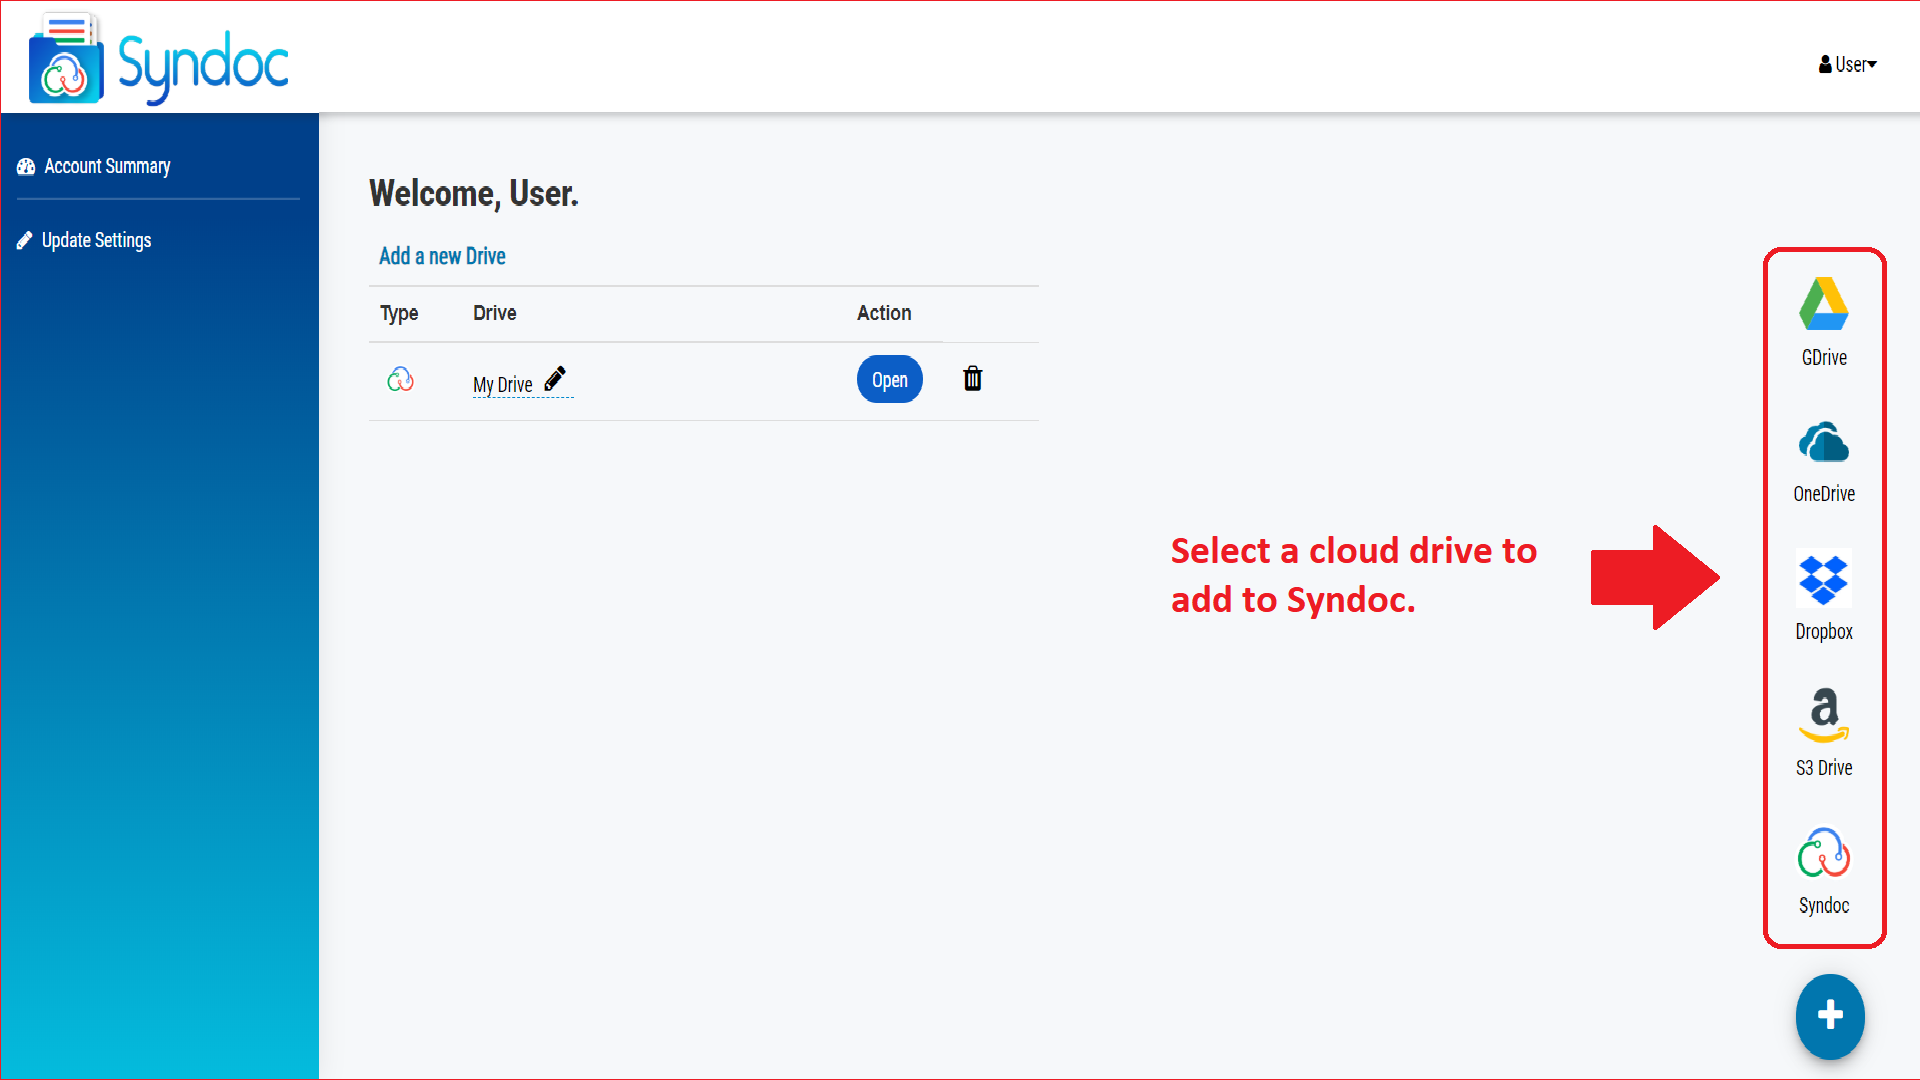
- After clicking on one of the above mentioned buttons,
you will see popup to "Select Drive".Click on the drive
you wish to add to syndoc.
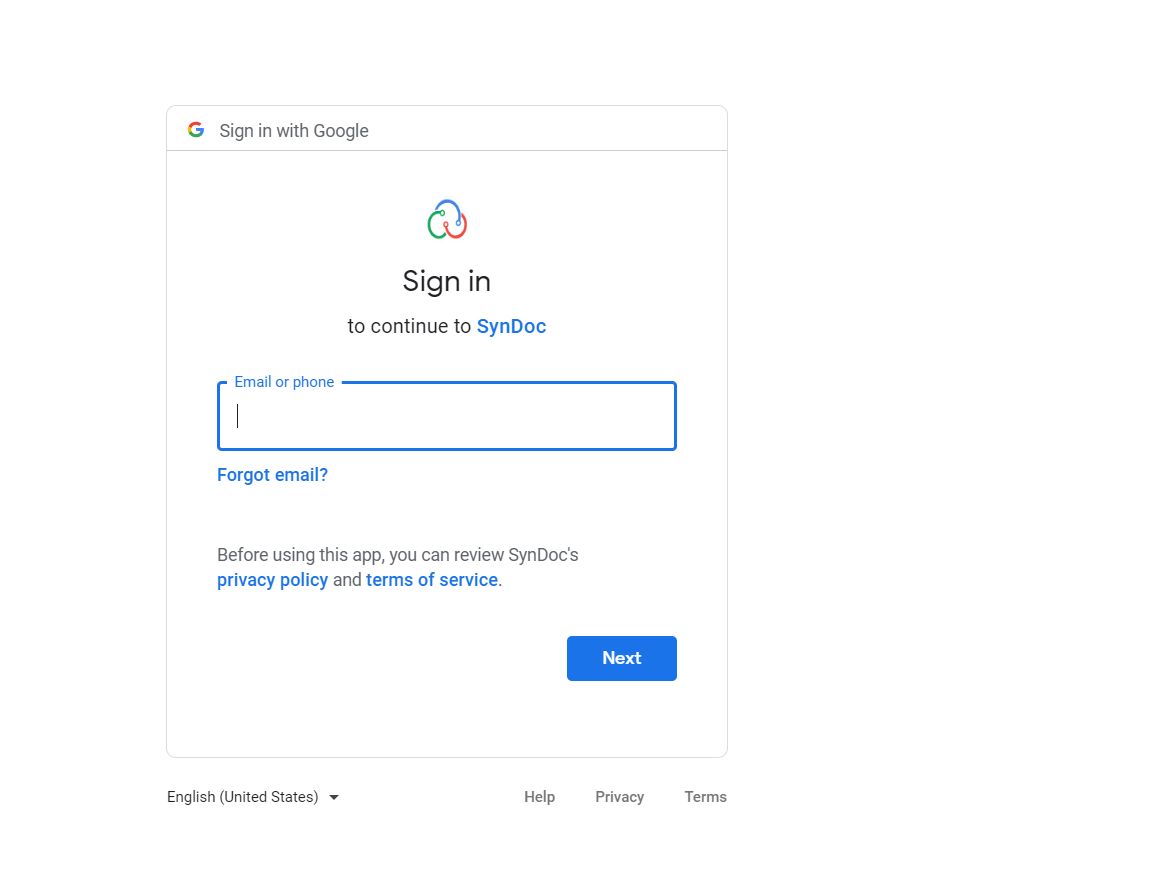
- After selecting Drive say Google Drive i.e,Step 2 in above picture, it will jump to
the following page. Enter your email and password of a Google
Drive account, then click "Sign in". You will be asked
to allow access to Syndoc, Click on "Allow".
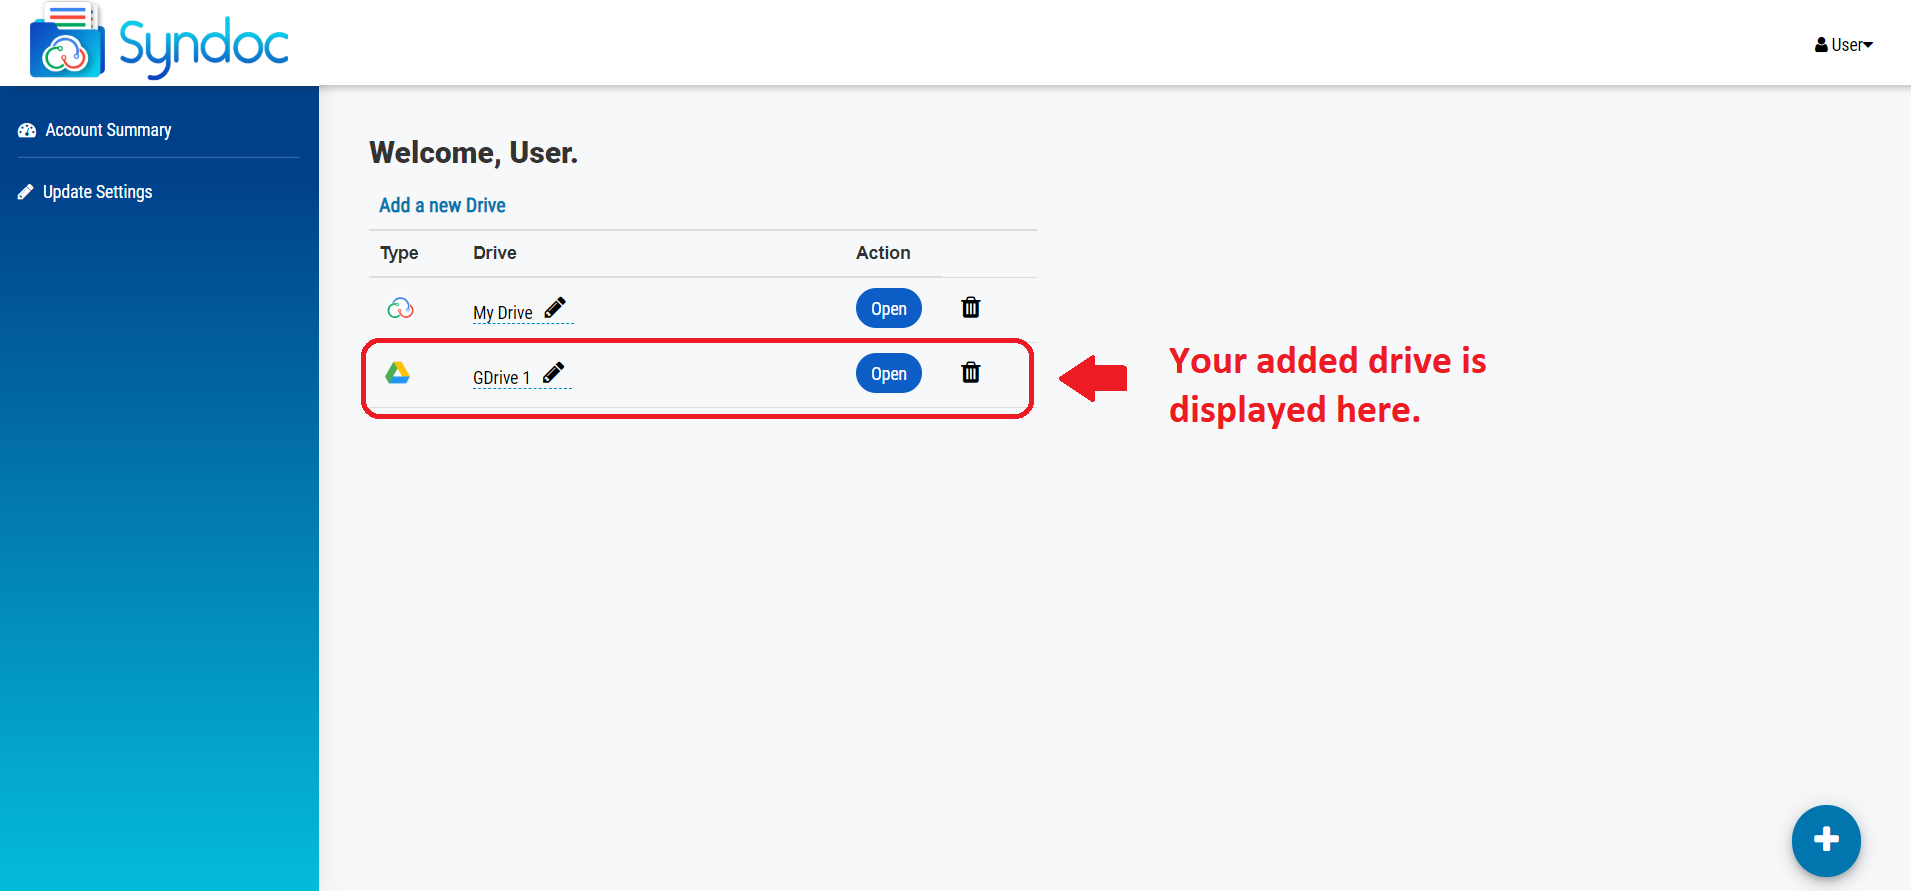
- Now we have finished adding Google Drive account to
Syndoc. If you want to open the drive, Click on "Open"
Button.
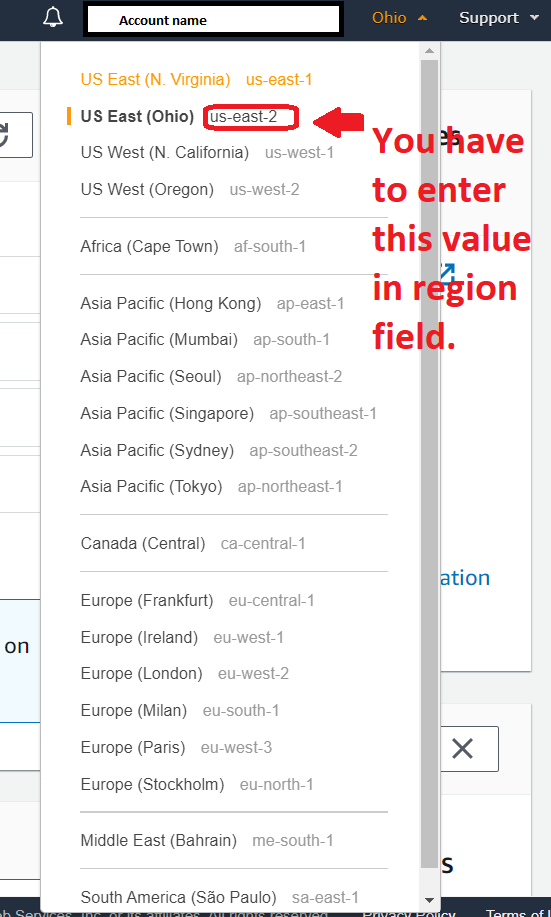
- For adding Amazon S3 drive to Syndoc, you will need to
enter Access Key,Secret Key and Region (Optional).
 1. To get an Access key and Secret Key, please visit How to get your
AWS Access Key and Secret Key.
1. To get an Access key and Secret Key, please visit How to get your
AWS Access Key and Secret Key.
2. To get region follow below steps:
* Open the Amazon EC2 console at https://console.aws.amazon.com/ec2/.
* Use the Region selector in the navigation bar.
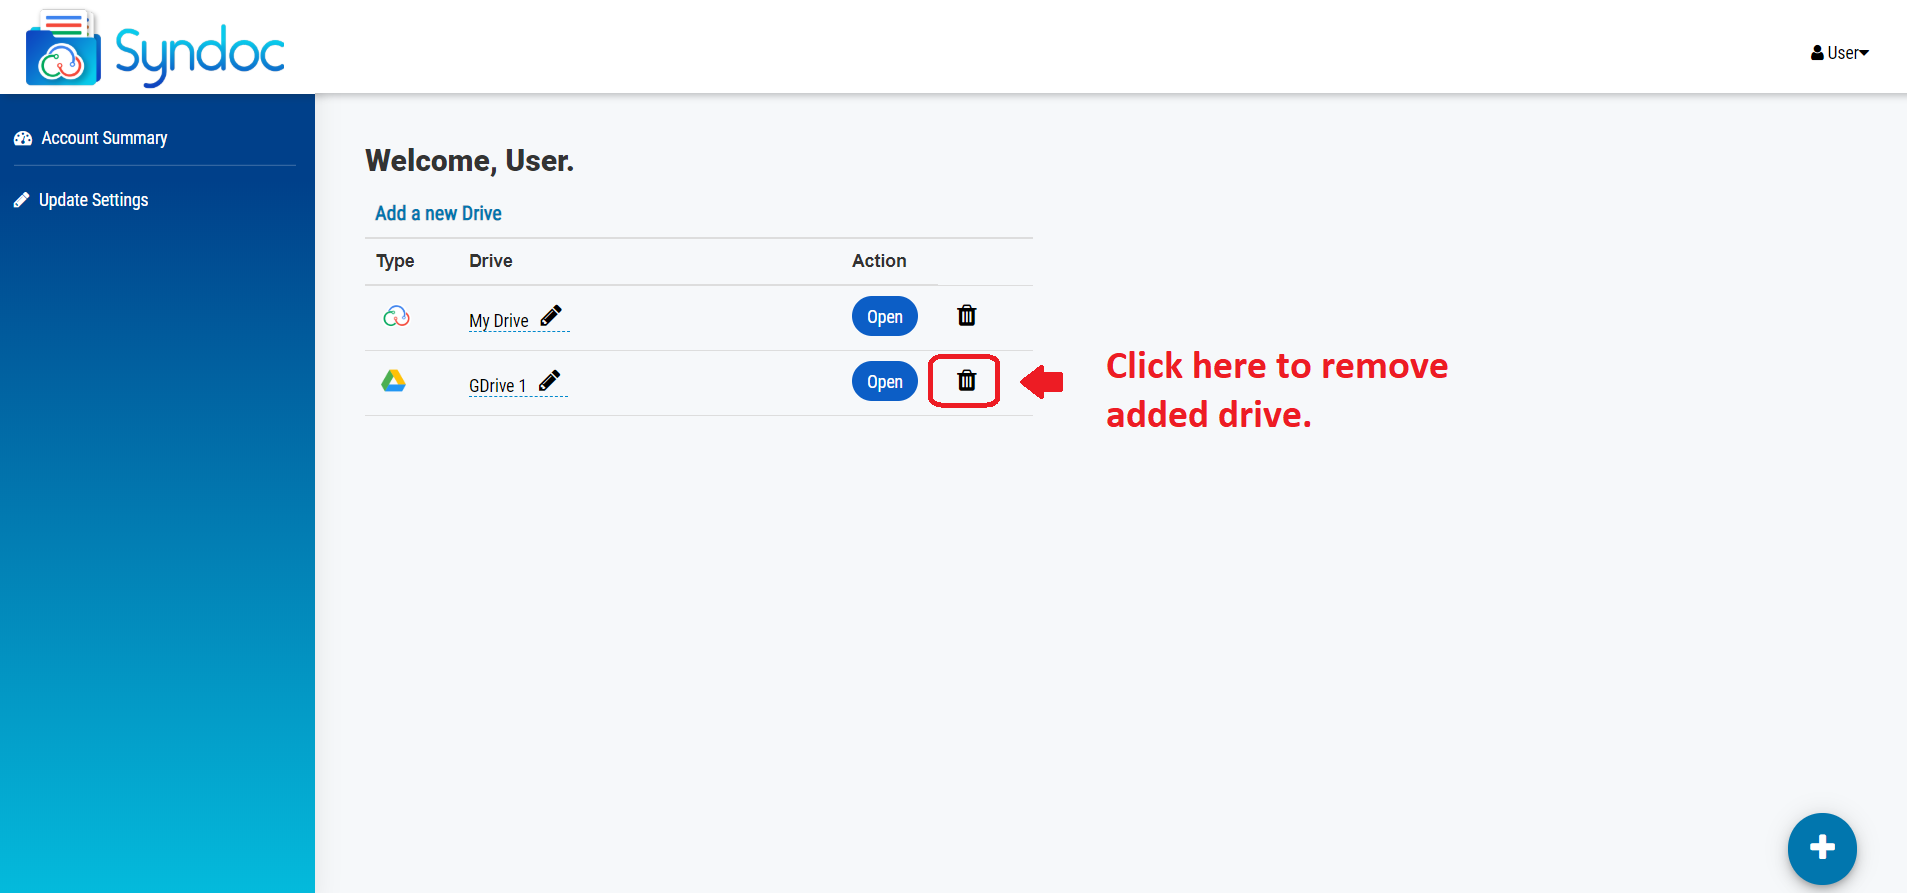
- Click on the "Delete" icon as shown in below
picture to remove the added cloud drive from the Syndoc.
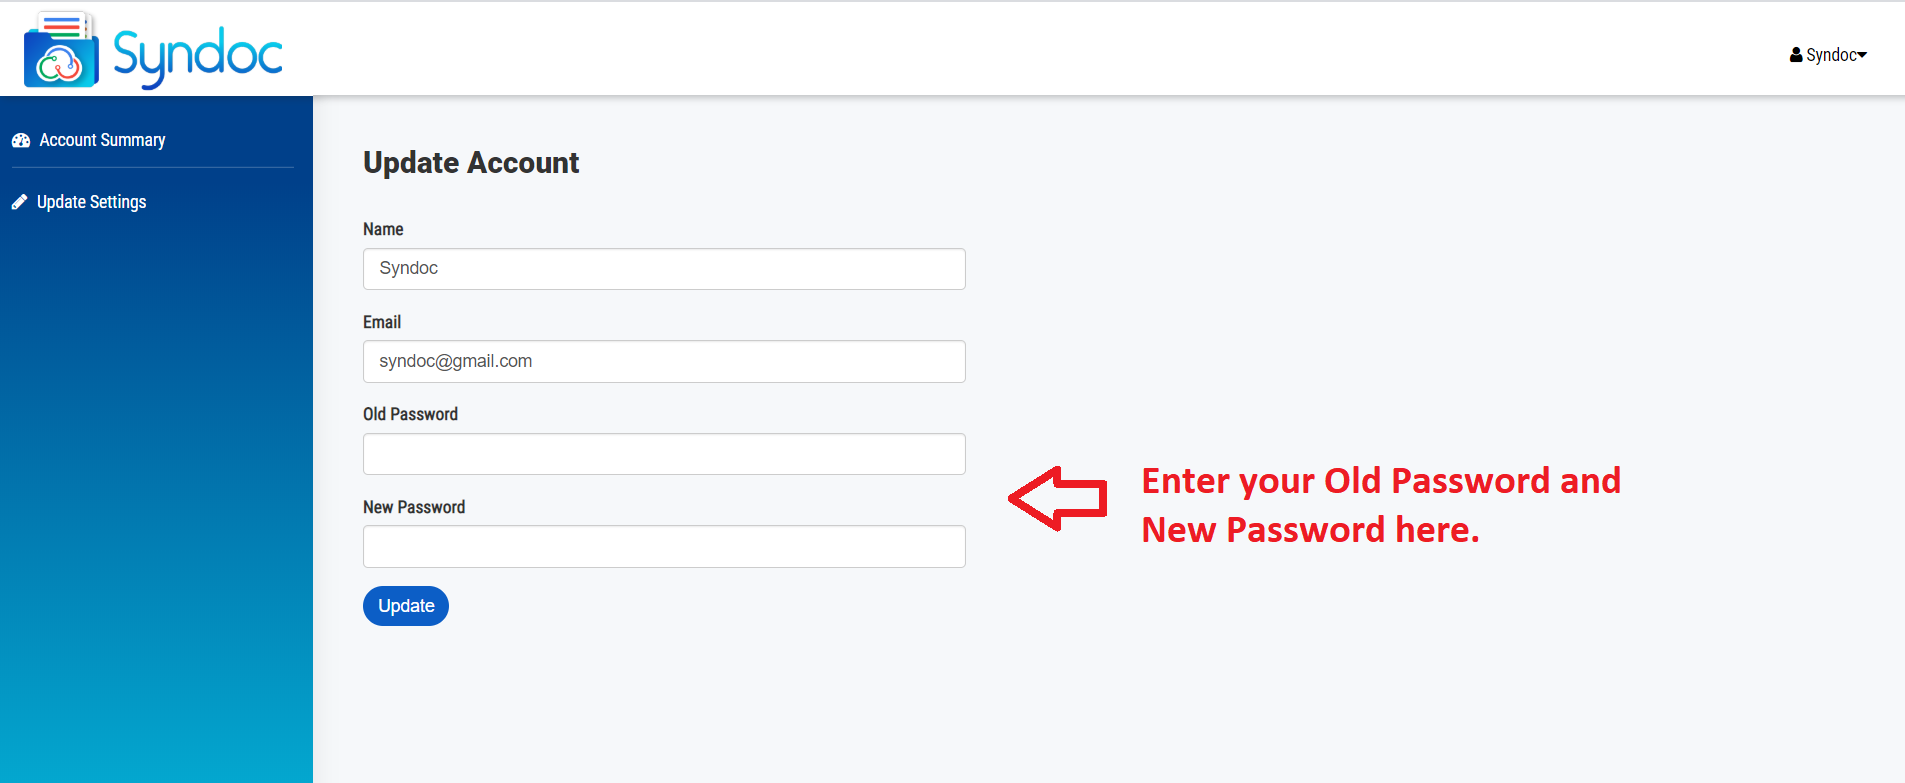
- Log In in Syndoc, make sure you already have a Syndoc account.
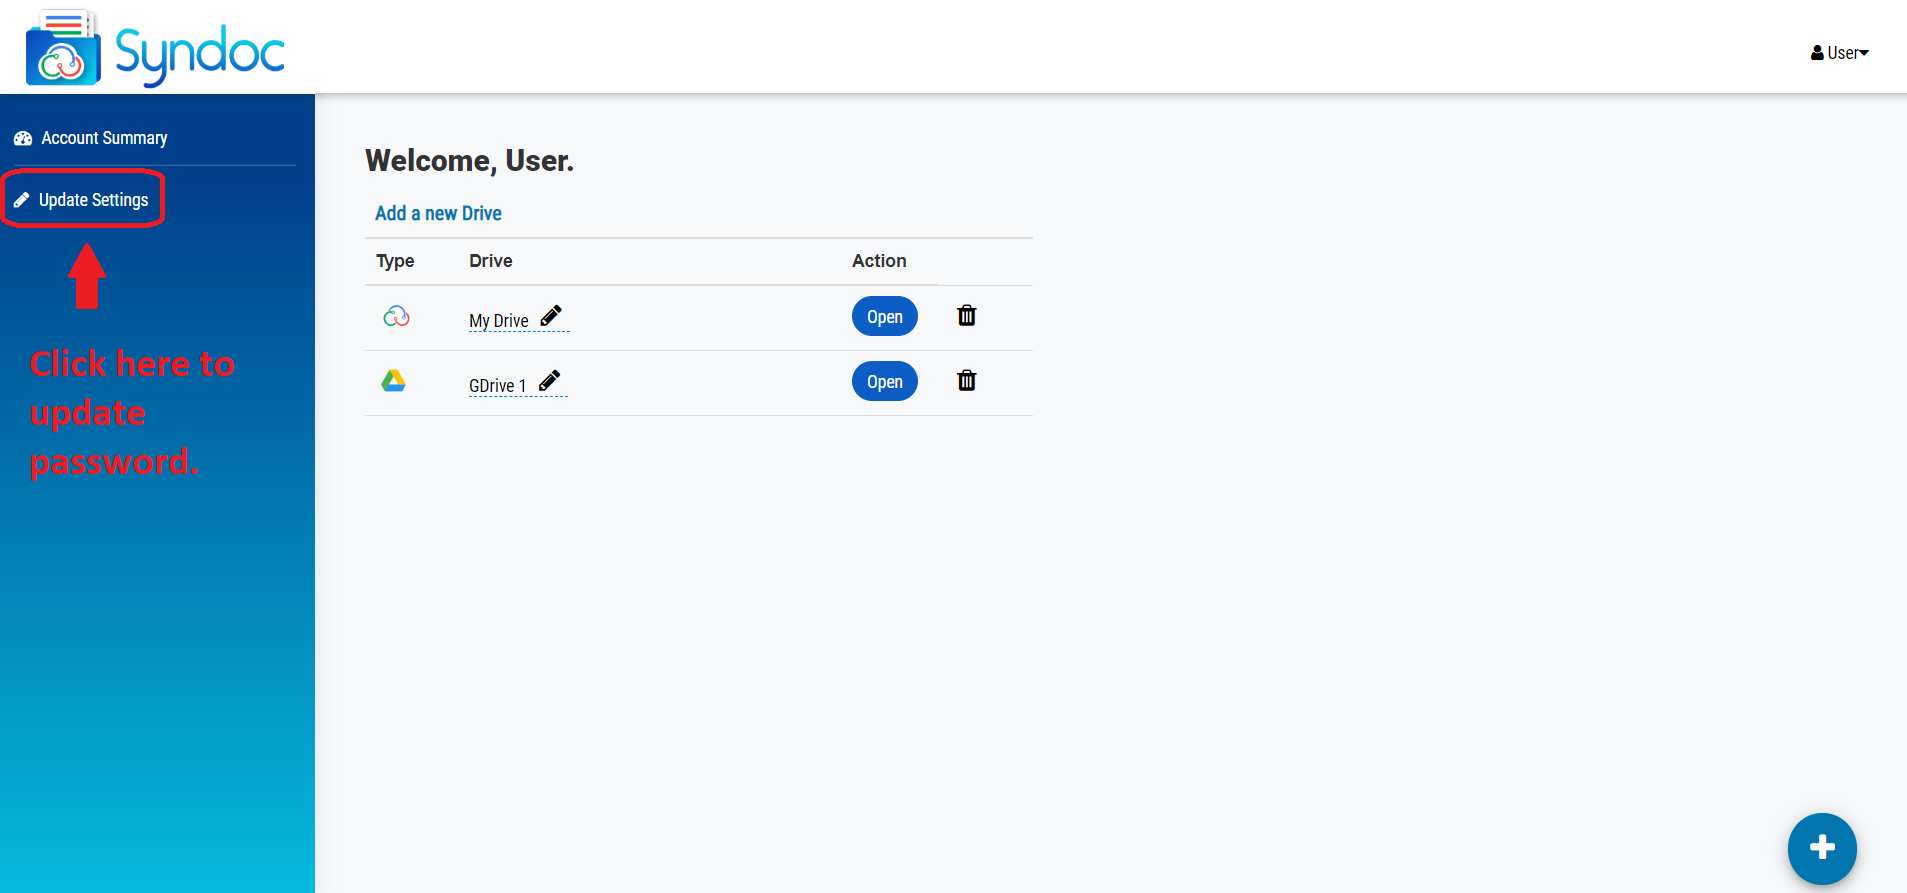
- Click on "Update Settings" on the left side of
the panel as shown in below picture.
- After the above step you will see below shown page to
enter your Old password and New password, and then click on "Submit".
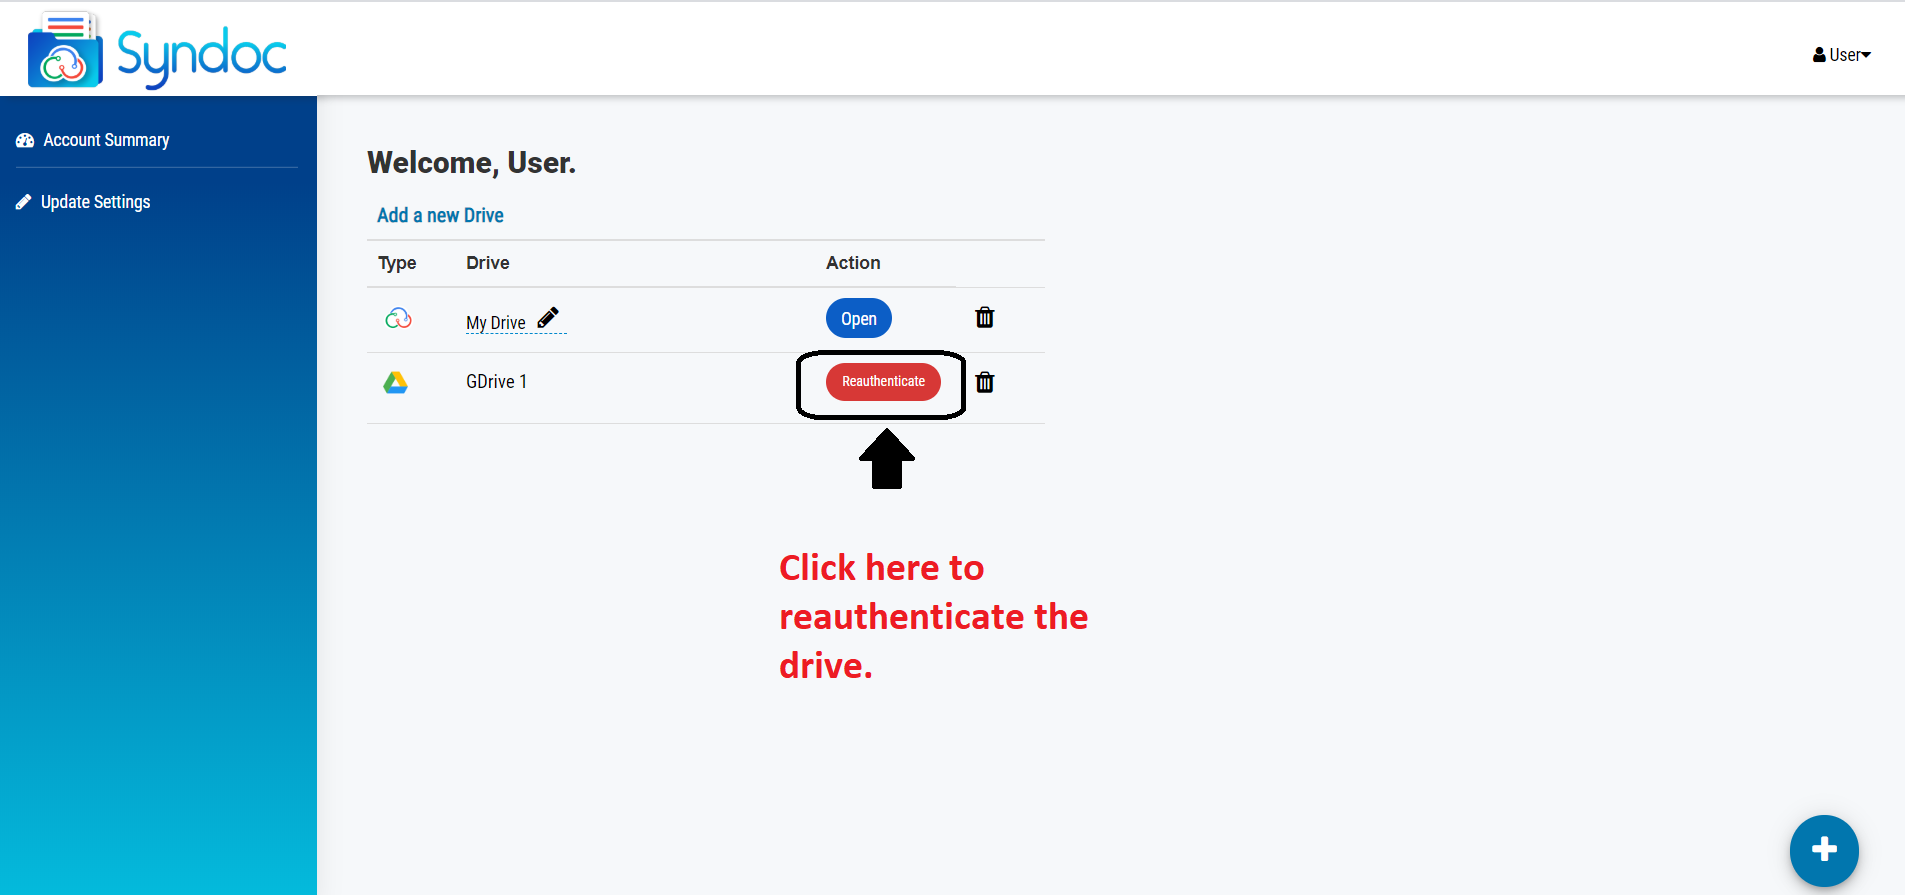
When you have removed Syndoc access
for added drive, then you will need to re-authenticate the added
drive. Follow the below steps to re-authenticate your account.
- Log In in Syndoc, make sure you already have a Syndoc account.
- You will see a button "Re-authenticate" in front
of a drive which does not have access to Syndoc. Click on "Reauthenticate"
button.
- It will jump to the following page, where you need to
re-enter your email and password of a Google Drive account,
then click "Sign in". You will now be asked to allow access to
syndoc, Click on "Allow".
- Now we have finished re-authenticating Google Drive
account to Syndoc. If you want to open the drive, Click on "Open"
Button.
This function helps you upload files to your cloud storage
services that have been added in Syndoc. Thus, you don’t need to
log into your cloud service. Just open Syndoc and directly
upload files to your cloud drive. If you have several cloud
accounts, this method will help you save lots of time.
To upload files to cloud services follow below steps:
To upload files to cloud services follow below steps:
- Log In to Syndoc. First, you should
ensure that you have Syndoc account and have already added
cloud drive(s) in Syndoc.
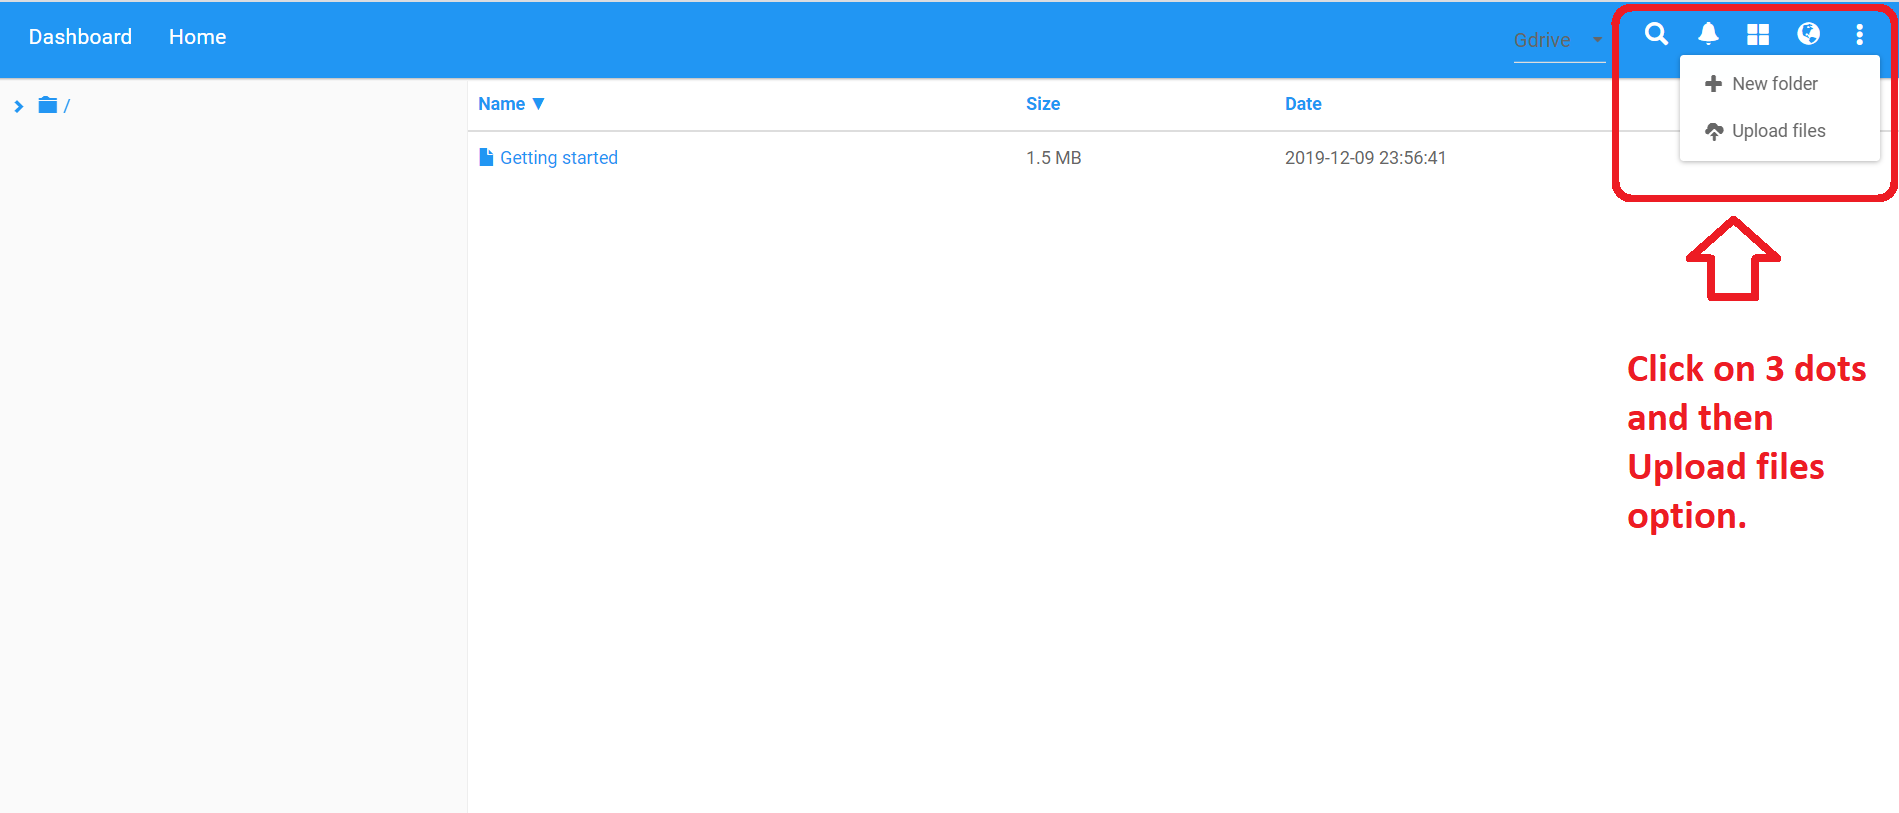
- Click on "Open" button to open a cloud drive,we
take Google drive as an example . It will show your dashboard
page for selected drive where all files and folders will be
displayed.
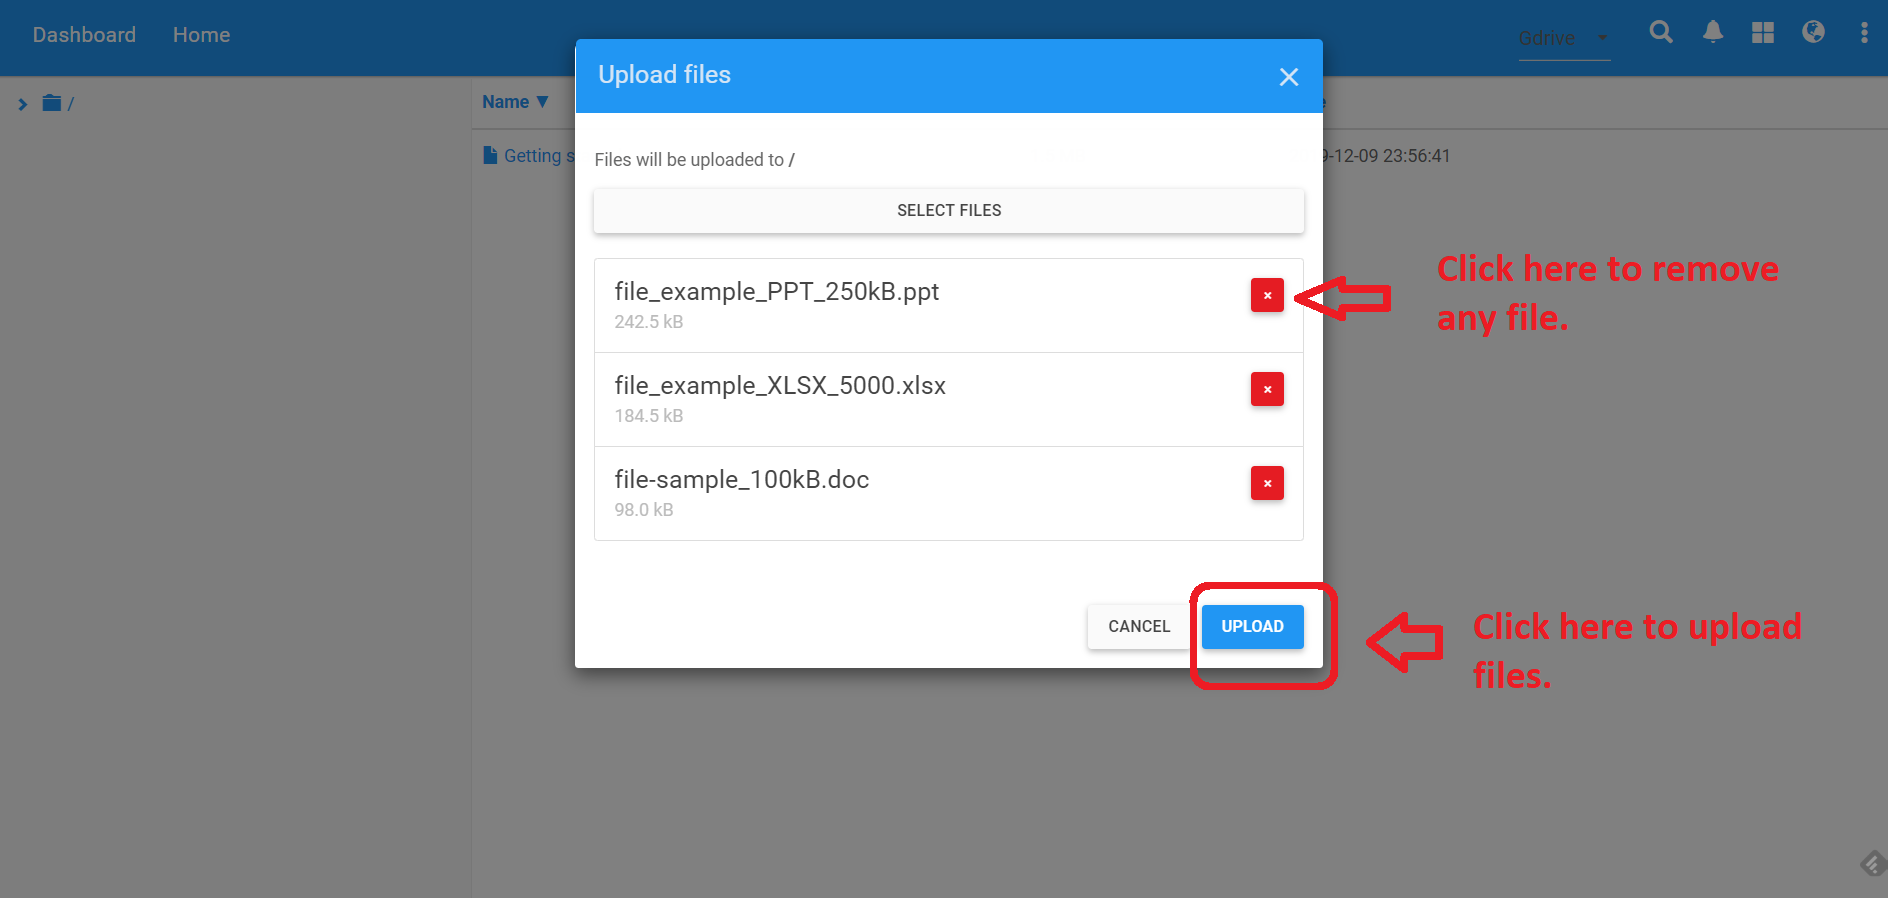
- Now you can click on "3 dots" at the upper
right corner,and click on "Upload Files" option as
shown in below picture.
- In the pop up window, it will show button "Select
files", where you can select desired files to add. You can
select multiple files too.
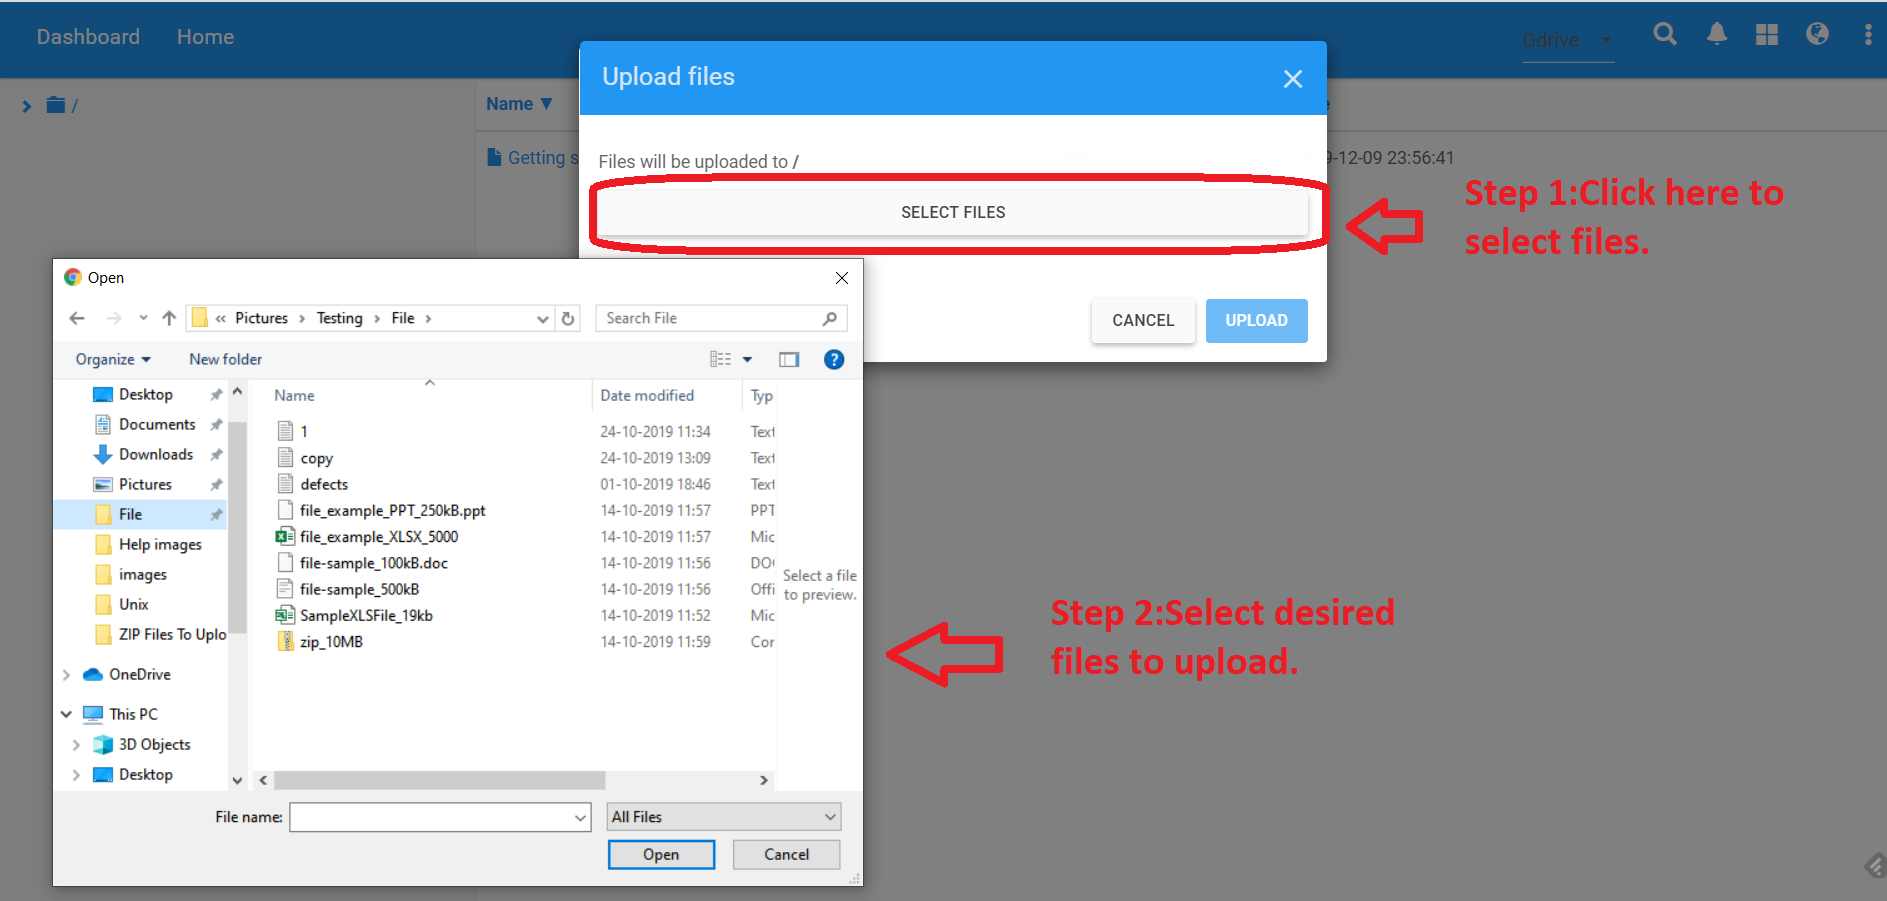
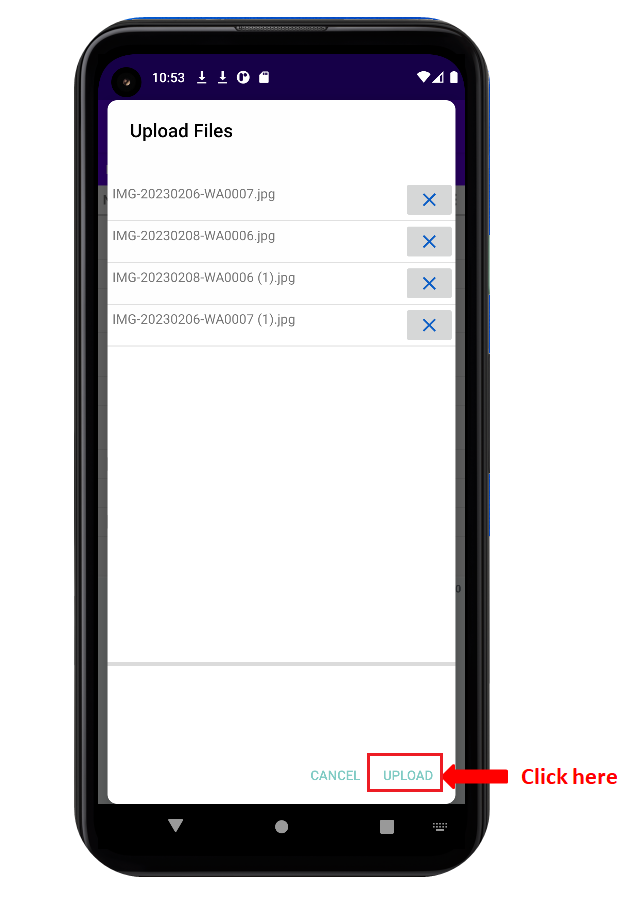
- After you have selected desired files, click “Upload”
button to start uploading. You can also remove the added files
by click on "X" button.
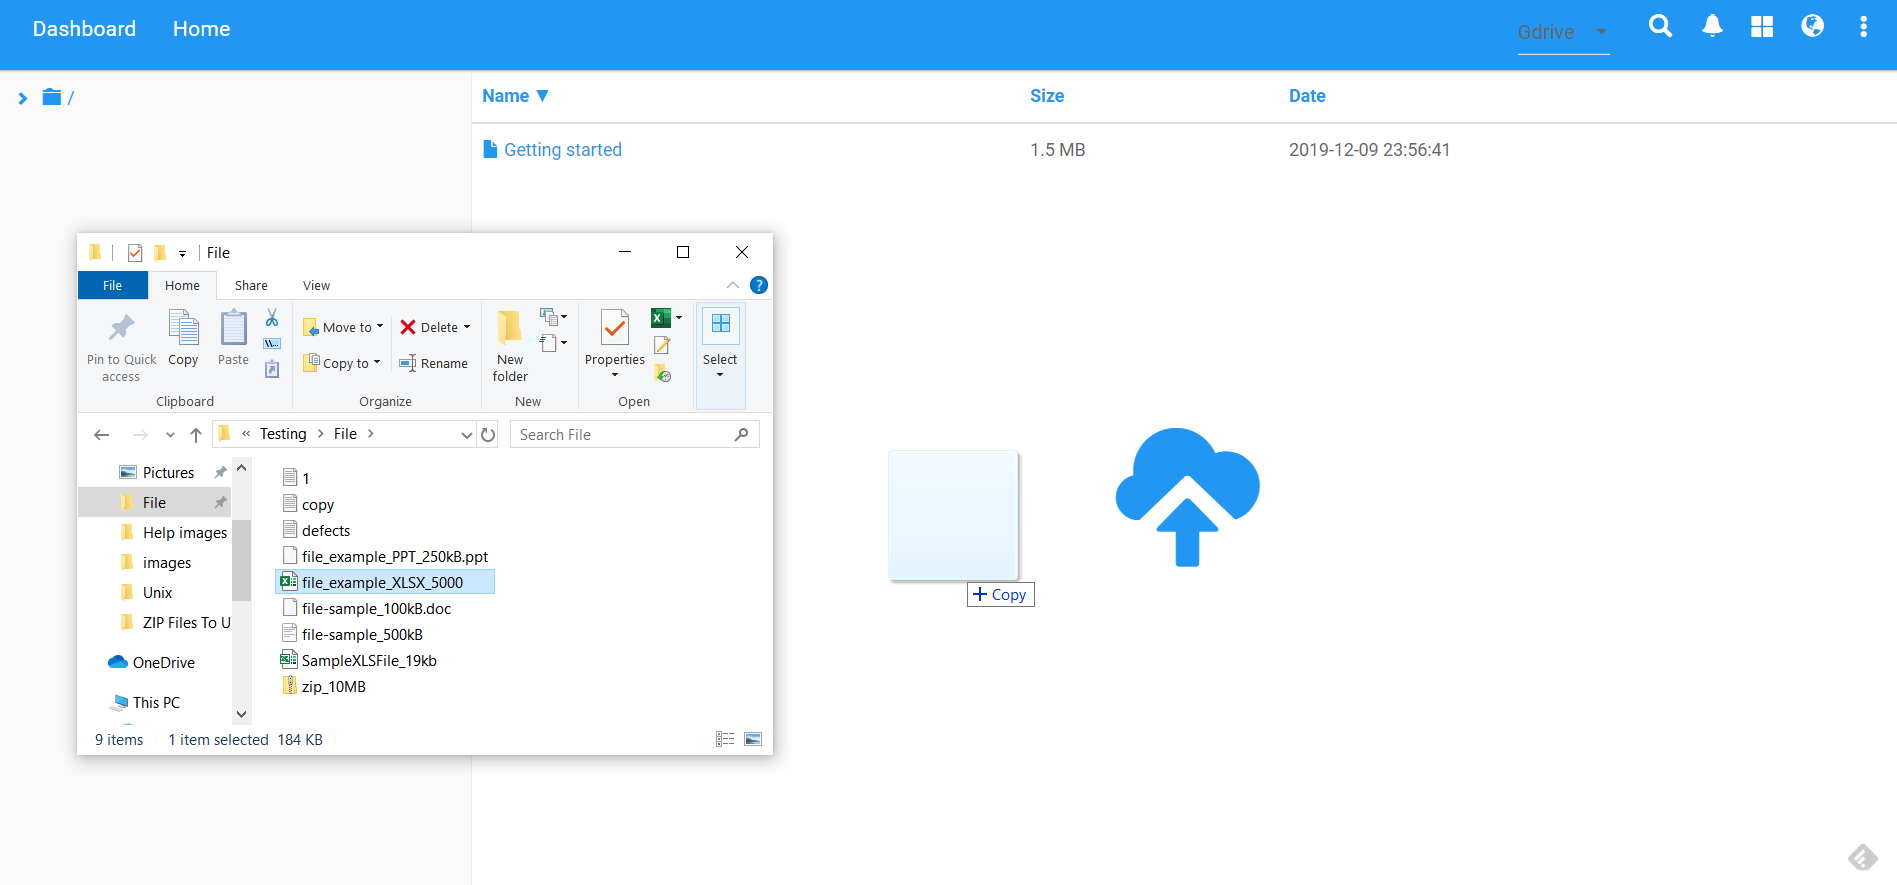
- Another easiest method is directly dragging a target
file from PC desktop to the interface of Syndoc by holding the
left mouse button like moving files in Windows Explorer.
Once you have added cloud services to Syndoc, you can download
files from cloud drives with Syndoc directly.
To download files follow below steps:
To download files follow below steps:
- Log Into Syndoc. First, you should ensure
that you have Syndoc account and have already added cloud
drive(s) in Syndoc. And there are files in your cloud storage
services.
- Click on "Open" button to open a cloud drive.
We take Google drive as an example . It will show your
dashboard page for selected drive where all files and folders
will be displayed.
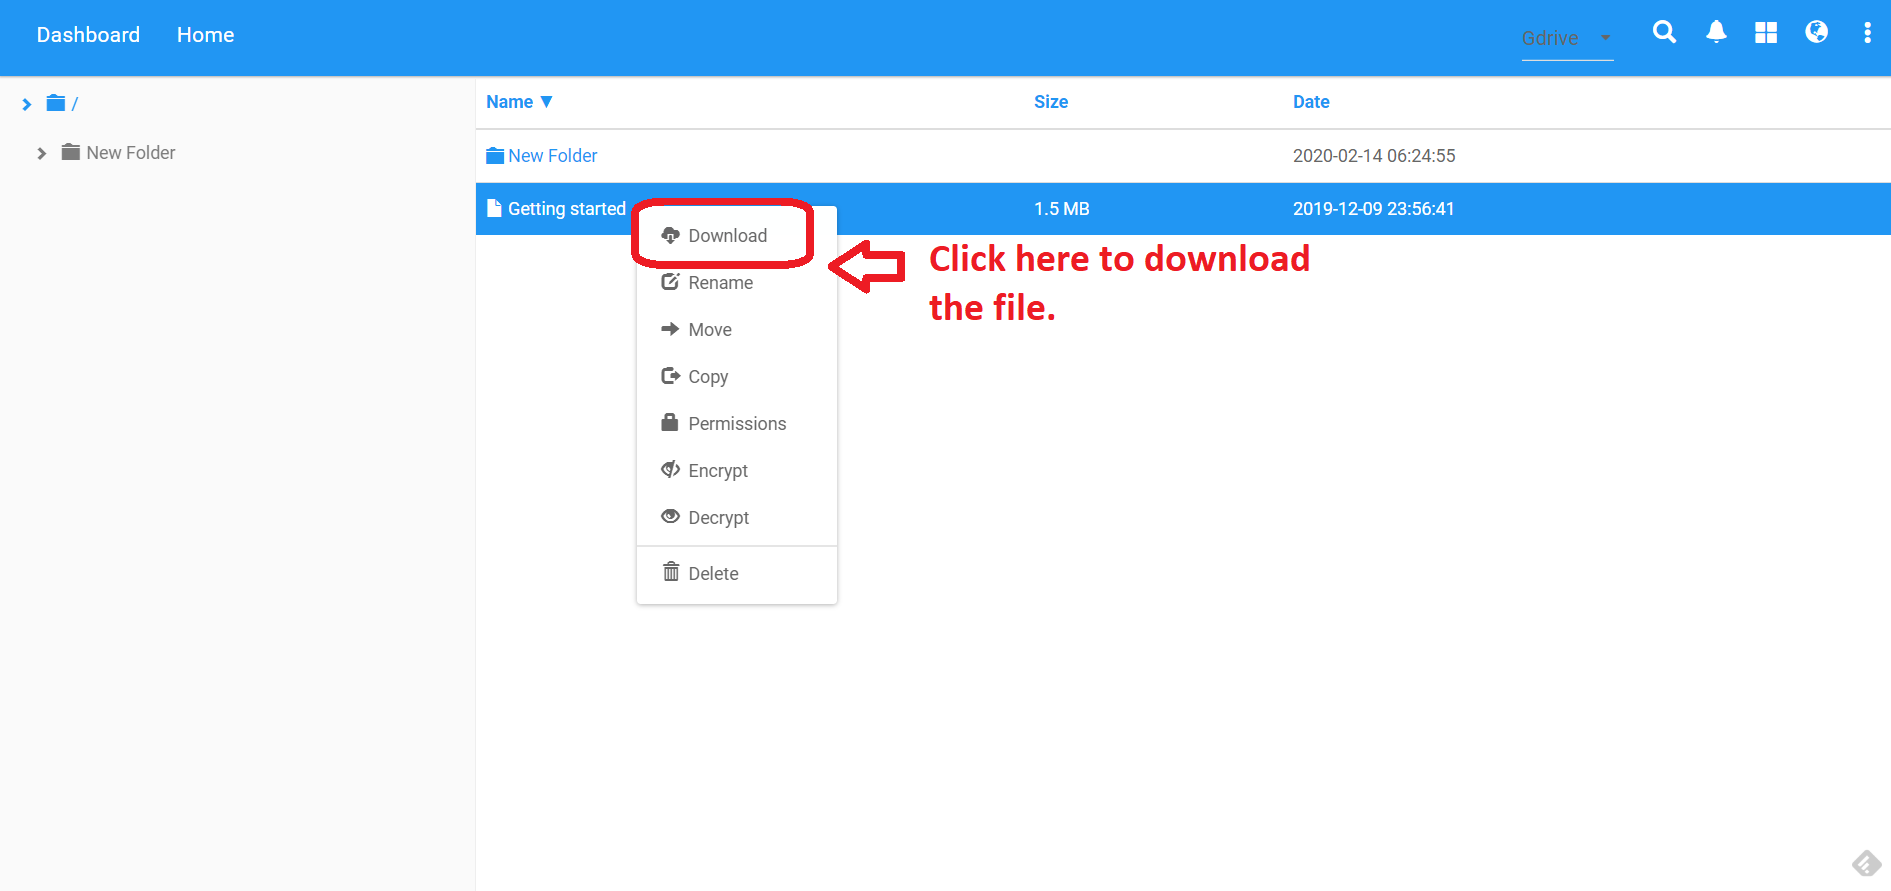
- Right click on the target file, then you will see a “Download”
option, click it to download the file. The selected file gets
downloaded in "Download Folder" on the machine.
- You can also download multiple files as zip, as shown
in below picture.
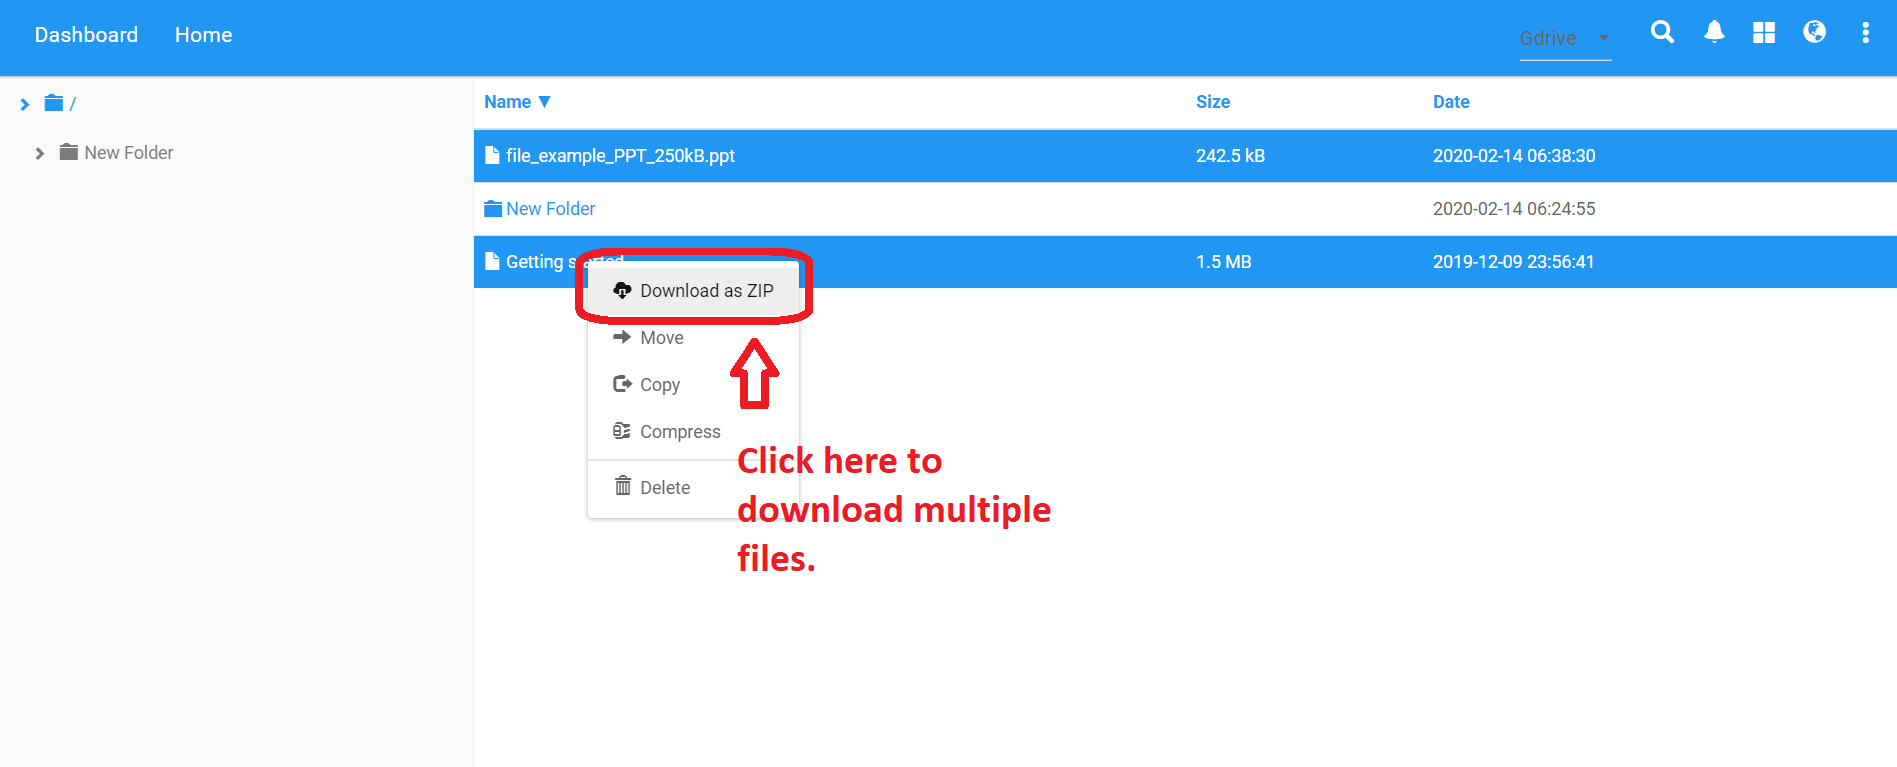
- You cannot download folders in Syndoc.
Copying and moving are two common operations. You can easily
copy or move file(s) or folder(s) from one cloud service to
another without downloading to local disk first then
re-uploading.
To copy file(s) or folder(s) follow below steps:
To copy file(s) or folder(s) follow below steps:
- Log In to Syndoc. First, you should
ensure that you have Syndoc account and have already added
cloud drive(s) in Syndoc. And there are files in your cloud
storage services.
- Click on "Open" button to open a cloud drive,
we take Google drive as an example. It will show your
dashboard page for selected drive where all files and folders
will be displayed.
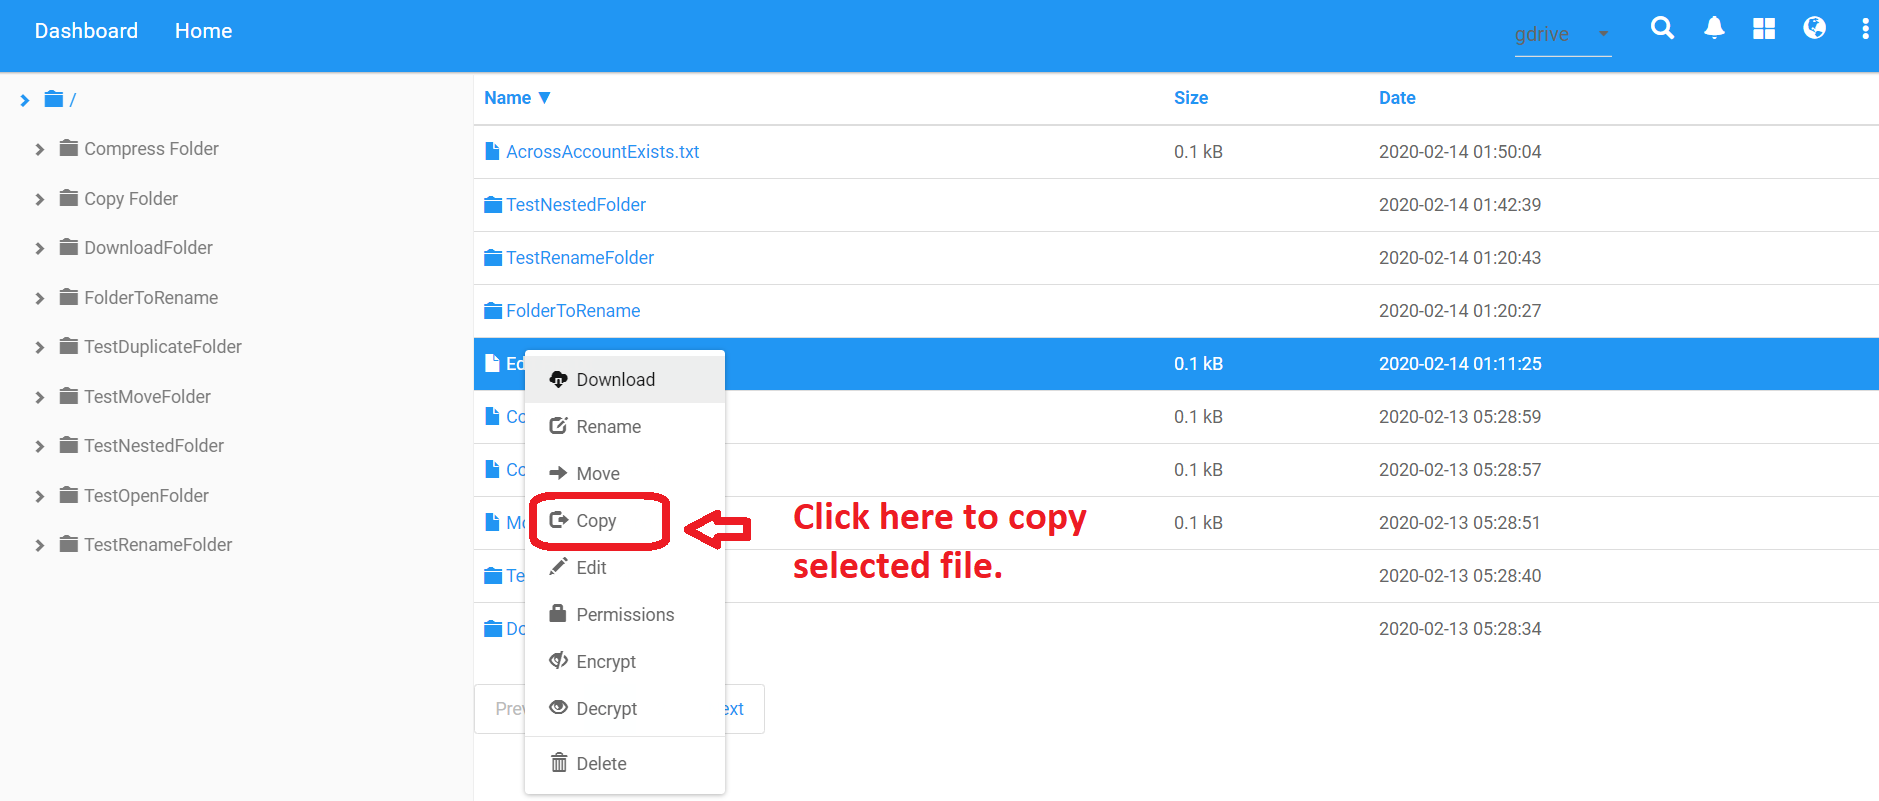
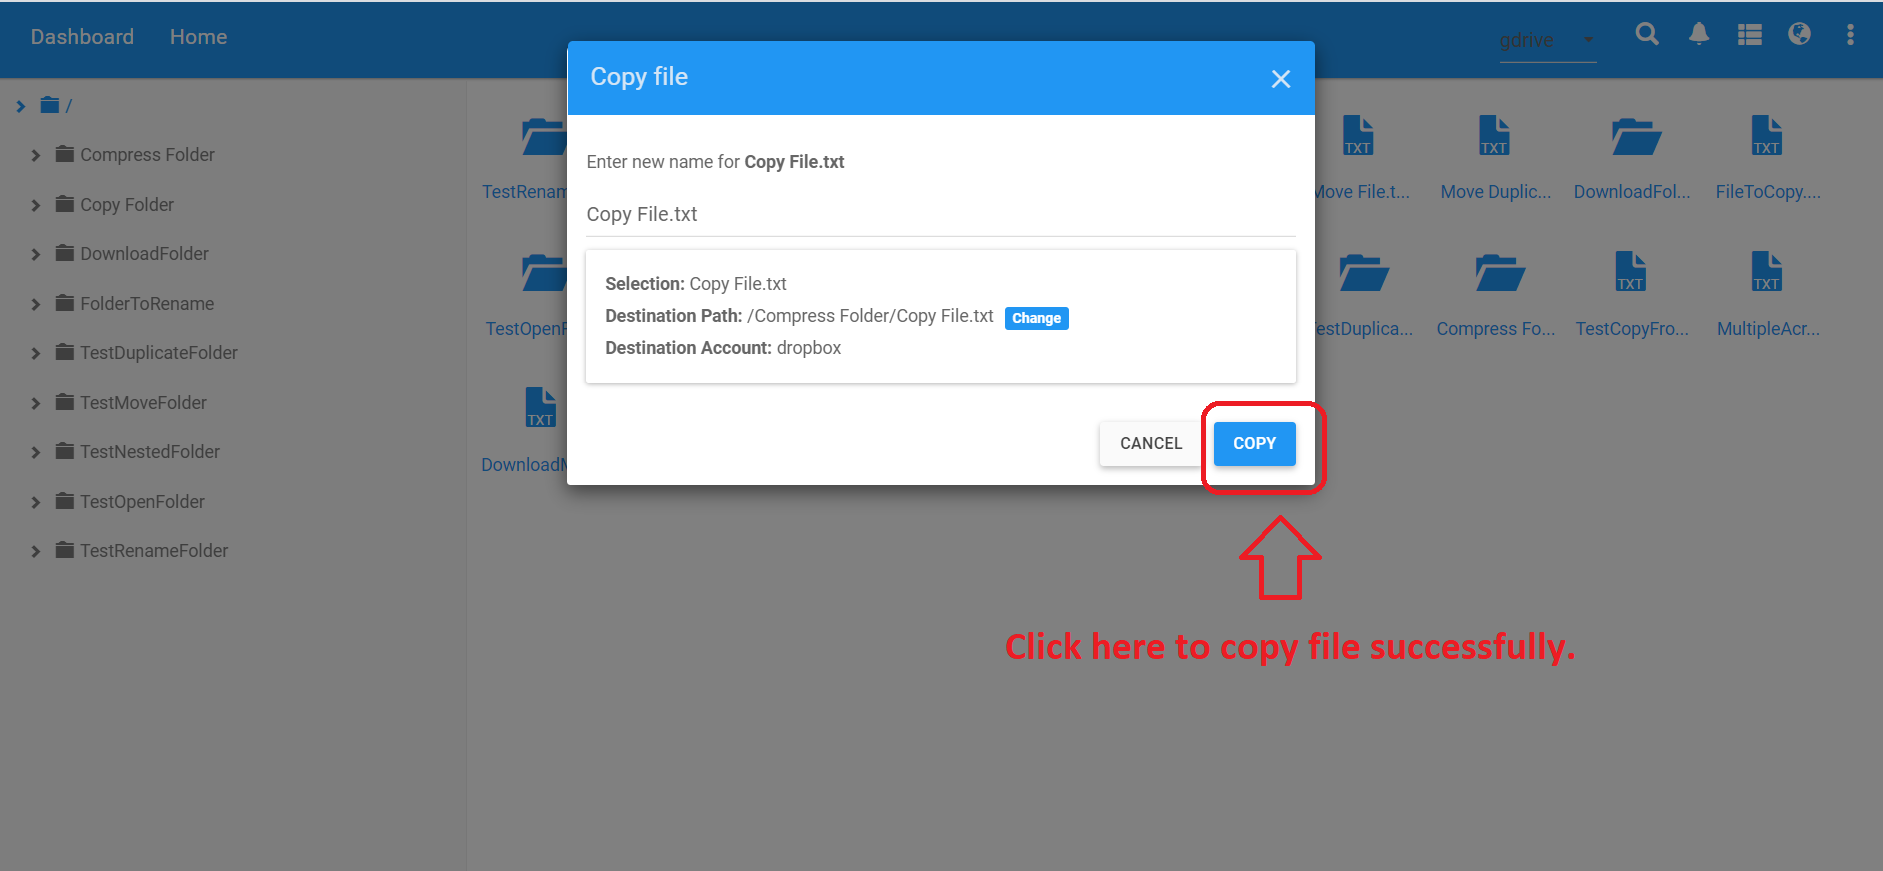
- Right click on the target file, then you will see a “Copy”
option, click on this option to copy file(s) or folder(s).
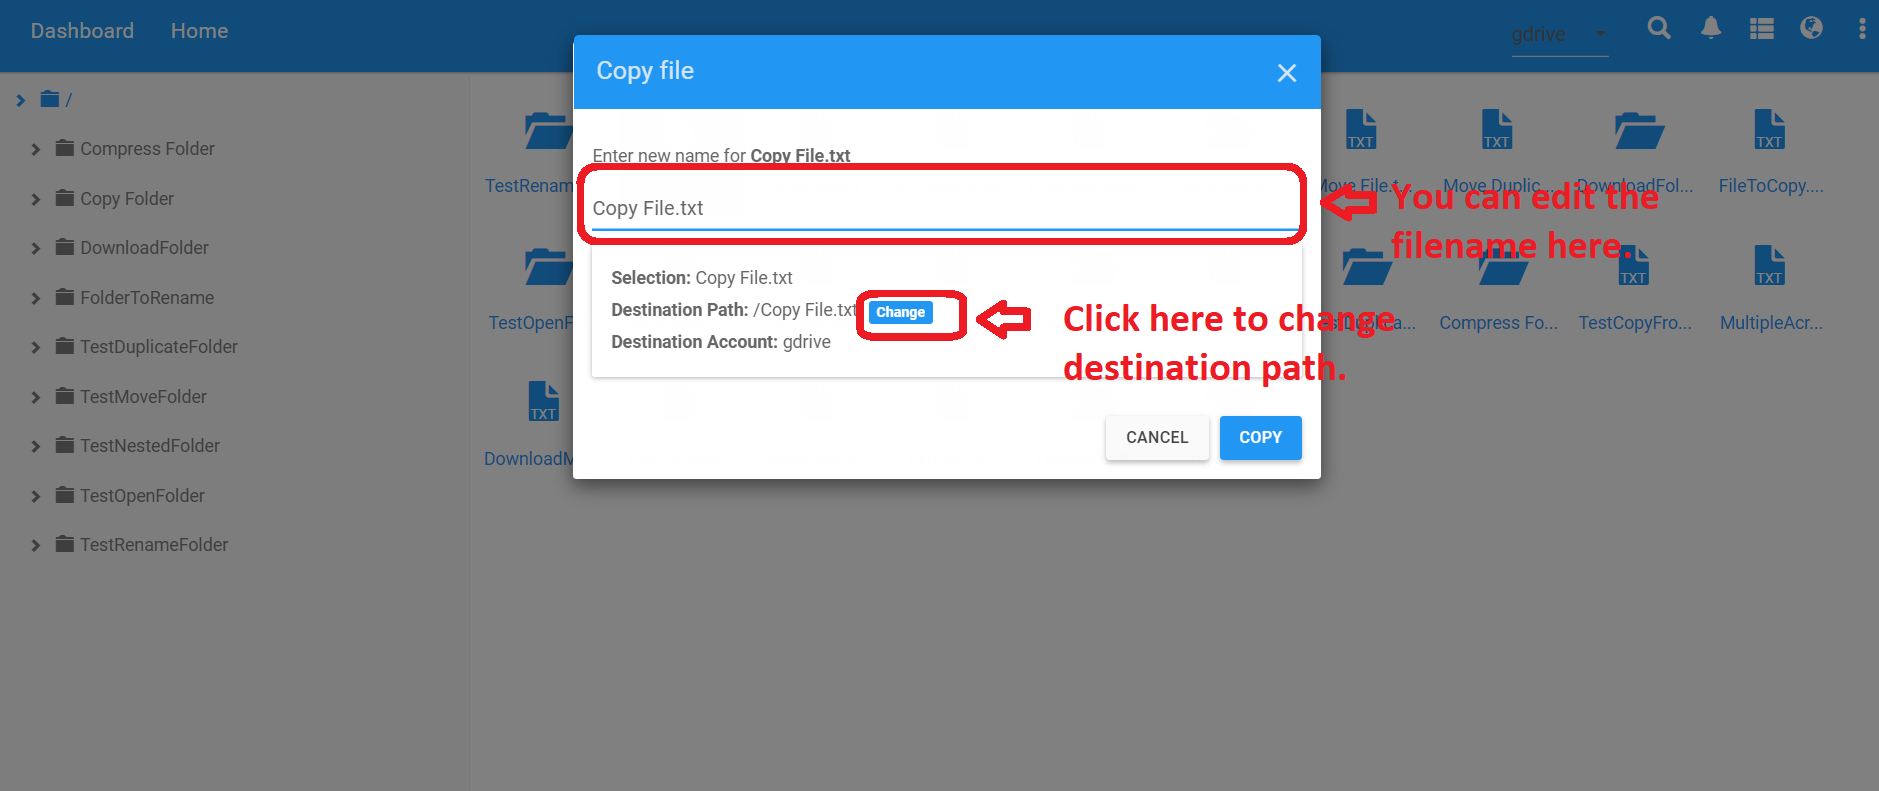
- After the above step, you will see a pop up window as
shown in below picture. Here you can edit the file name and to
select the destination path, click on "Change" button.
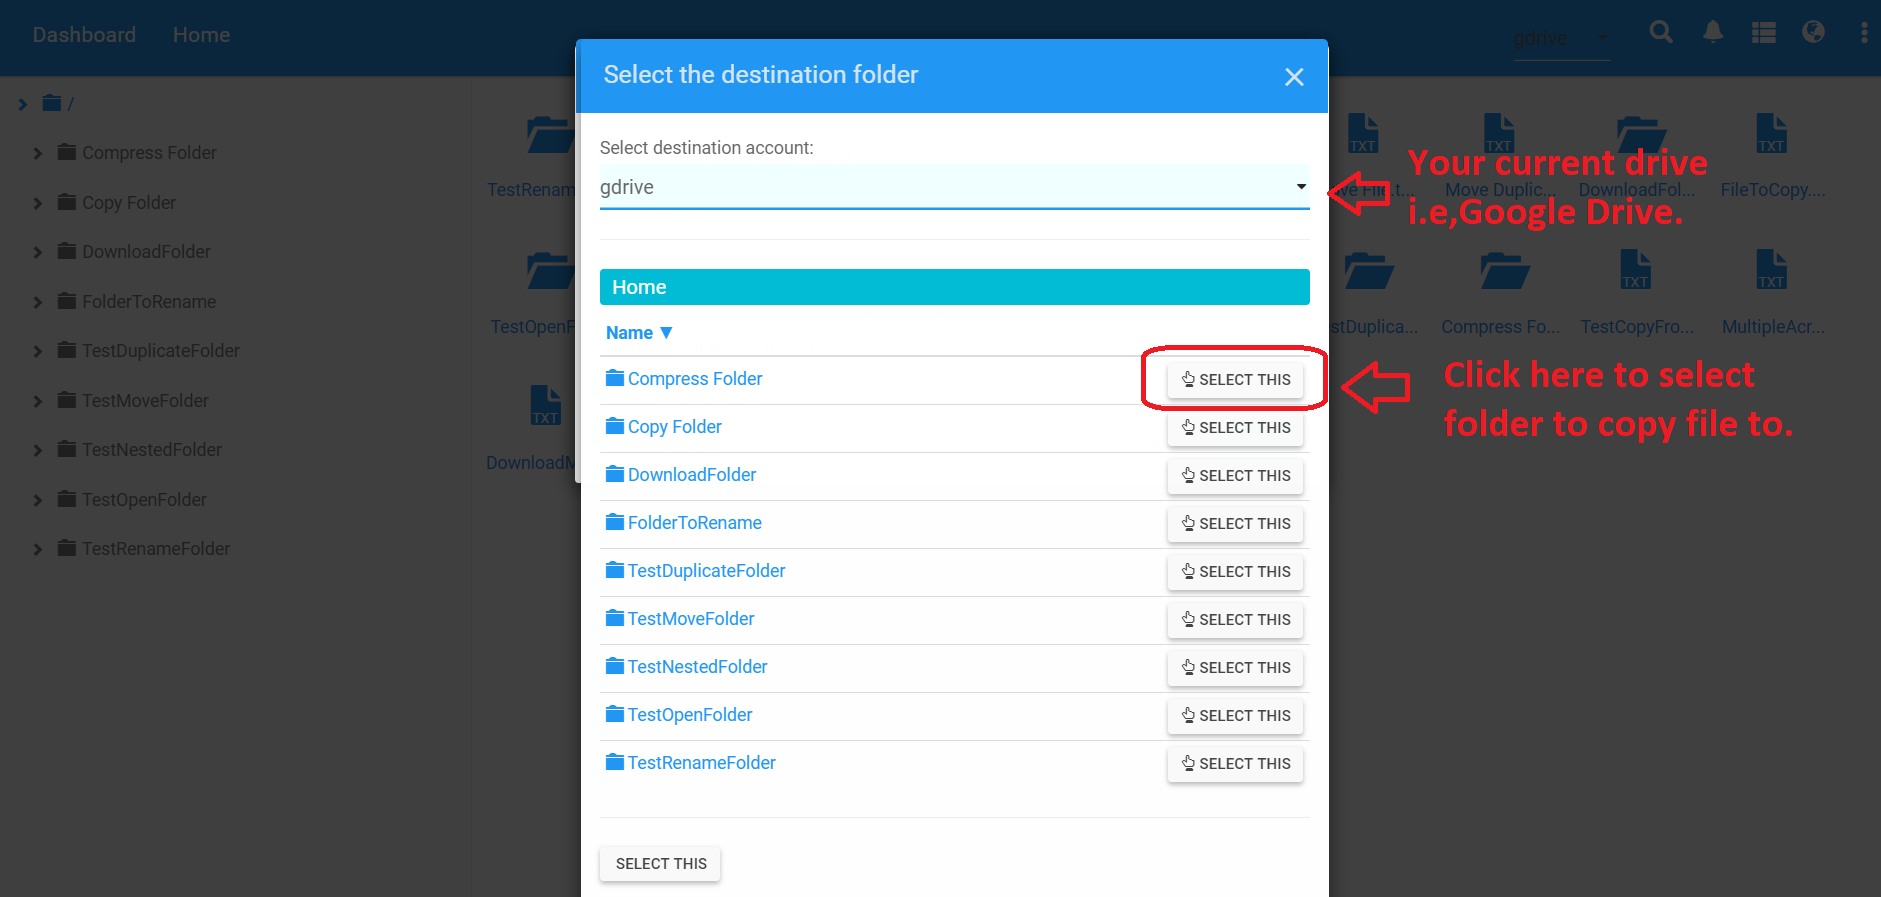
- You can copy file(s) or folder(s) to same cloud drive,
for this you just need to select destination folder from same
provider as shown below.
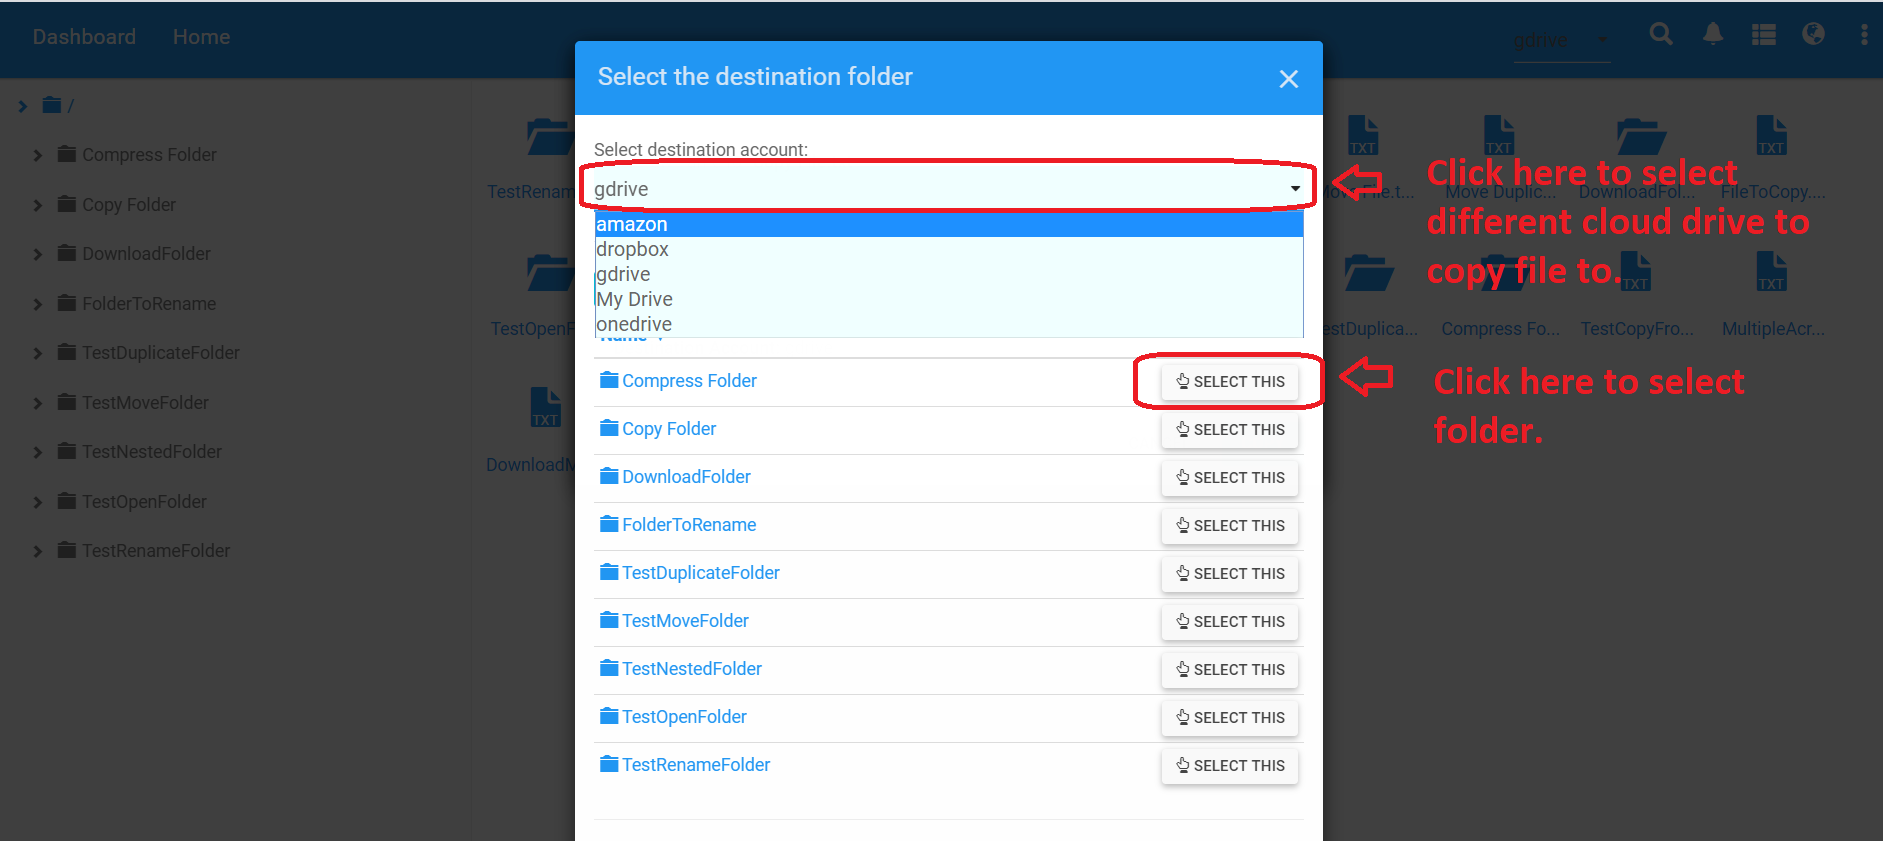
- And to copy file(s) or folder(s) to different cloud
drive,select a destination cloud drive from dropdown. This
will then display folders from selected cloud drive, where you
can copy file(s) or folder(s). To select folder, click on "Select
this" button in front of the folder.
- After selecting a folder, click on "Copy"
button.
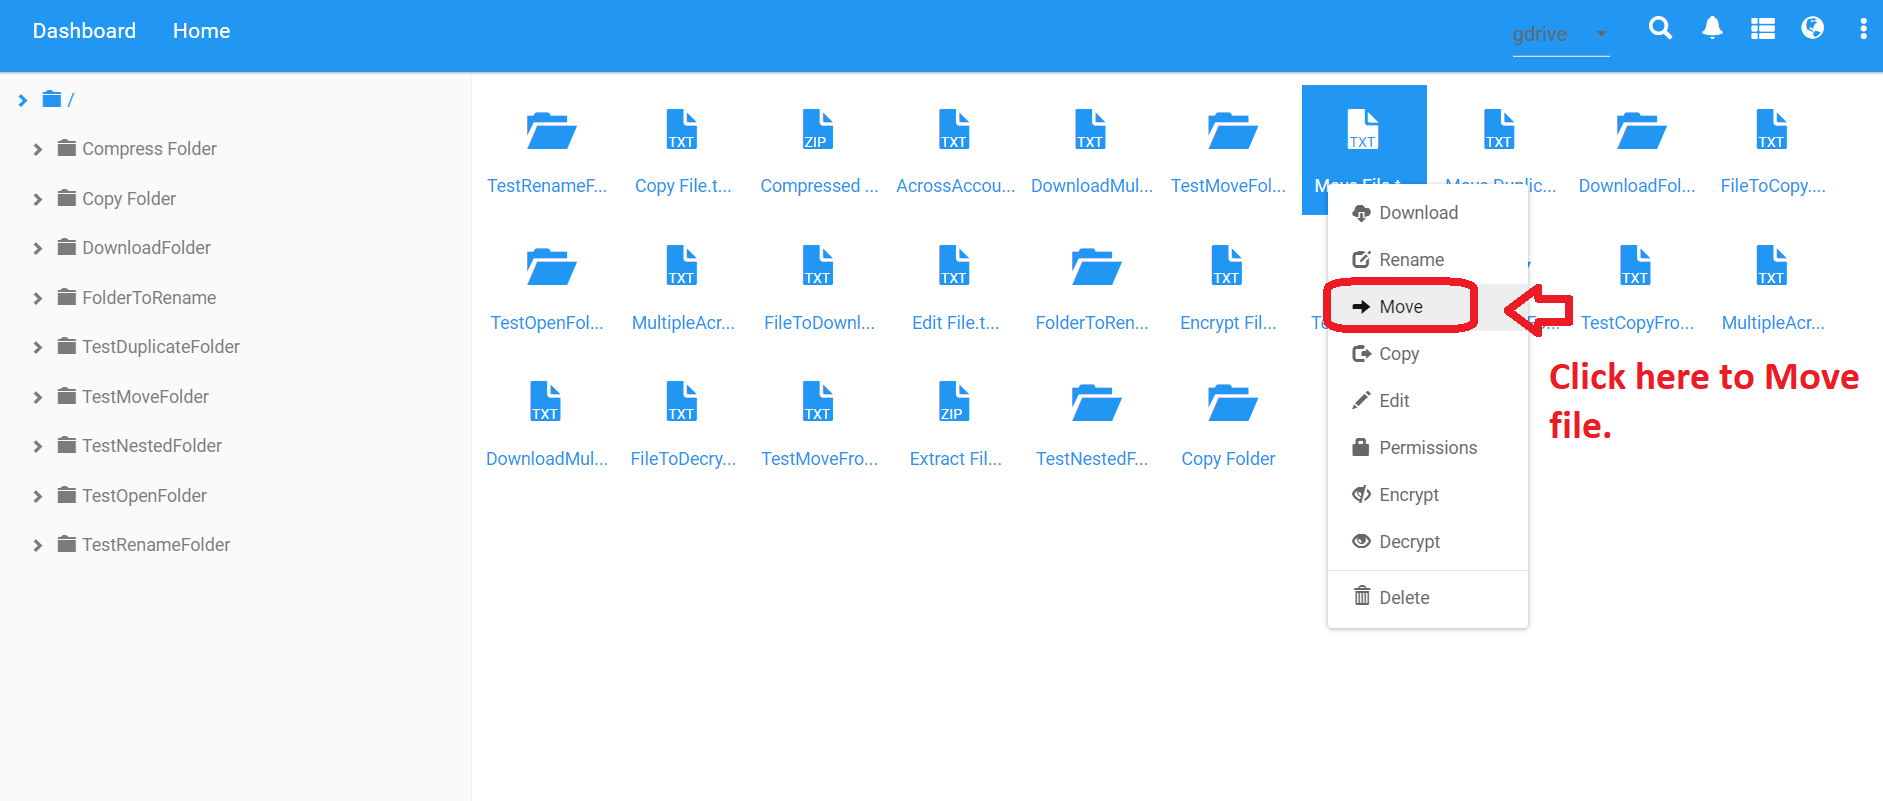
- Similarly Right click on the target file, then you
will see a “Move” option,click on this option to move
file(s) or folder(s). Further steps are same like copy action,
only the original file will be removed from the current cloud
drive after you click “Move” button.
Syndoc protects your data whenever you transfer, store, or
access it. A single click to securely encrypt your data using
industry standard AES-256 encryption. And equally simple way to
decrypt files encrypted with Syndoc.
To encrypt file follow below steps:
To encrypt file follow below steps:
- Log In to Syndoc. First, you should
ensure that you have Syndoc account and have already added
cloud drive(s) in Syndoc. And there are files in your cloud
storage services.
- Click on "Open" button to open a cloud drive,we
take Google drive as an example . It will show your dashboard
page for selected drive where all files and folders will be
displayed.
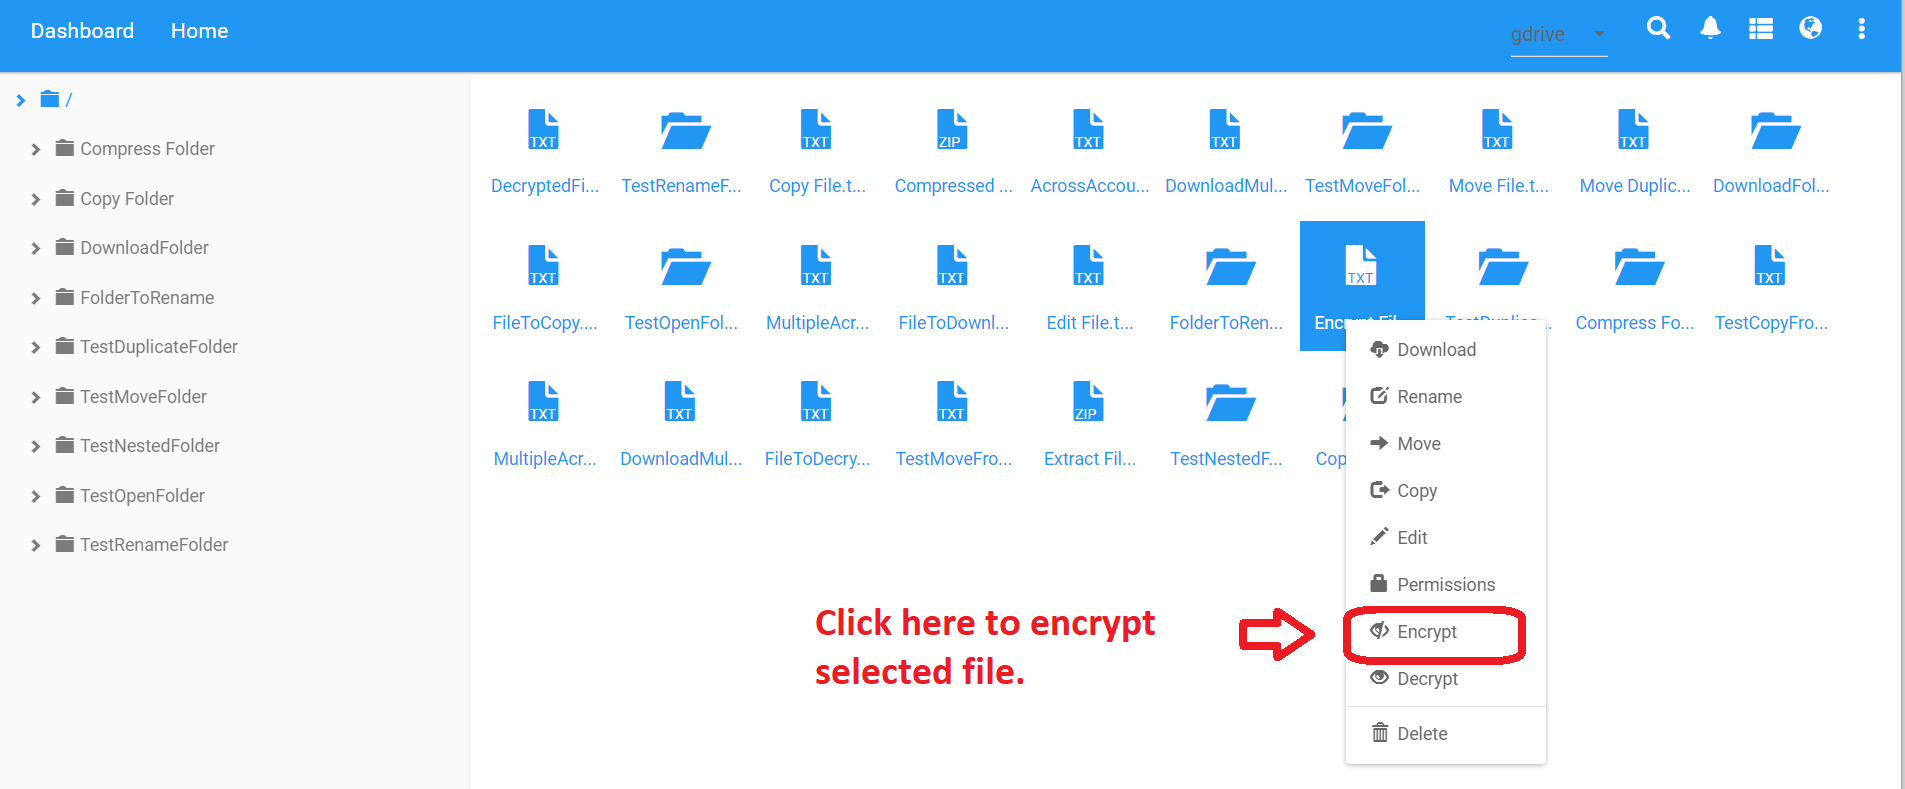
- Right click on the target file, then you will see a “Encrypt”
option, click on this option to encrypt files.
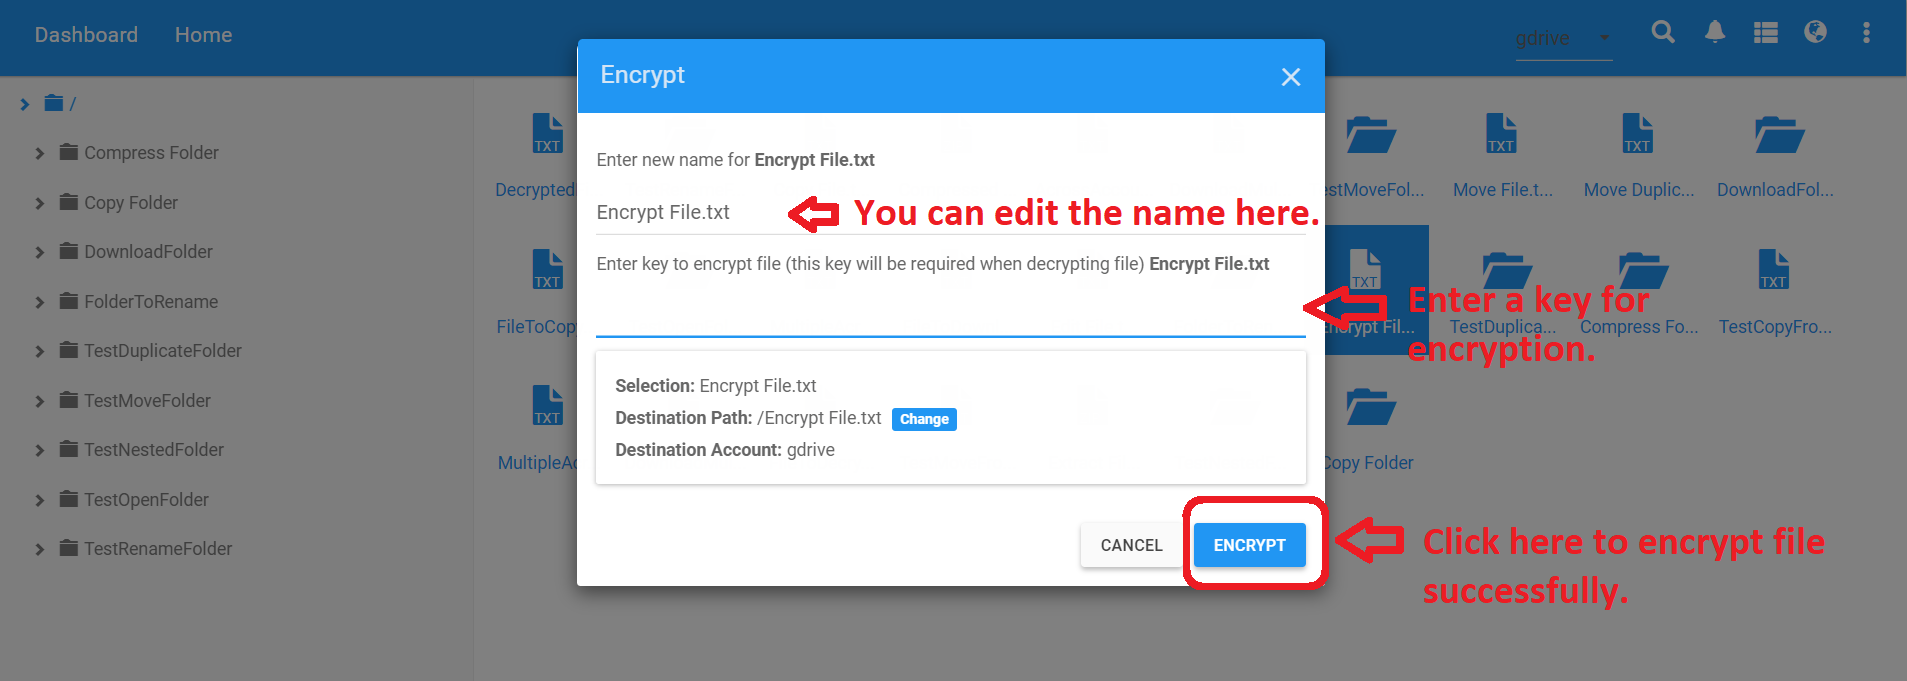
- After the above step, you will see a popup window as
shown in below picture. You can edit the file name, enter the
Key(compulsory) which will be required to decrypt the same
file and then click on "Encrypt" button.
- If you want to encrypt files to another folder in same
cloud drive or to a different cloud drive, then click on "Change"
button,select destination cloud drive and then click on "Encrypt"
button.
- Similarly, right click on the target file, then you
will see a “Decrypt” option,click on this option to
decrypt files.

- Now you will see a popup window as shown in below
picture. You can edit the file name, enter the correct Key
(compulsory) which was used to encrypt the selected file and
then click on "Decrypt" button.
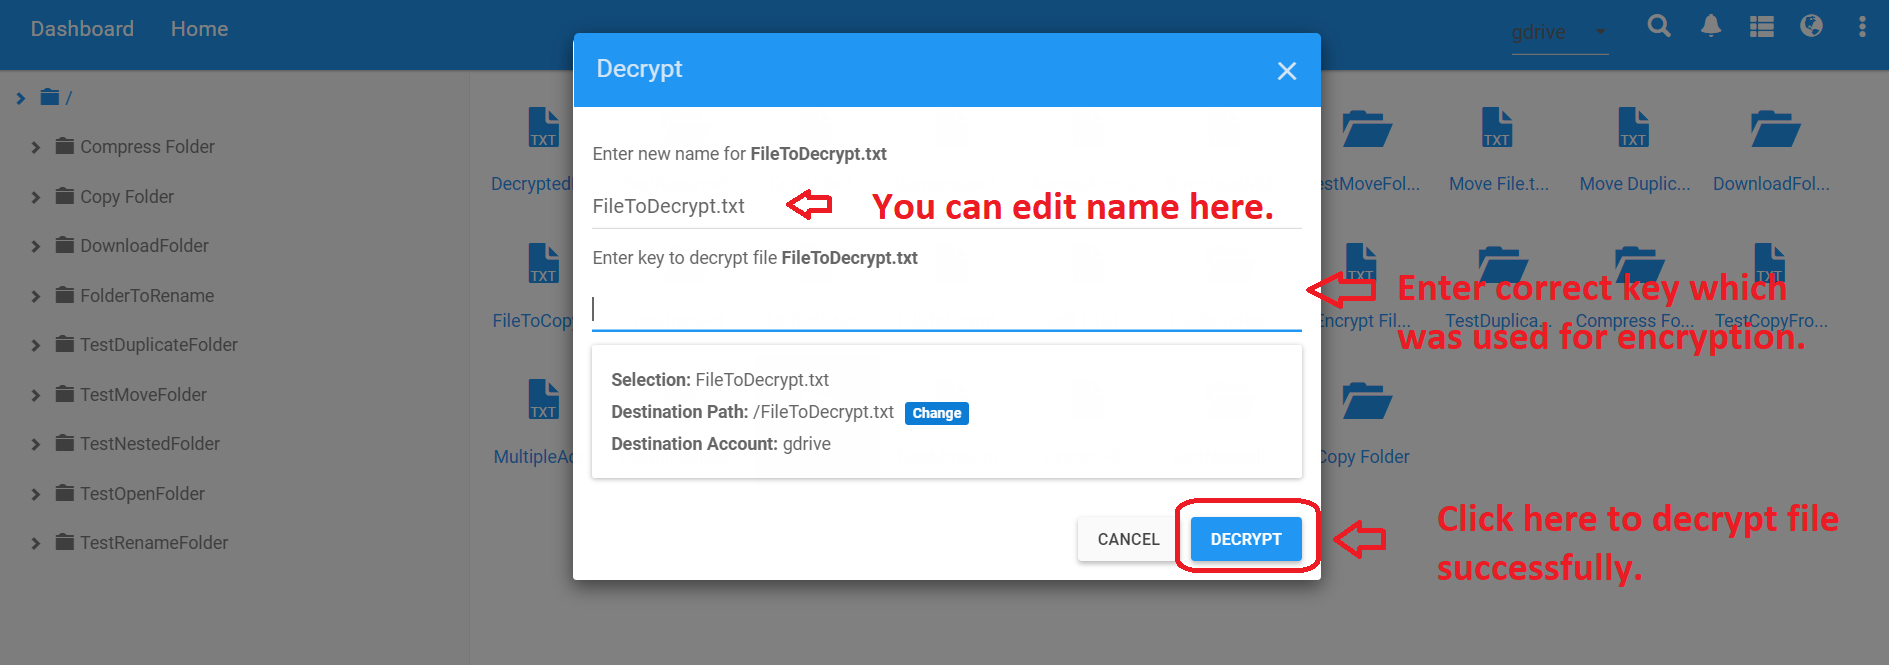
- If you want to decrypt files to another folder in same cloud drive or to a different cloud drive, then click on "Change" button,select destination cloud drive and then click on "Decrypt" button.
Syndoc allows compress and extract of files and folders with a
single click. The compressed files will automatically show up in
your cloud provider account. No need to download files, zip them
and then upload the zip files to cloud provider account anymore.
To Compress file(s) or folder(s) follow below steps:
To Compress file(s) or folder(s) follow below steps:
- Log In to Syndoc, first you should ensure
that you have Syndoc account and have already added cloud
drive(s) in Syndoc. And there are files in your cloud storage
services.
- Click on "Open" button to open a cloud drive,we
take Google drive as an example . It will show your dashboard
page for selected drive where all files and folders will be
displayed.
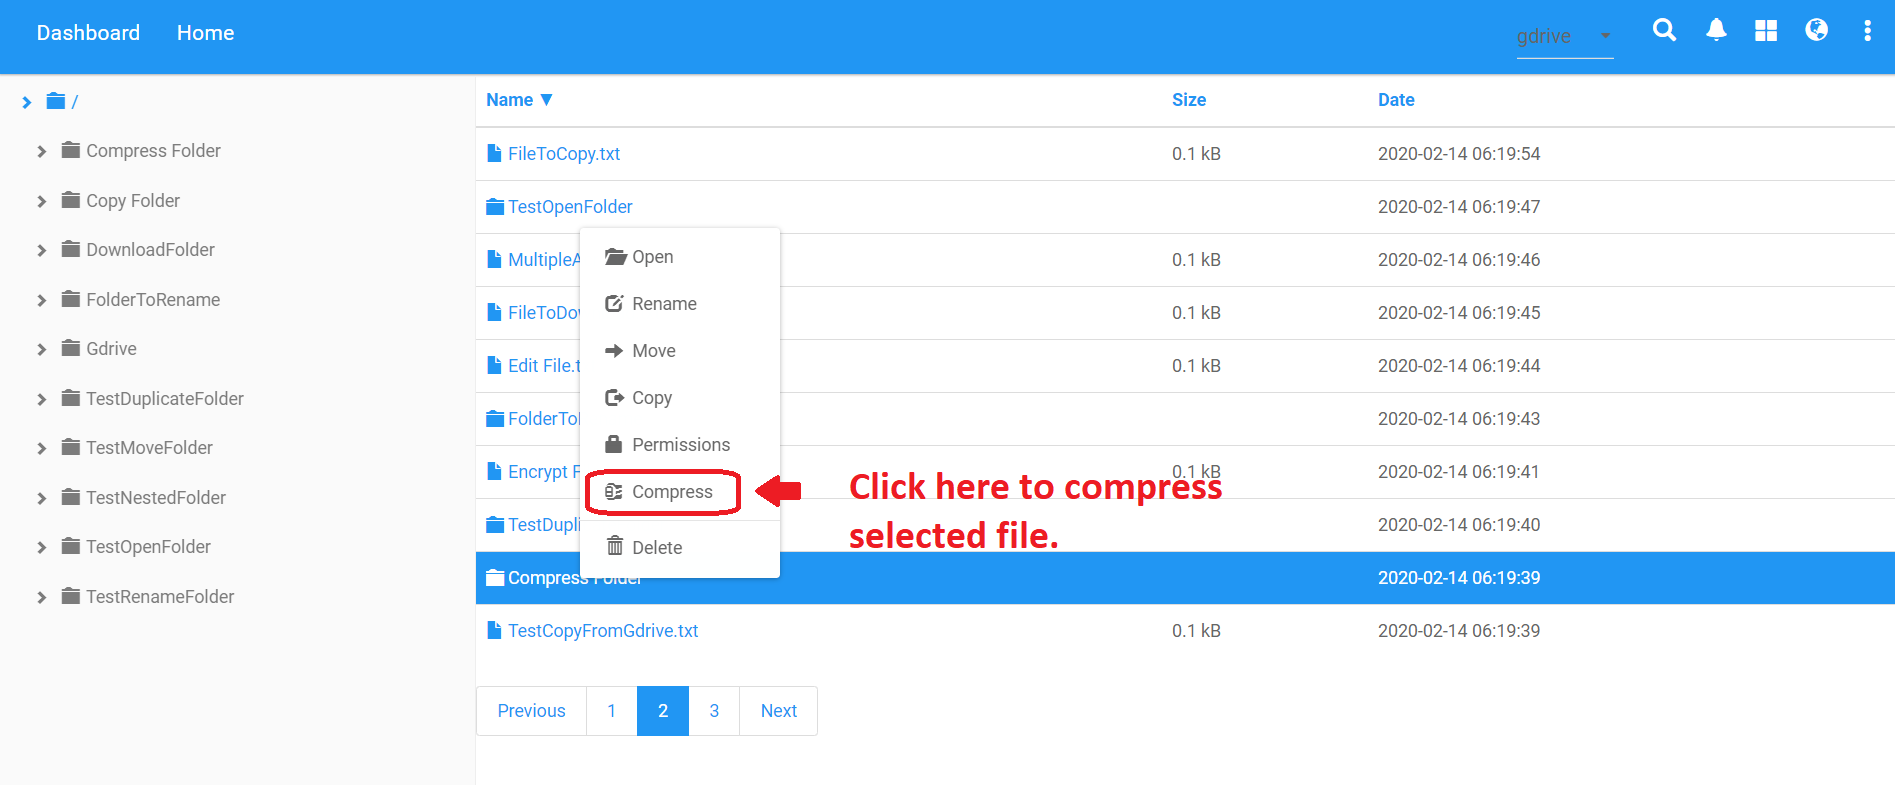
- You can either compress single folder or multiple
file(s) or folder(s). For compressing single folder, right
click on the target folder, then you will see a “Compress”
option, click on this option to compress single folder.
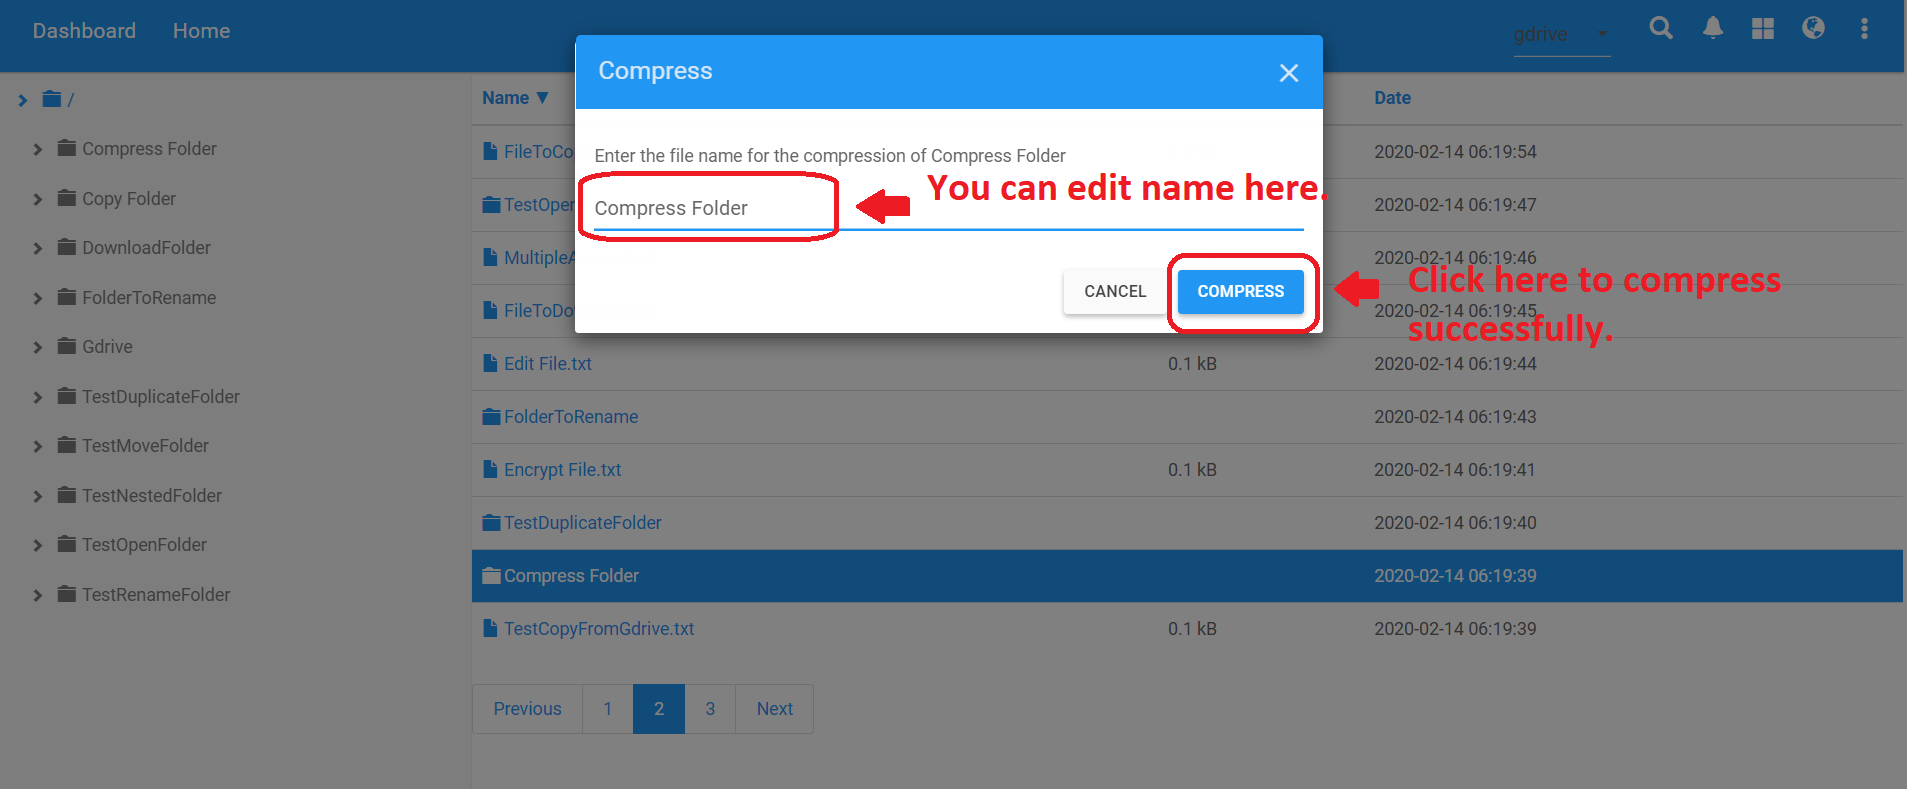
- After the above step, you will see a popup window as
shown in below picture. You can edit the file name and then
click on "Compress" button.
- Similarly, you can compress multiple files or folders
to single zip.
- After successfully compressing file, the compressed
zip will be displayed in the list.
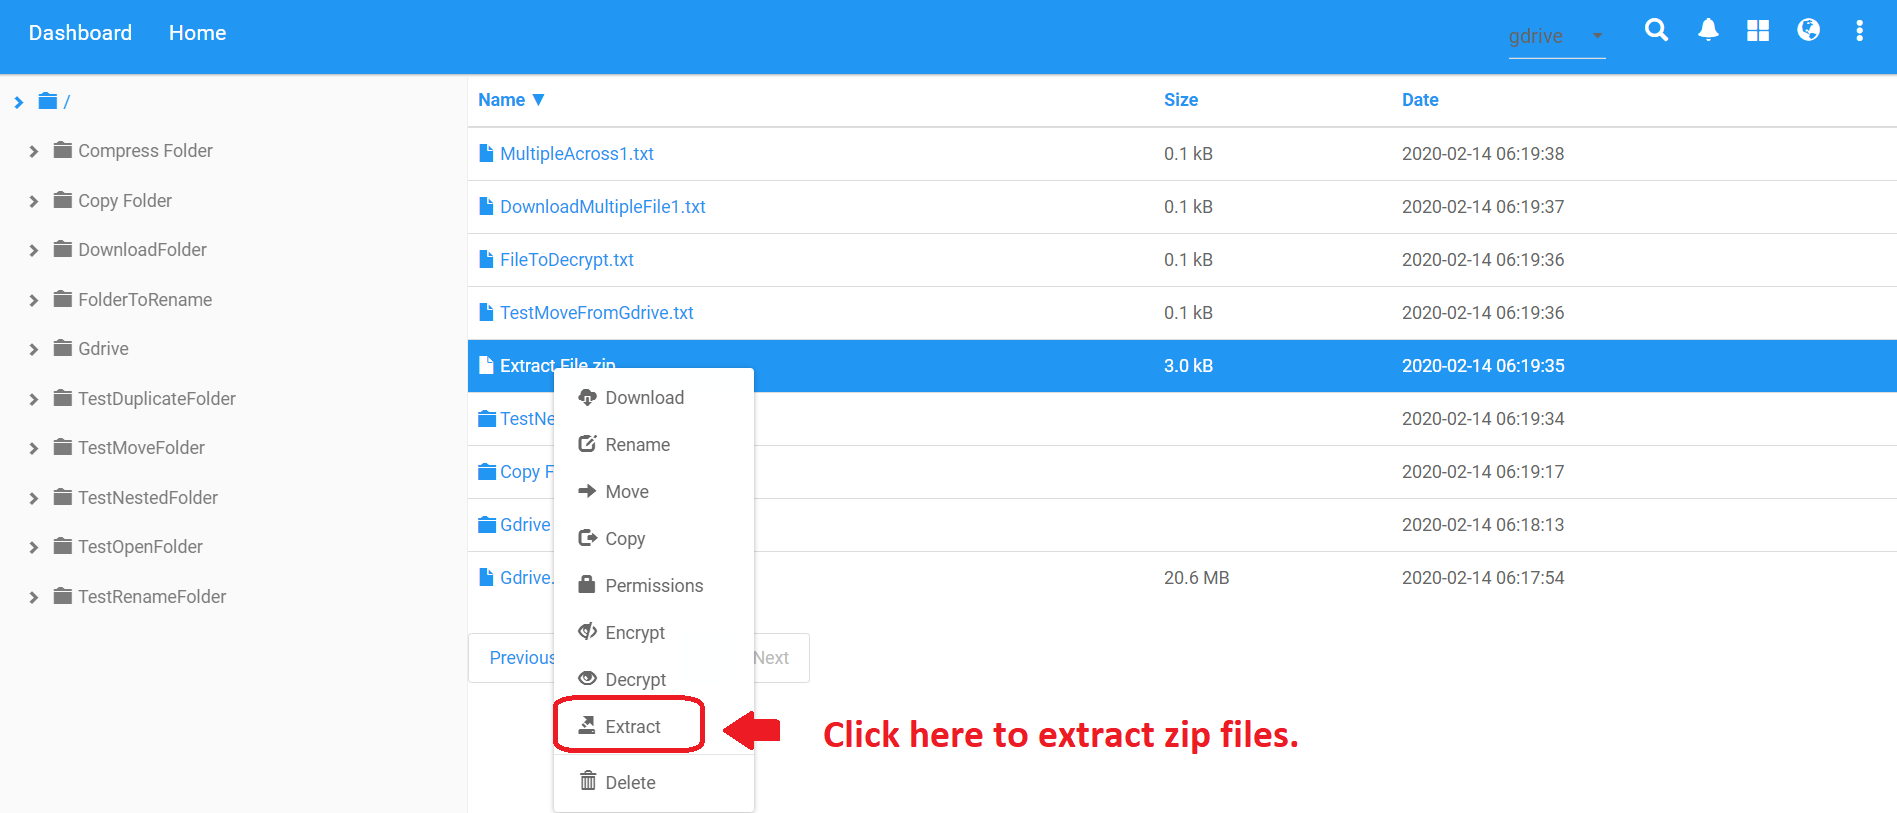
- Right click on the zip file, then you will see a “Extract”
option, click on this option to extract zip file.
- Now you will see a popup window as shown in below
picture. You can edit the file name and then click on "Extract"
button.
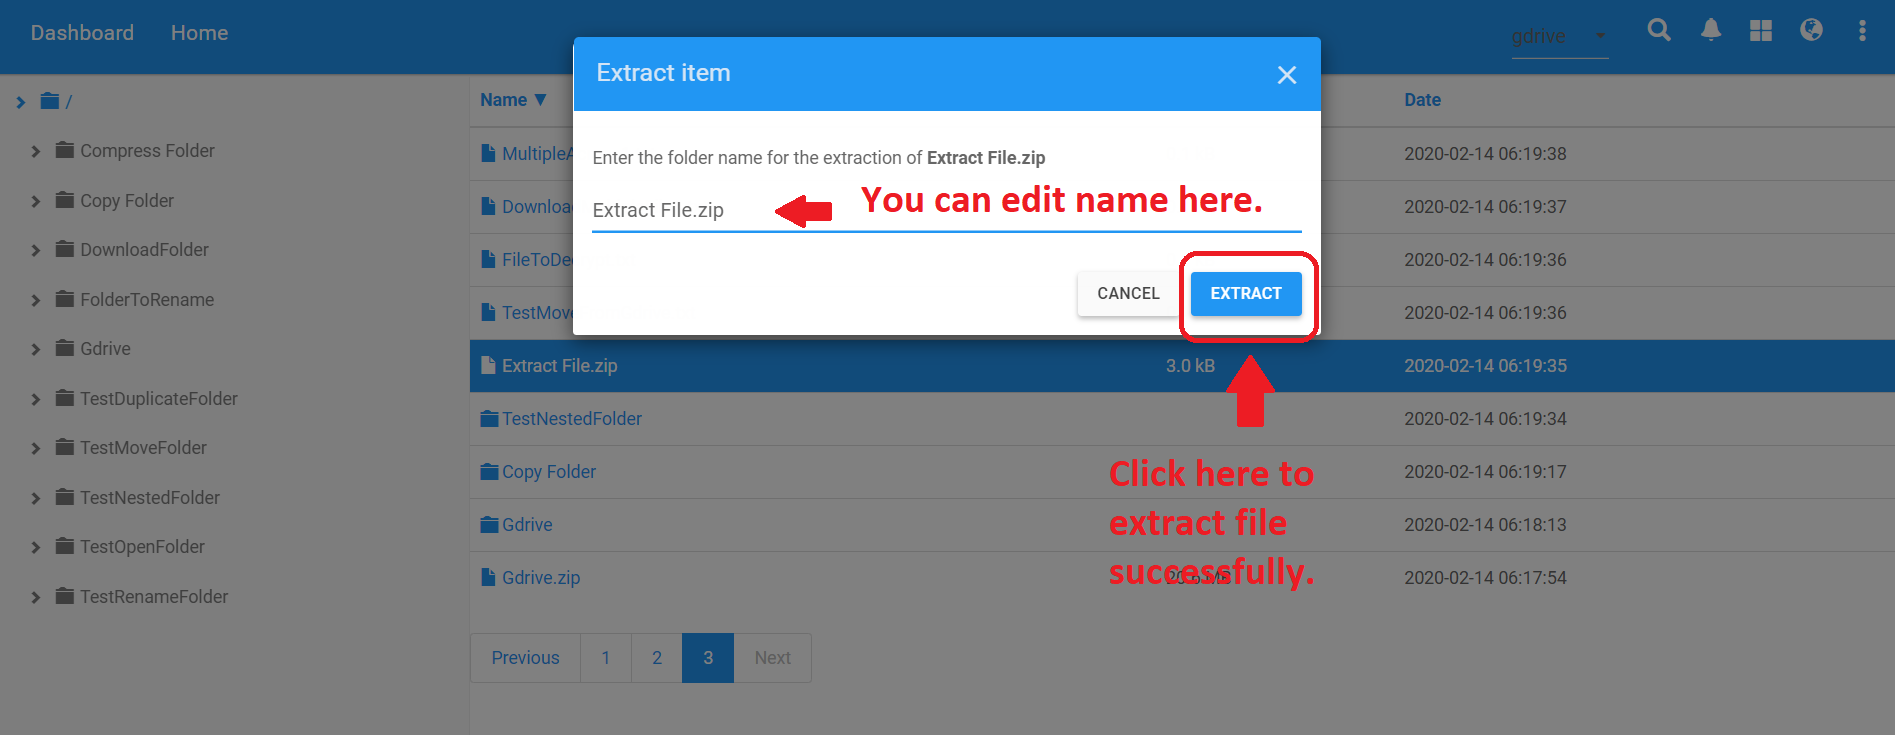
- After successfully extracting file, the extracted folder will be displayed in the list.
There is a quick search bar in Syndoc that helps the users to
instantly locate a certain file among multiple cloud drives.
Once a keyword is entered and click on "Enter" keyword, Syndoc
will immediately filter the related files throughout all the
cloud drives.
To Search file(s) or folder(s) follow below steps:
- Log In to Syndoc. First, you should
ensure that you have Syndoc account and have already added
cloud drive(s) in Syndoc. And there are files in your cloud
storage services.
- Click on "Open" button to open a cloud drive,we
take Google drive as an example . It will show your dashboard
page for selected drive where all files and folders will be
displayed.
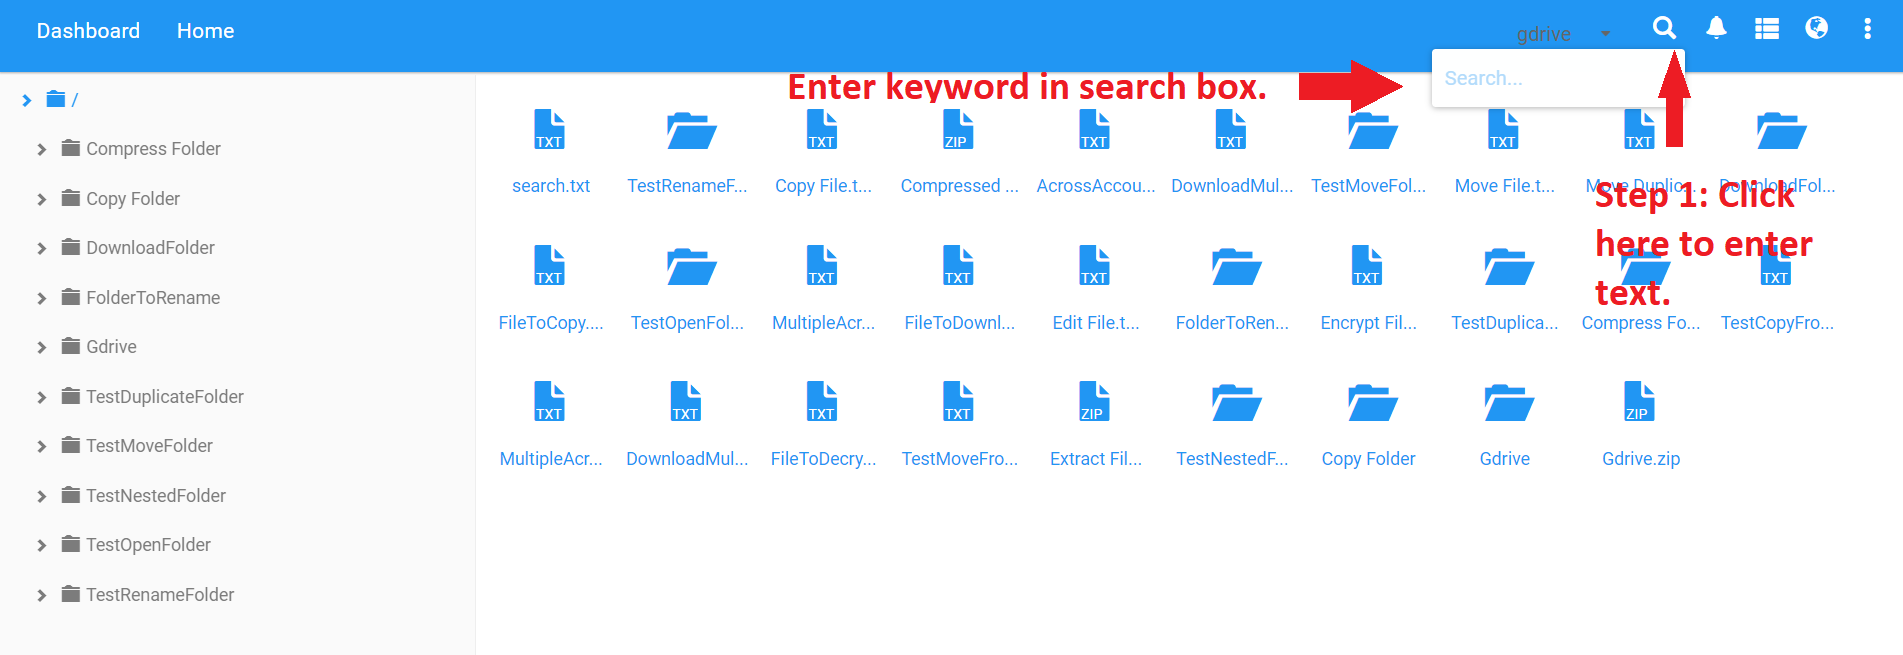
- You will see a search option at upper right corner as
shown in picture, Enter the keyword say "Search" you wish to
search and press "Enter".
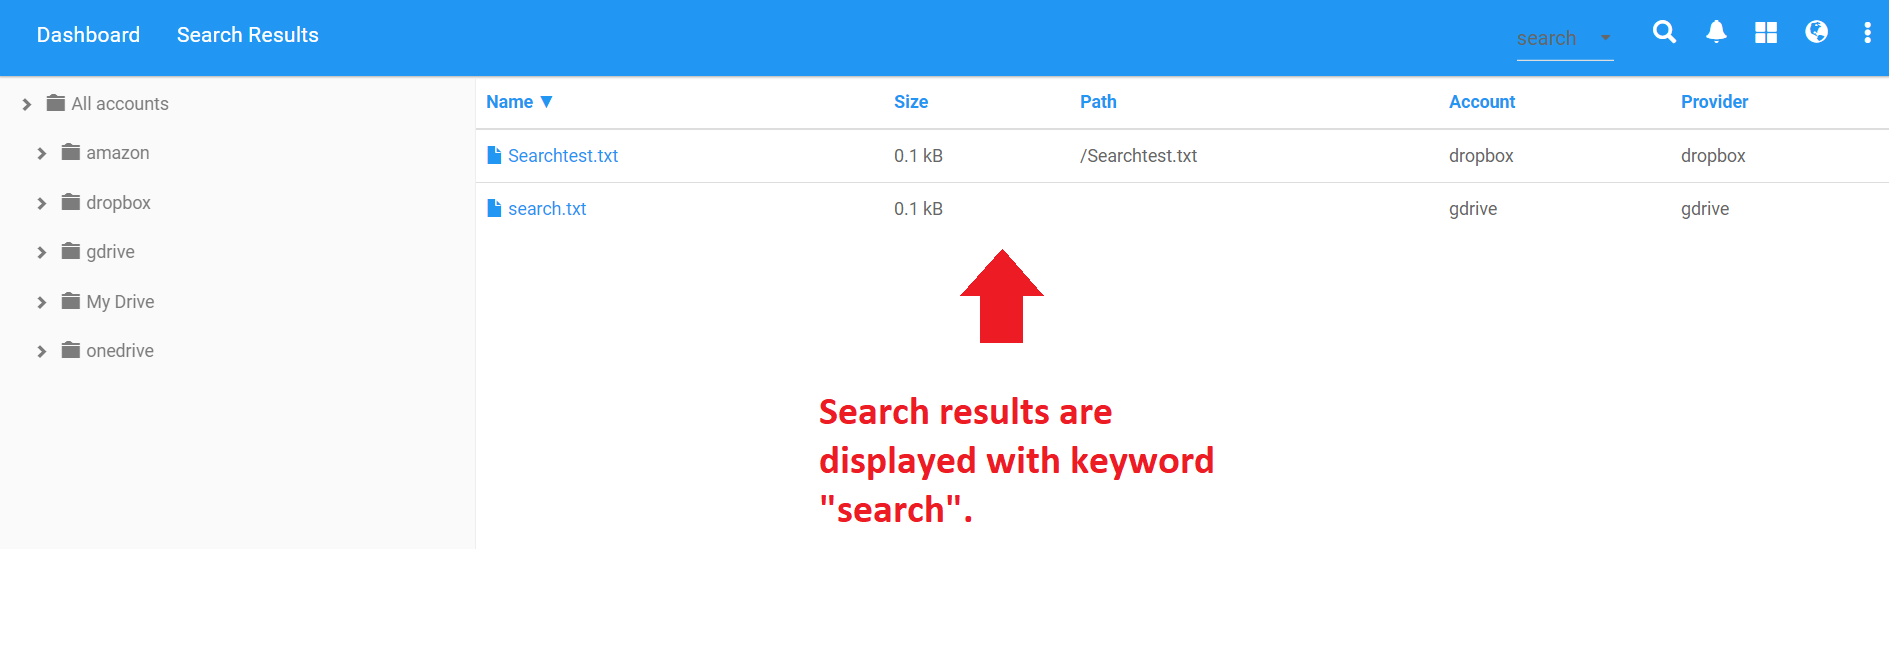
- You will see the results as below which contains the
keyword "Search". Syndoc also displays the path, cloud drive
name and provider.
Syndoc iOS app provides the option to access your files from
iCloud and perform specific operations on the selected file.
To access file(s) from iCloud follow below steps:
You can only copy files from iCloud to My files(Local Folder) when selected and rest actions on file can be performed from My Files access available on the dashboard.
- Log In to Syndoc iOS app. First, you should ensure
that you have Syndoc account and already have an Apple ID.
- Click on "OPEN" button in front of iCloud to
open a drive where all files will be displayed.

- Select file(s) you want to copy to My Files and click on "Open". The selected file will get copied to My Files where you can access the files to perform any action like Rename, Copy, Move.
You can only copy files from iCloud to My files(Local Folder) when selected and rest actions on file can be performed from My Files access available on the dashboard.
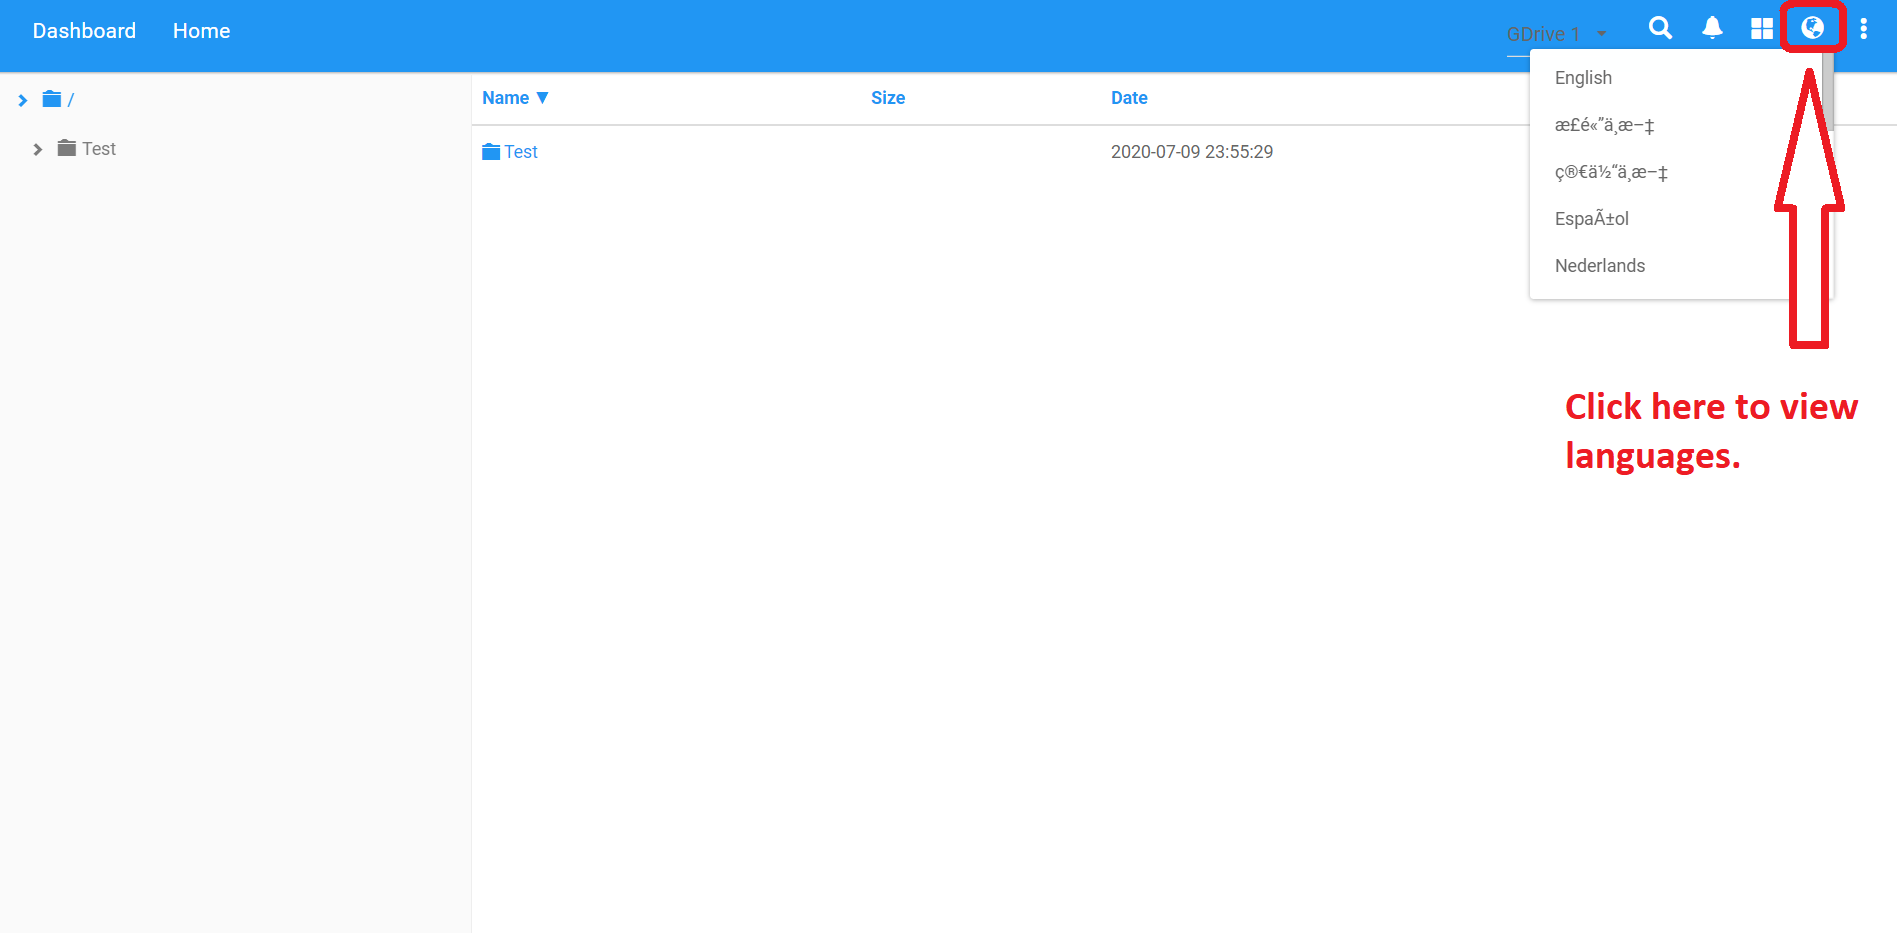
Syndoc provides the option to change the language as preferred
by the user.
To change language follow below steps:
- Log In to Syndoc and make sure you already have a
Syndoc account.
- Click on "OPEN" button to open a cloud drive,
we will take Google drive as an example. You will see the file
manager view as shown in below picture.
- Click on the Icon at upper right corner highlighted in
below picture, and select your preferred language.
Sharding is a method of splitting and storing the files in
multiple added drives so that the file is securely stored also
you can retrieve the file anytime by unsharding the sharded
file.
To Shard/Unshard any file, follow the below steps:
- First of all make sure you are subscribed to Syndoc PRO to access the Shard/Unshard feature.
- Log In to syndoc.com or Syndoc PRO app and make sure you already have a Syndoc account subscribed to the PRO version.
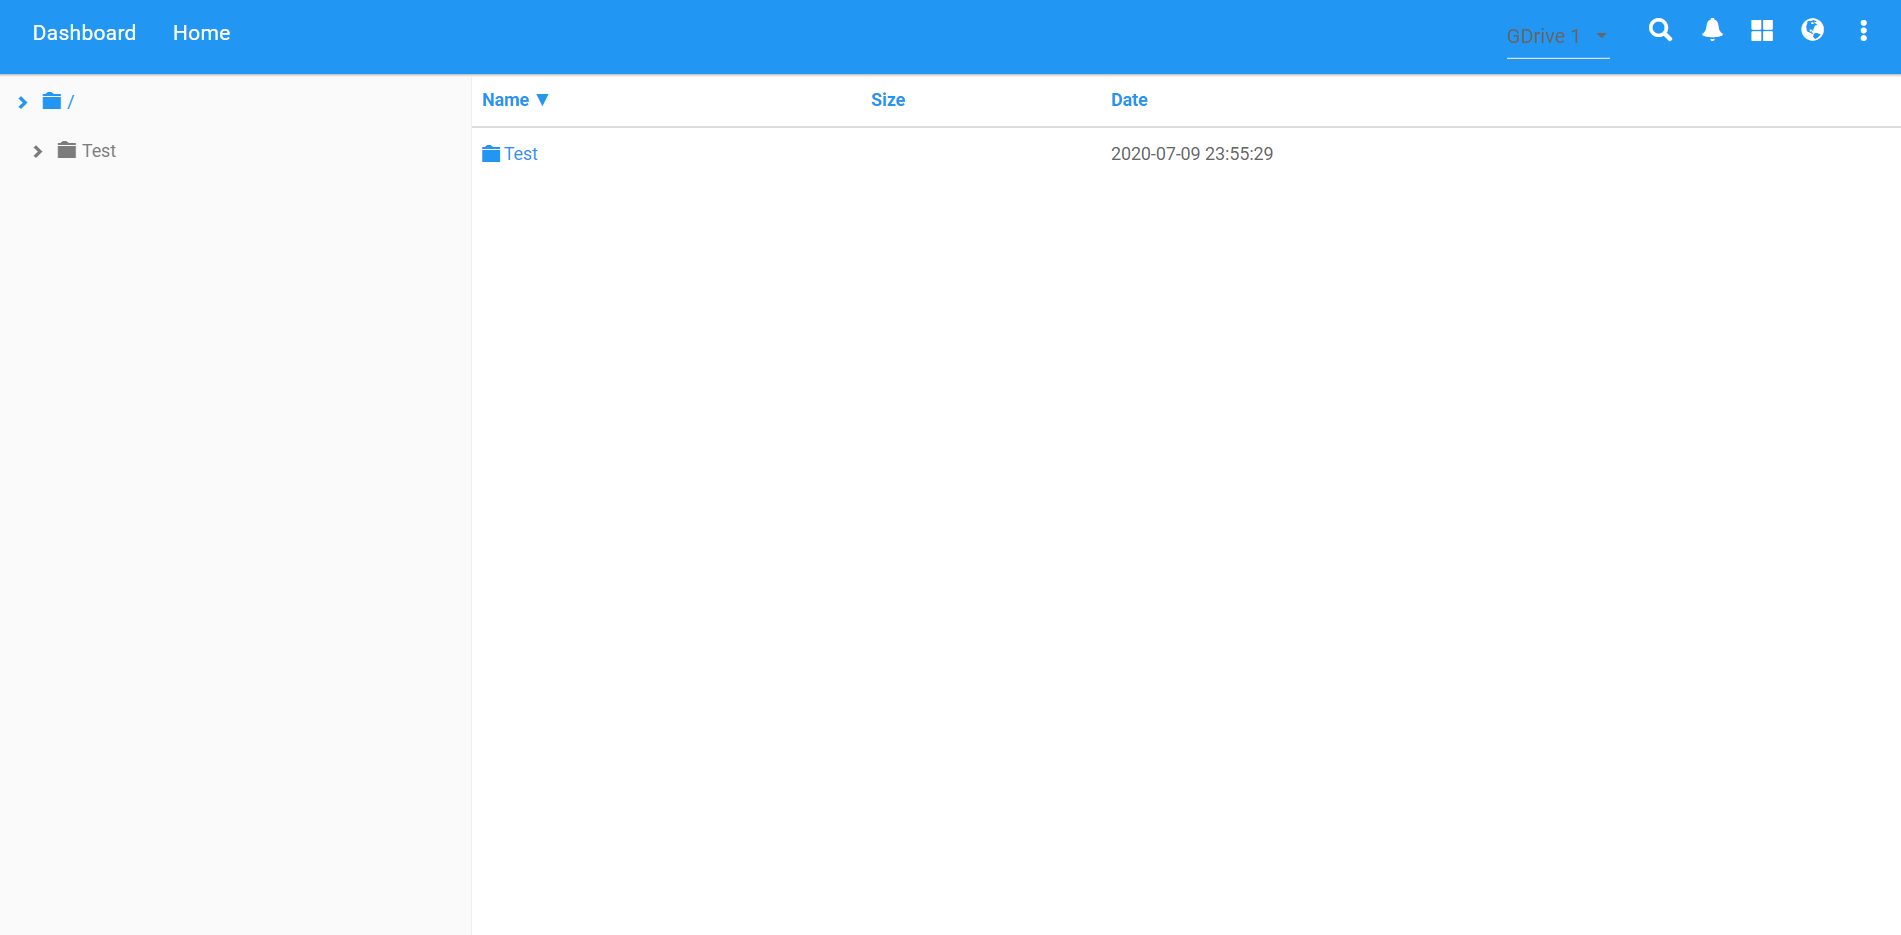
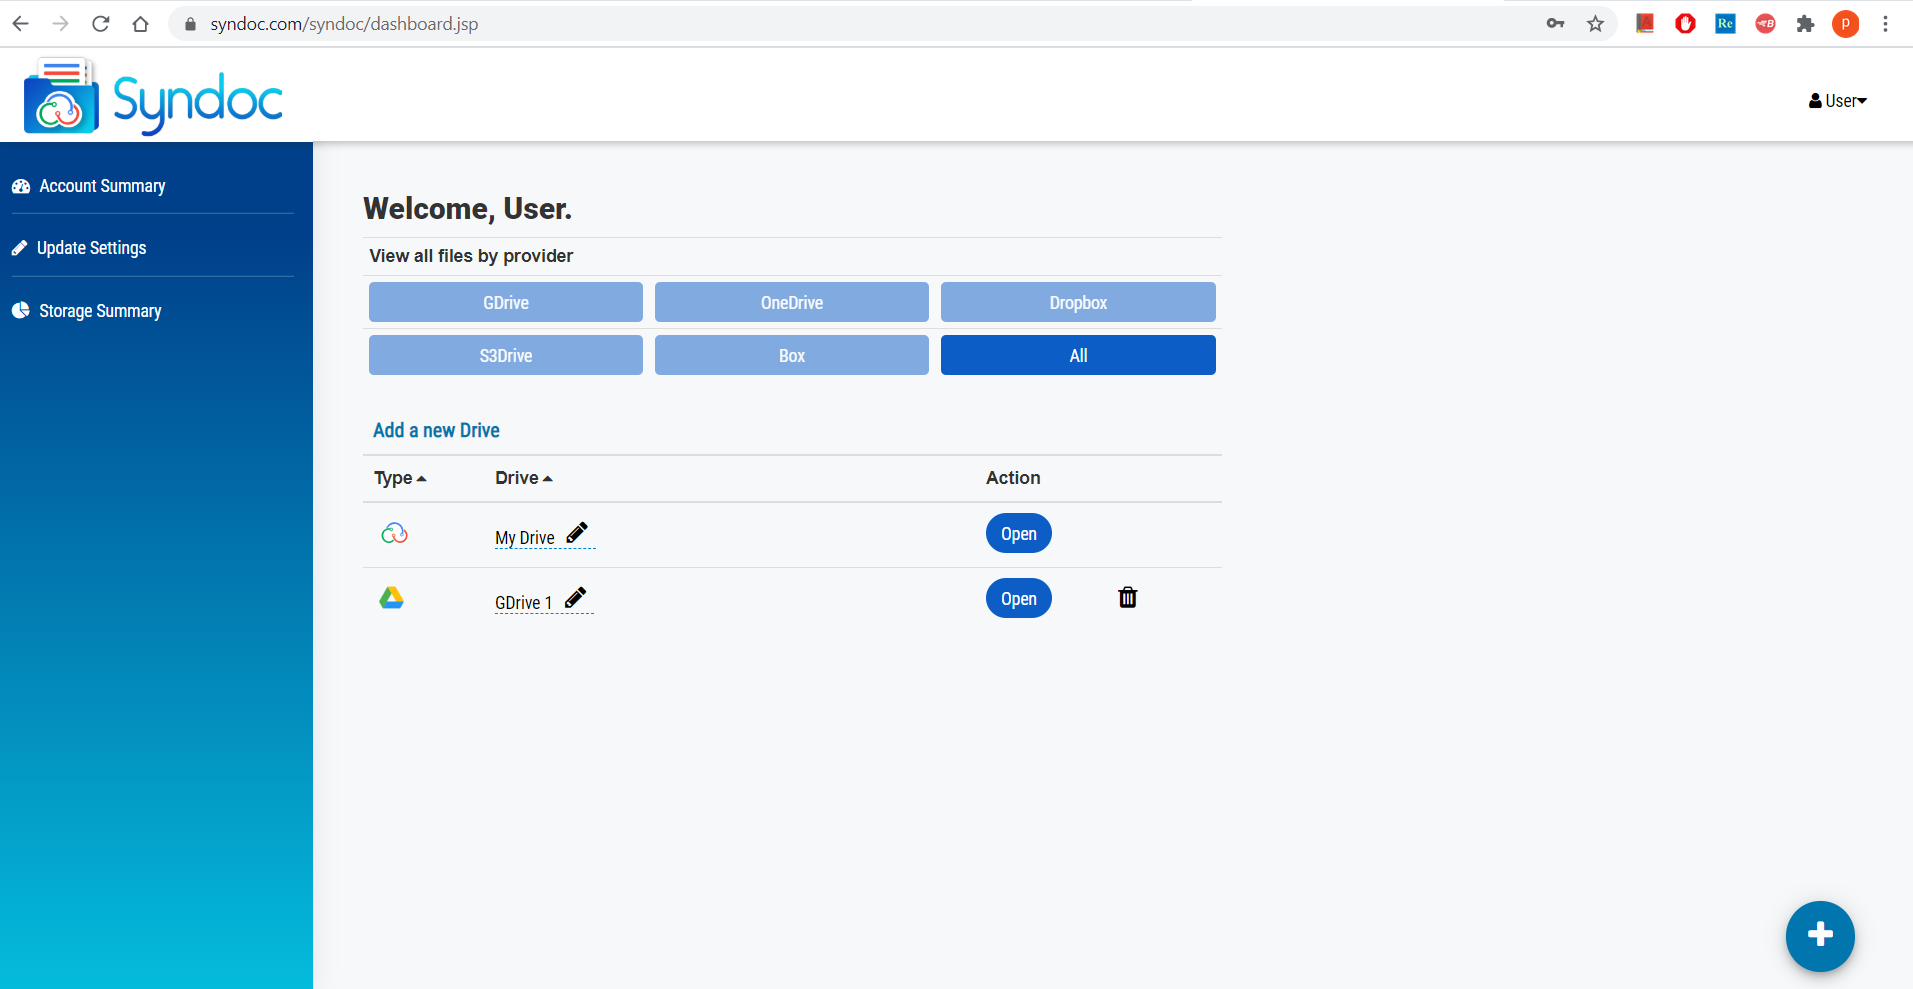
- We have added two drives in test account that are "My
Drive" and "GDrive" as you can see in below image.
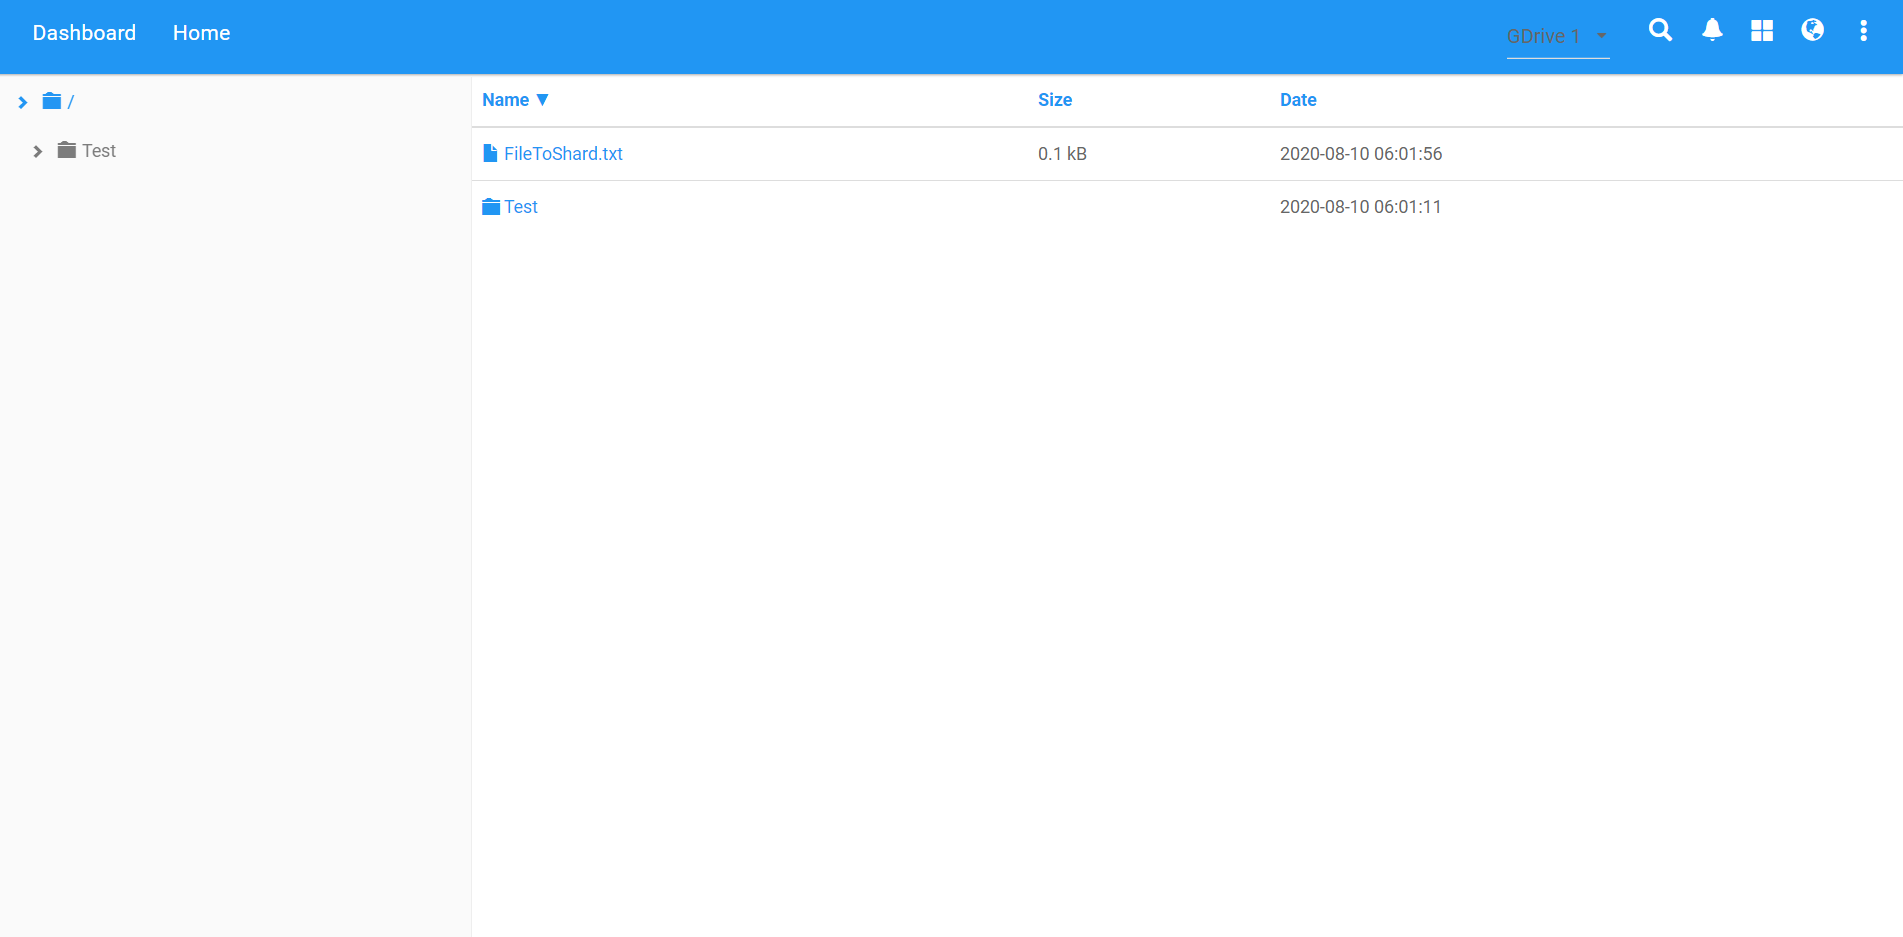
- Click on "OPEN" button to open a cloud drive,
we will take Google drive as an example. You will see the file
manager view as shown in below picture.
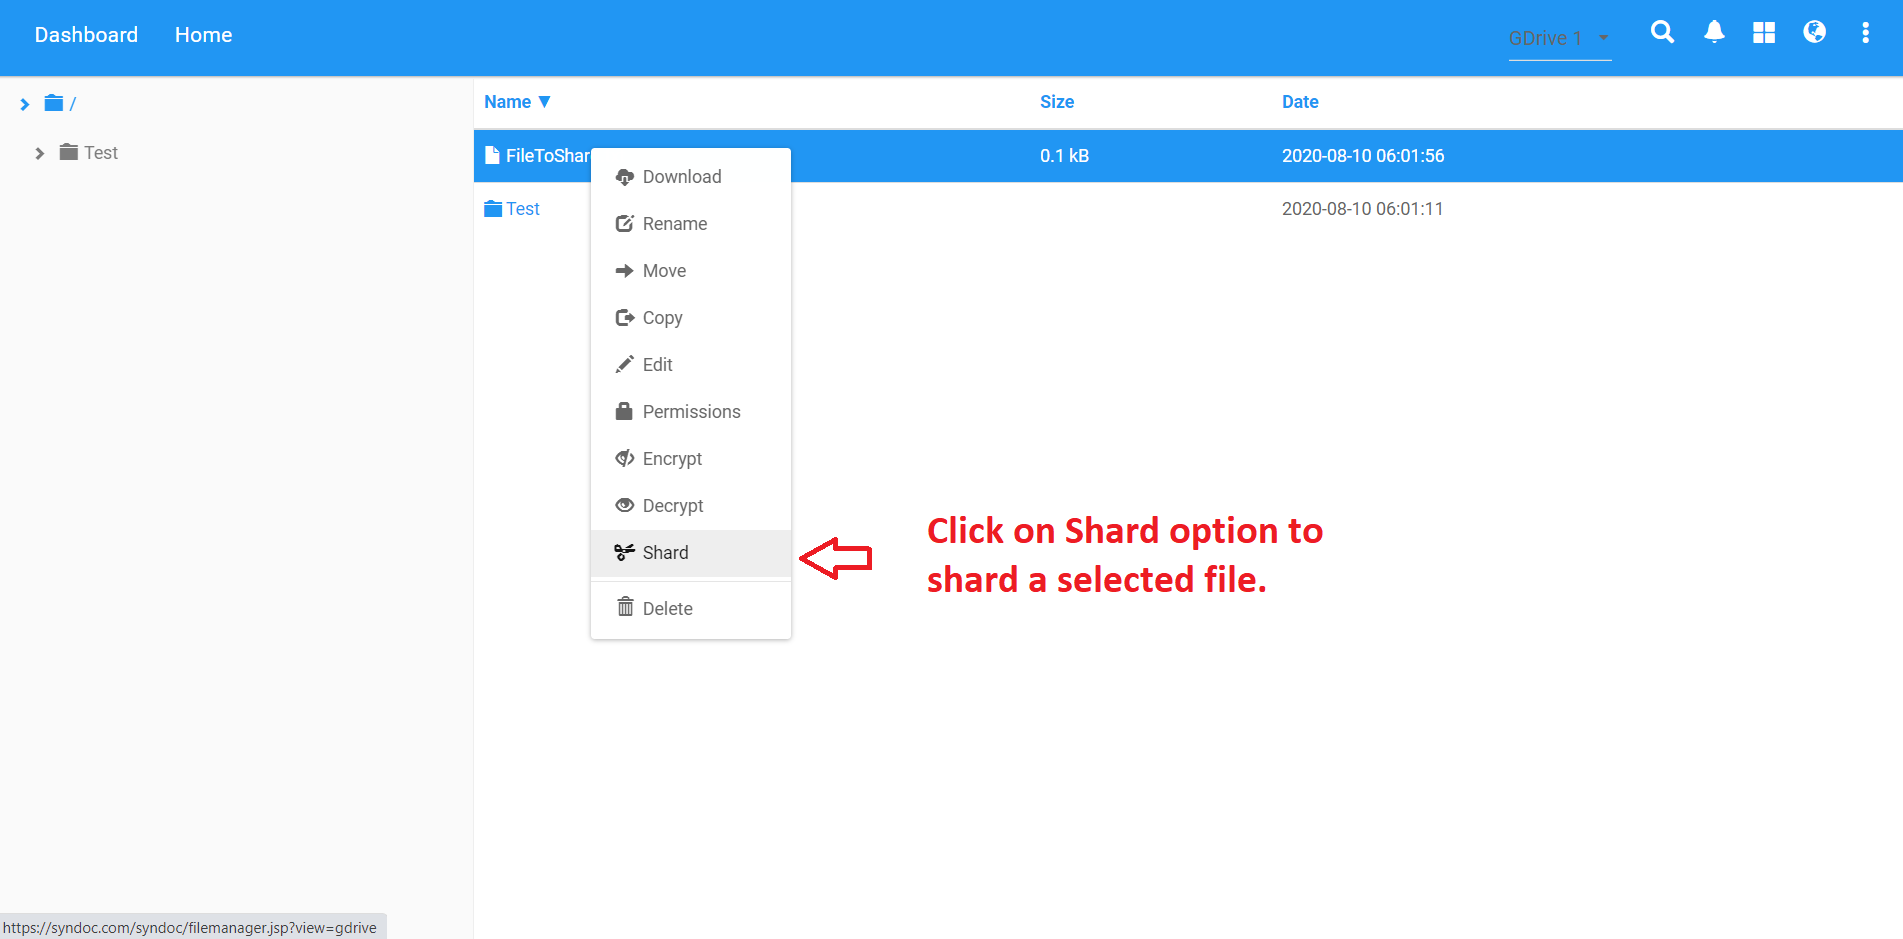
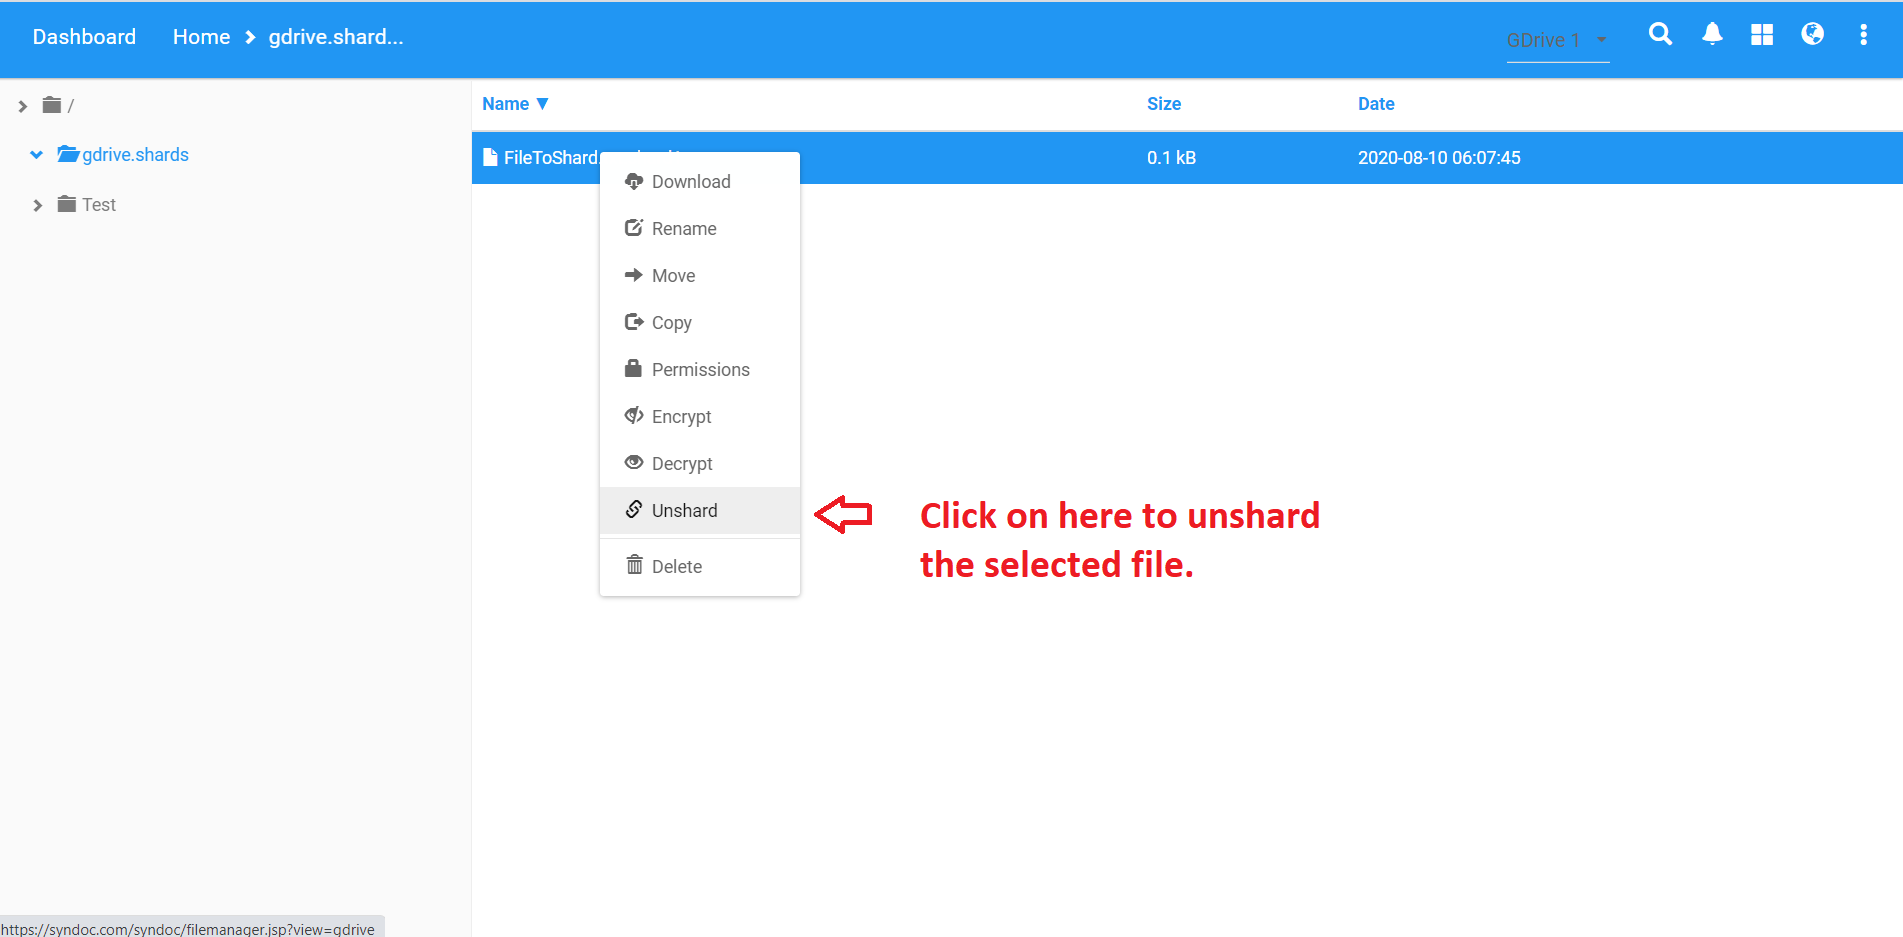
- Select a file you want to shard and click on SHARD
option.
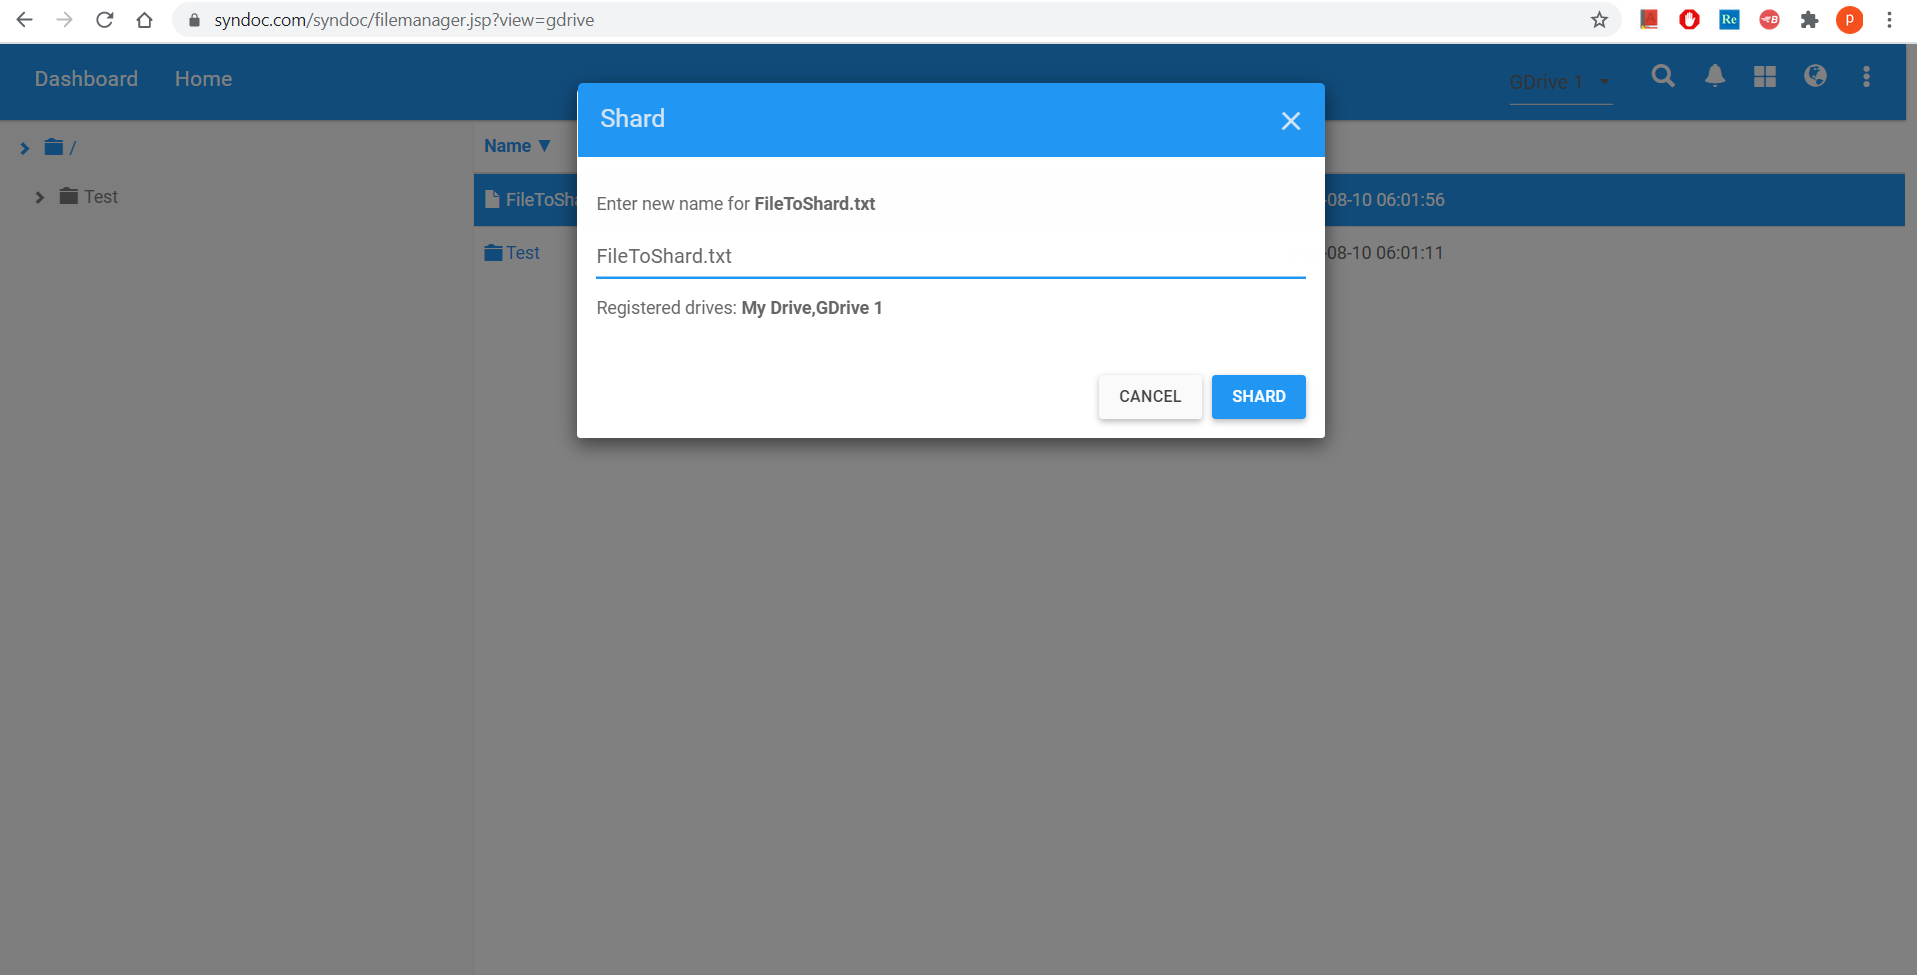
- Once you click on shard it will show box as shown in
below picture, where registered drives will be displayed and
file will get split across these registered drives.
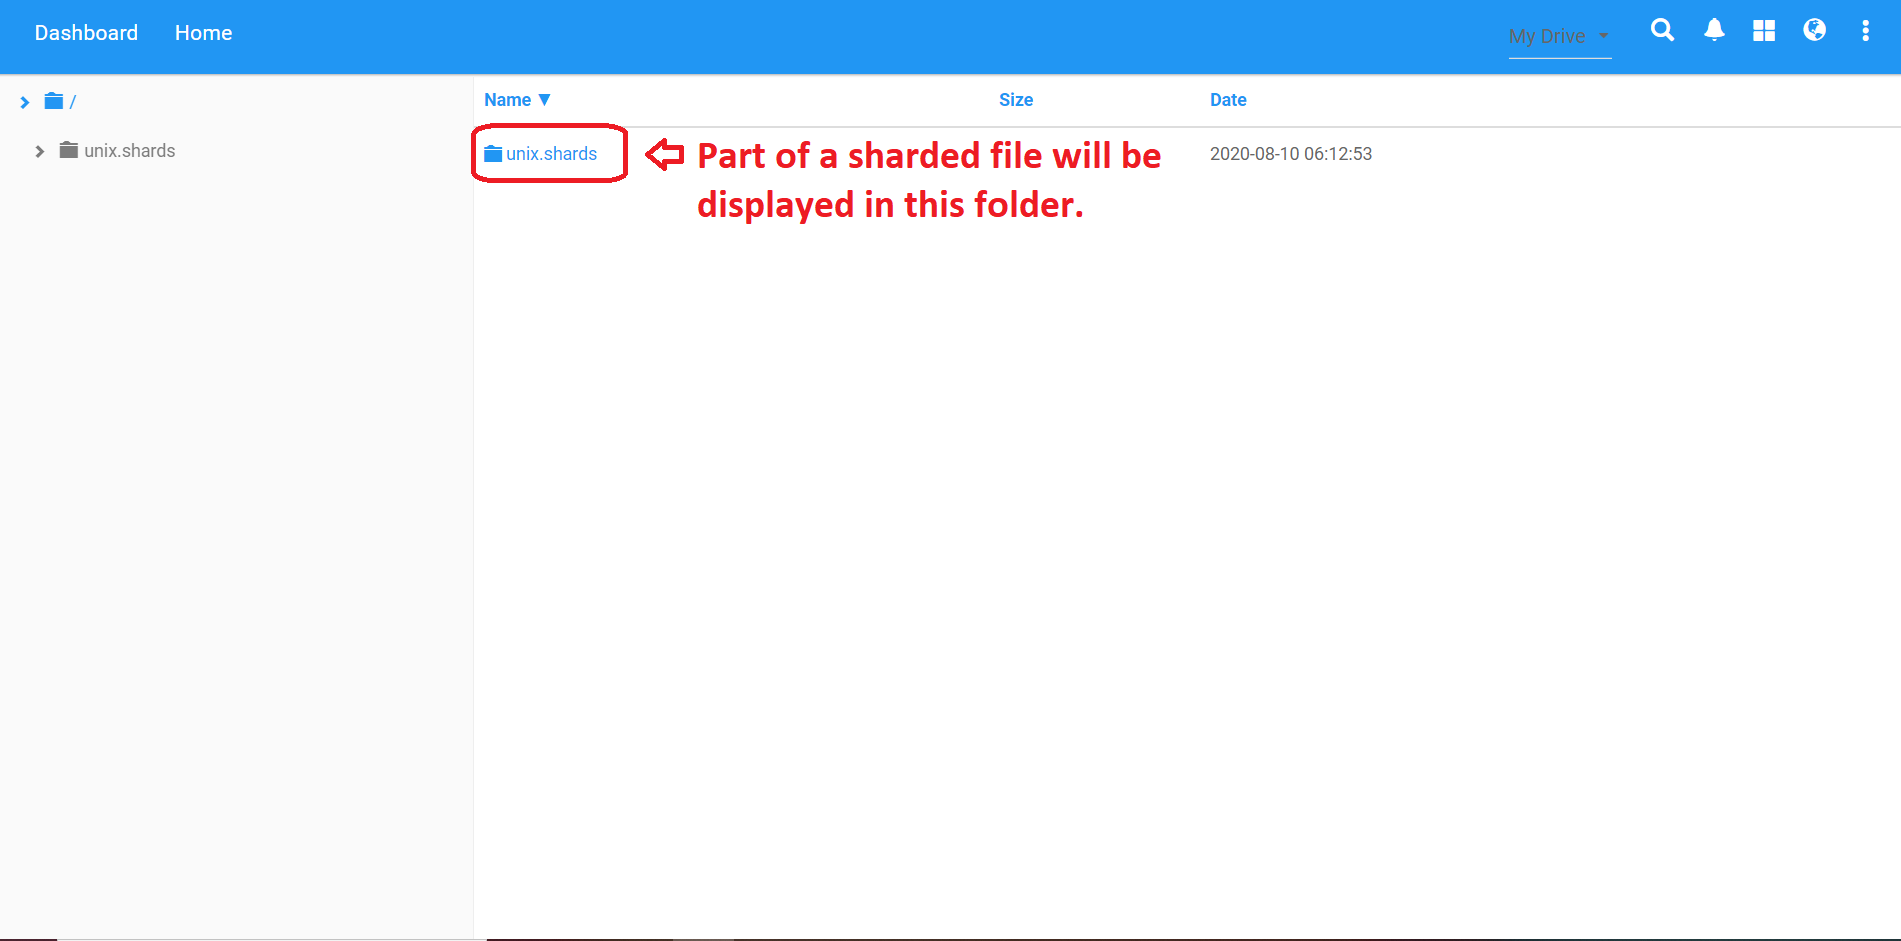
- After sharding the file the selected file will get
split into My Drive and Gdrive 1. You can get
the sharded files in Unix.shards and gdrive.shards
folders.
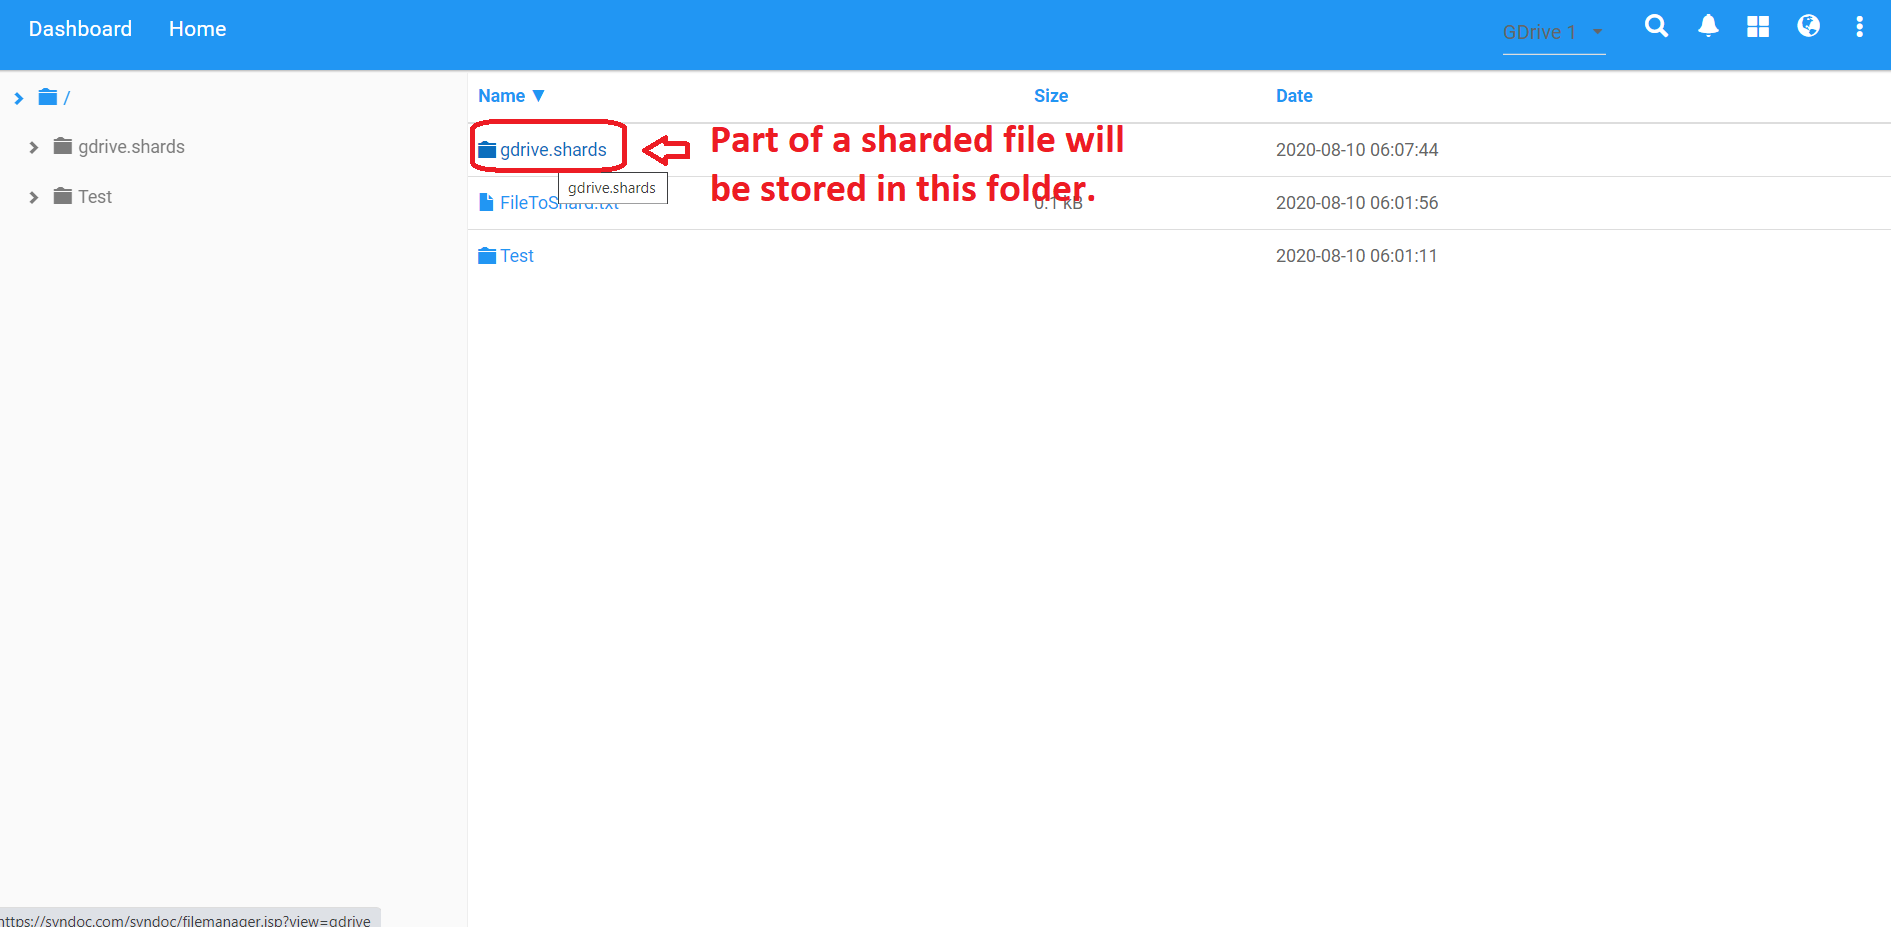
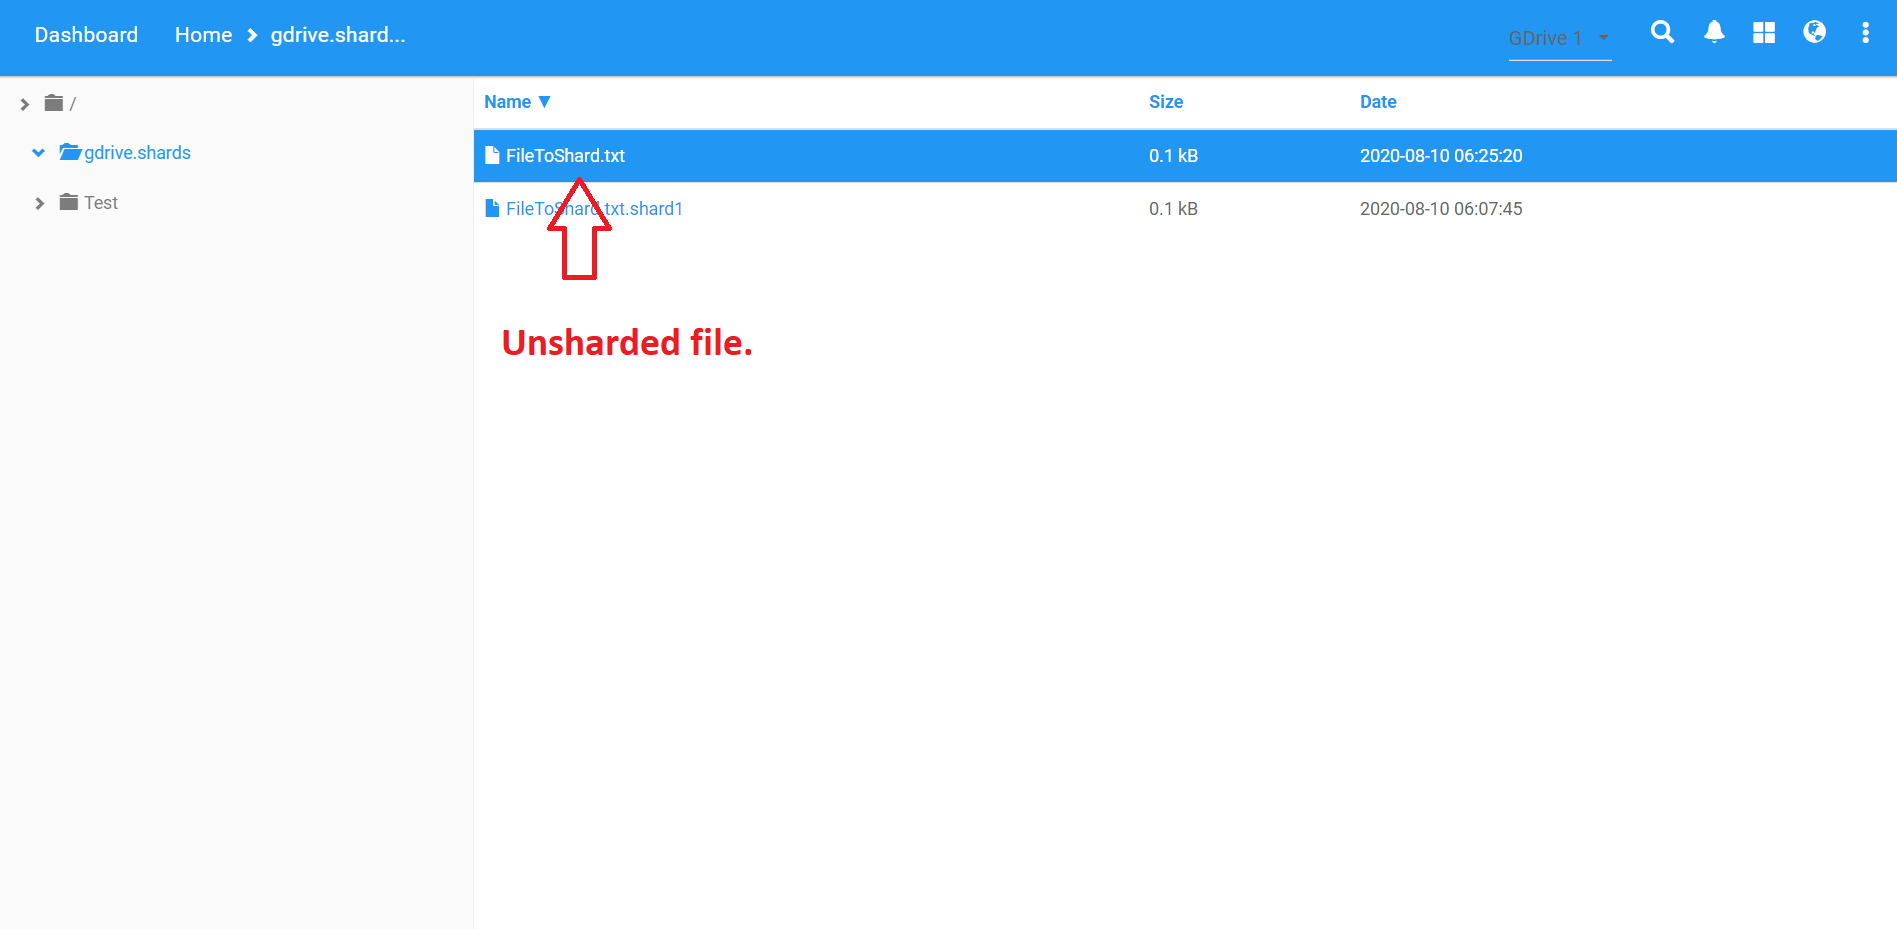
- To retrieve the original file content the file needs
to be unsharded, Go to any of the added drives and open .shard
folder. We will go to Google drive and open the gdrive.shards
folder where you will see your sharded file.
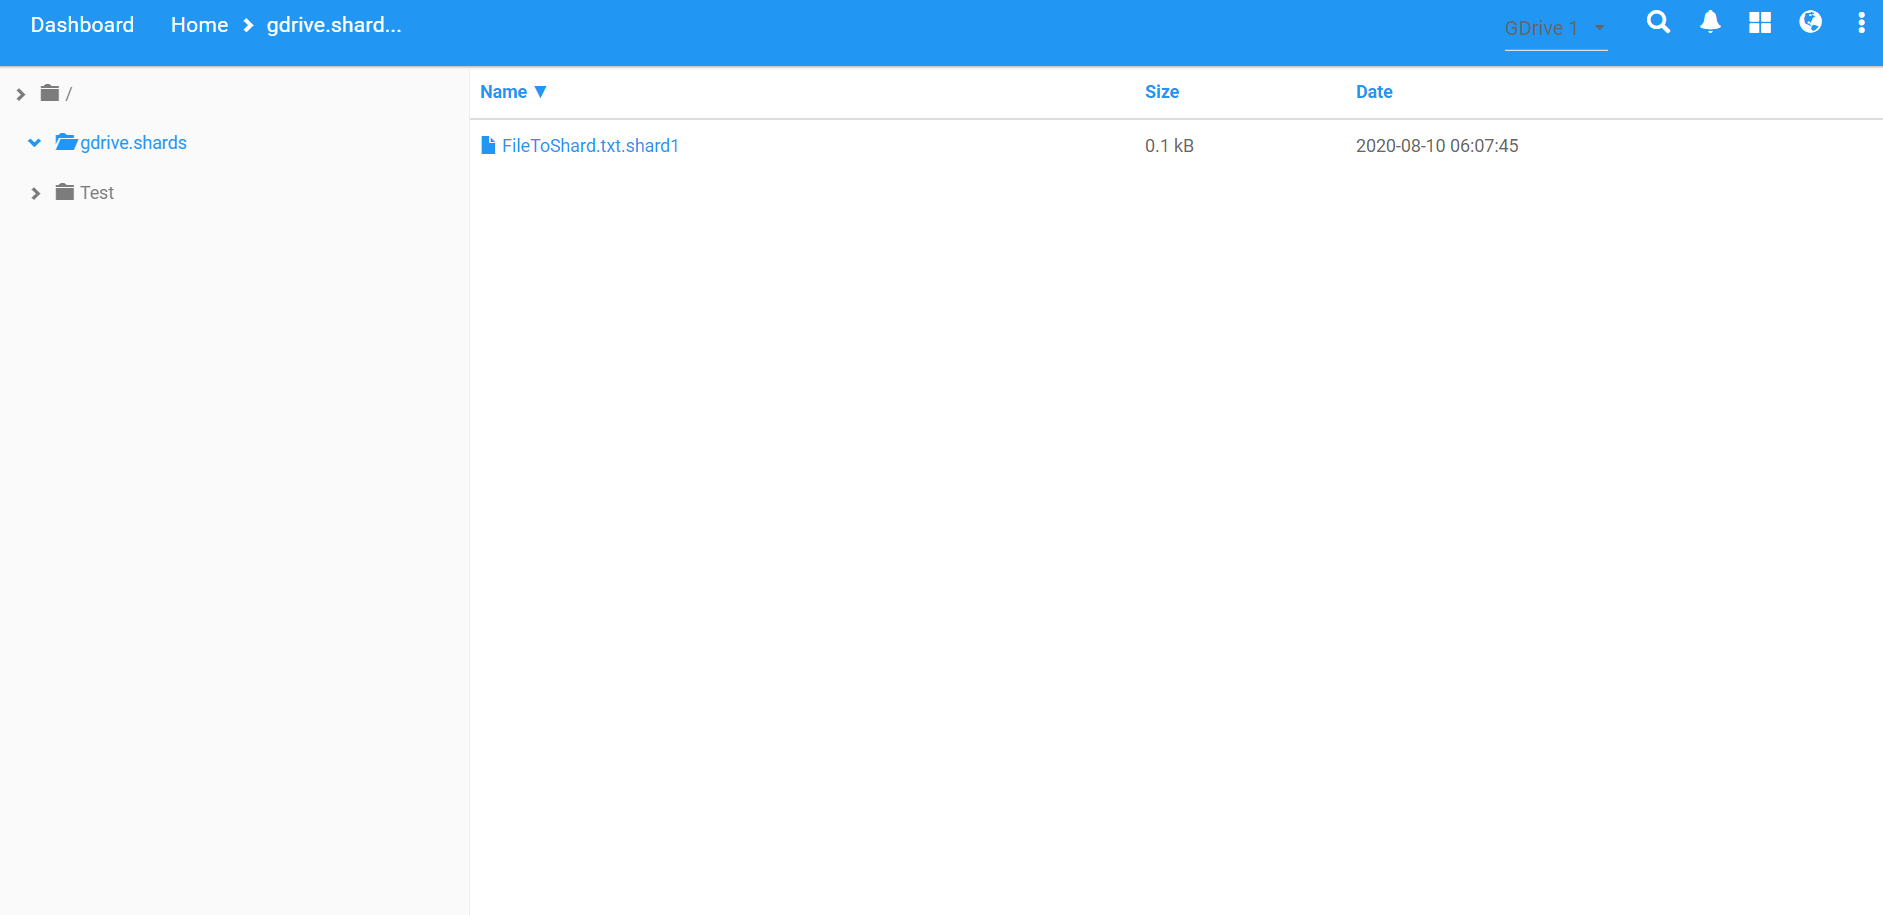
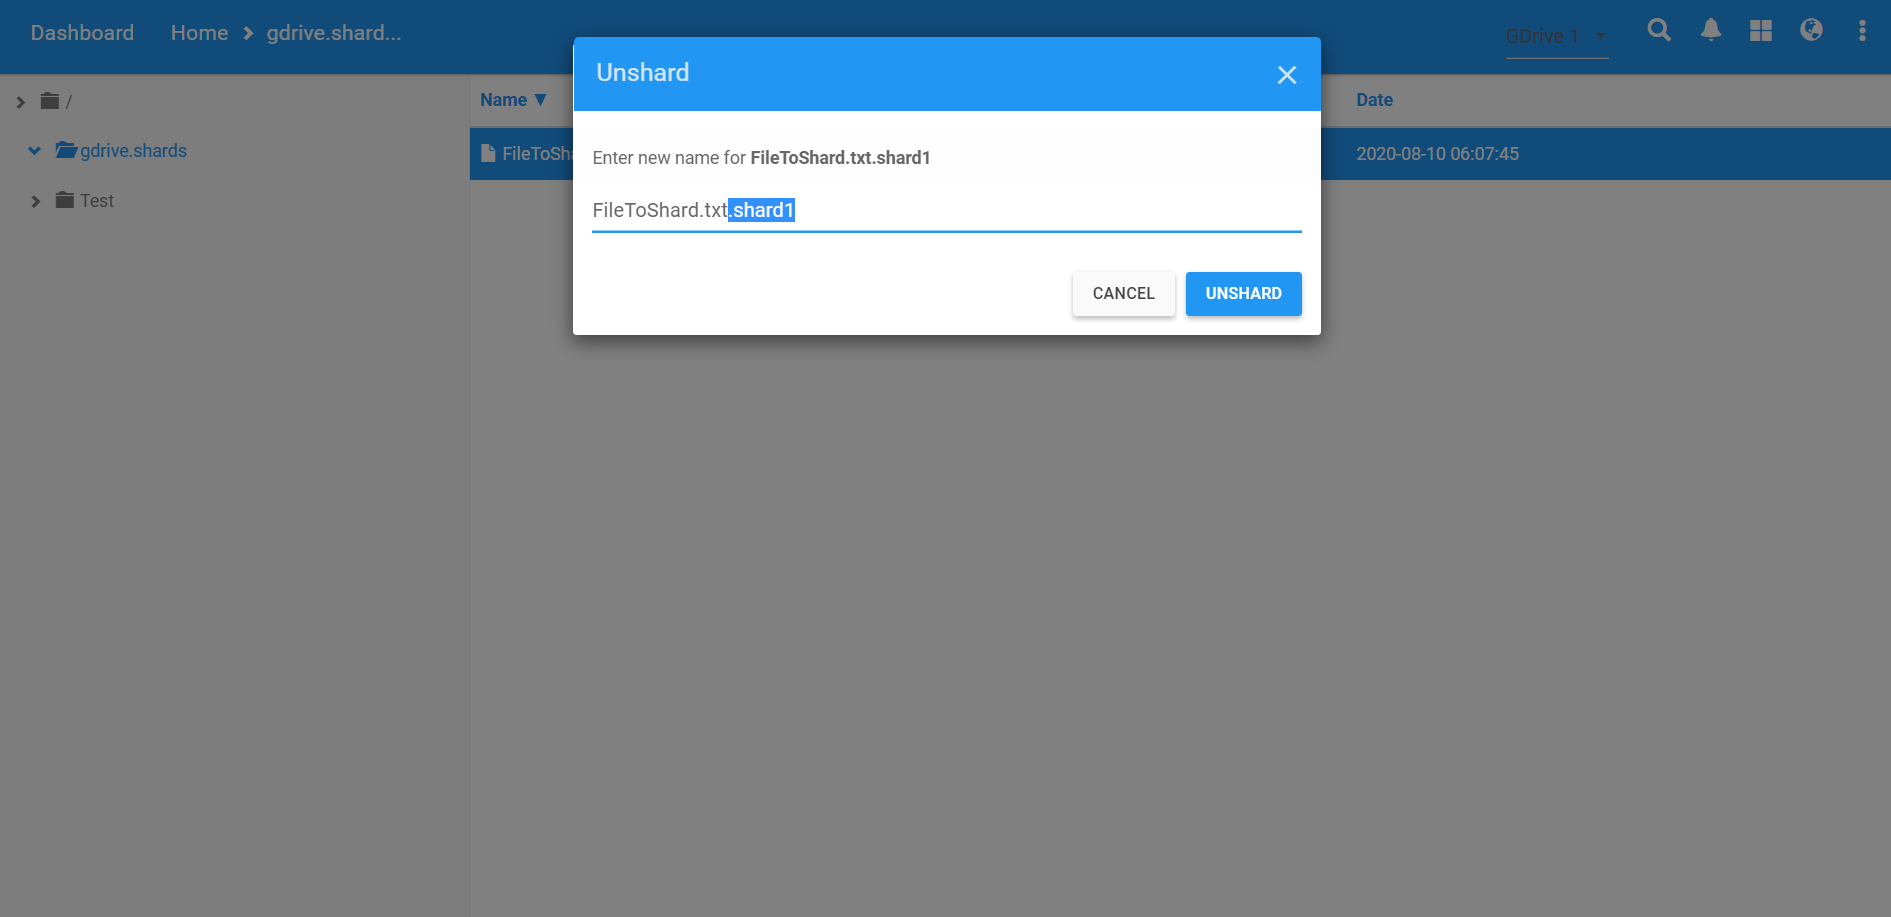
- Select the file you want to Unshard and click on Unshard
option.
- You will see a modal box to edit the file name, remove
the .shard extension and enter any name and click on UNSHARD
button, then the file will get unsharded at the same location.
- You can shard the file at root level only.
- If you delete any sharded file, then file cannot be unsharded to the original content.
- You cannot unshard the file if sharded file is moved to some other location.
- Any registered drive listed while sharding the file is deleted, then file could not be unsharded properly.
To play the video/audio file, follow the below steps:
- First of all make sure you are subscribed to Syndoc PRO to enjoy the Media Streaming feature.
- Log In to Syndoc PRO app and make sure you already have a Syndoc account subscribed to PRO version and have added drives which has media files in it.
- Click on "OPEN" button to open a cloud drive,
we will take Google drive as an example as shown in below
picture.
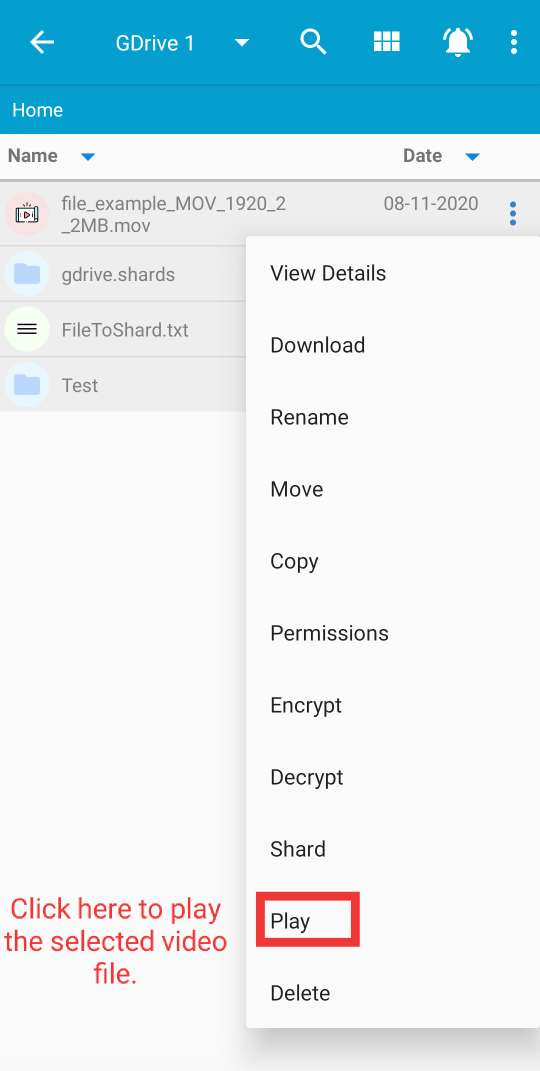
- Select a media file you want to play and click on PLAY
option.
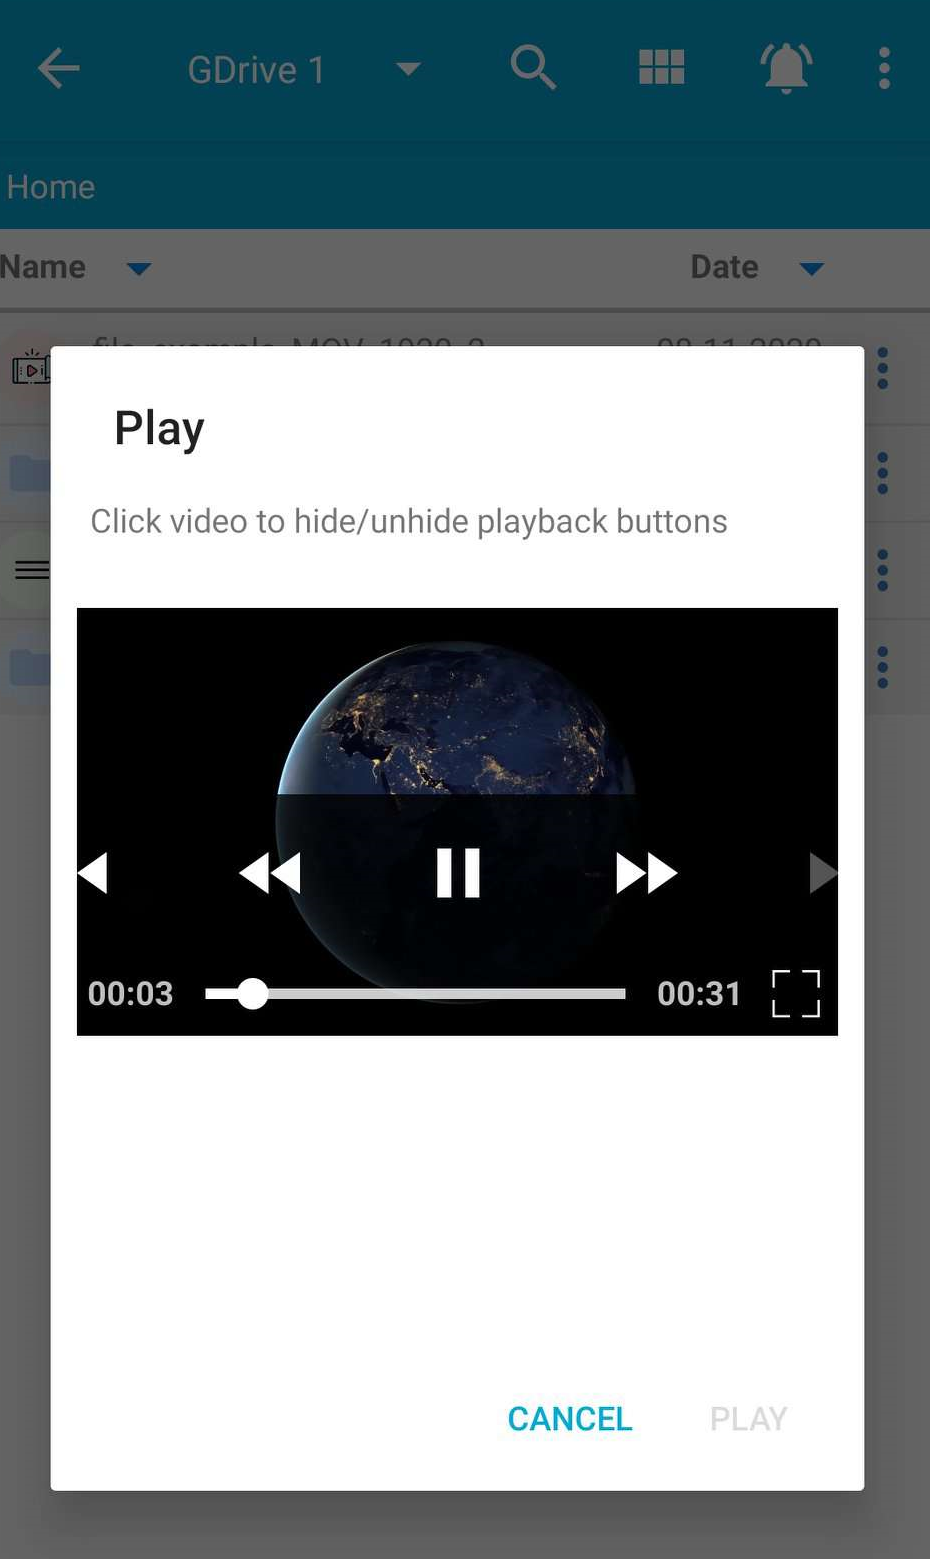
- Once you click on Play, it will show box as shown in
below picture , where you can watch your videos.
- For now this feature available only in Syndoc Pro app and not on website.
Note: You can cast your media files from My Drive only
So first check from which drive you are casting the media files, if its Google Drive, or OneDrive or any other supported drives then its not going to work. Secondly, make sure your mobile phone is on the same Wi-Fi network as your Chromecast device.
To cast media files from My Drive follow below steps:
- Make sure you are subscribed to Syndoc PRO to enjoy the Casting feature.
- Log In to Syndoc PRO app and make sure you already have a Syndoc account subscribed to PRO version and have added drives which has media files in it.
- Click on "OPEN" button to open a My Drive, as
shown in below picture.
- Select a media file you want to cast and click on PLAY
option.
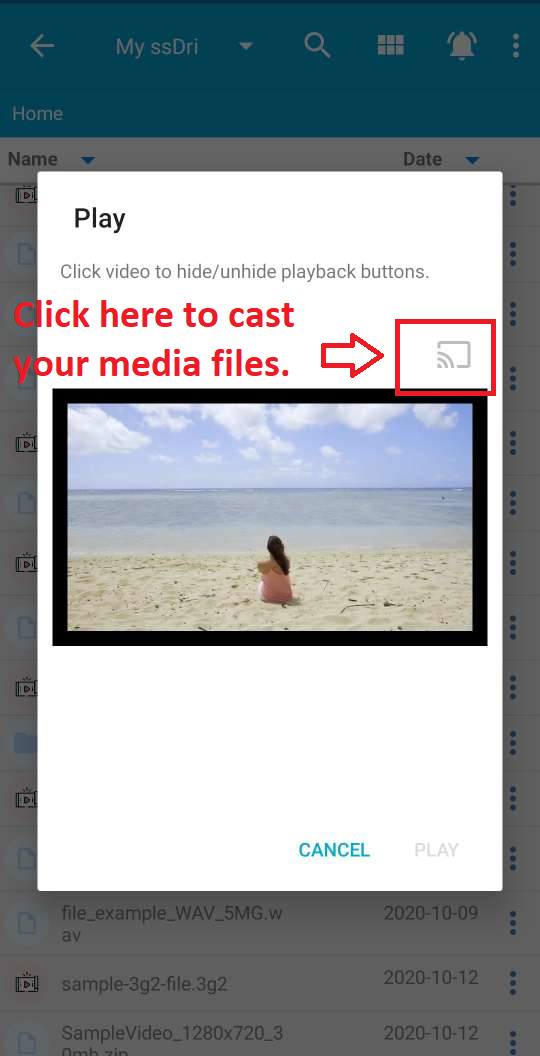
- Once you click on Play, it will show box as shown in
below picture , where you will get cast icon. Click on icon to
select available devices for casting.
- For now this feature available only in Syndoc Pro and Syndoc Business app and not on website.
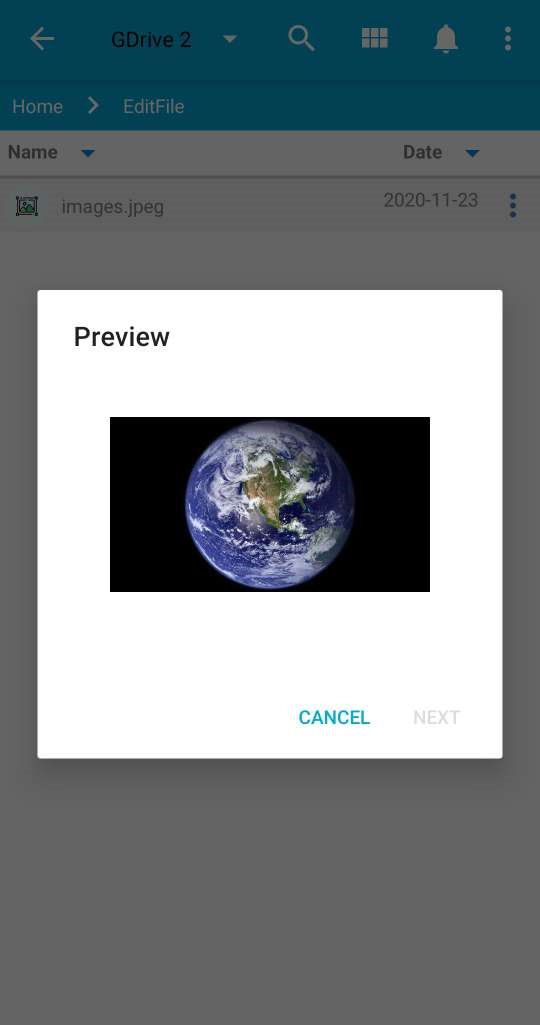
Note: You can preview images only from subscribtion based
android app (Syndoc
PRO, Syndoc
Business) and IOS app (Syndoc
PRO, Syndoc
Business) . Currently we do not support preview feature on
website Syndoc.com .
To preview images follow below steps:
To preview images follow below steps:
- Make sure you are subscribed to Syndoc PRO or Syndoc Business to enjoy the image preview feature.
- Log In to Syndoc PRO or Syndoc Business app and make sure you already have a Syndoc account subscribed to PRO/Business version and have added drives which has image files in it.
- Click on "OPEN" button to open the added drive,
as shown in below picture.
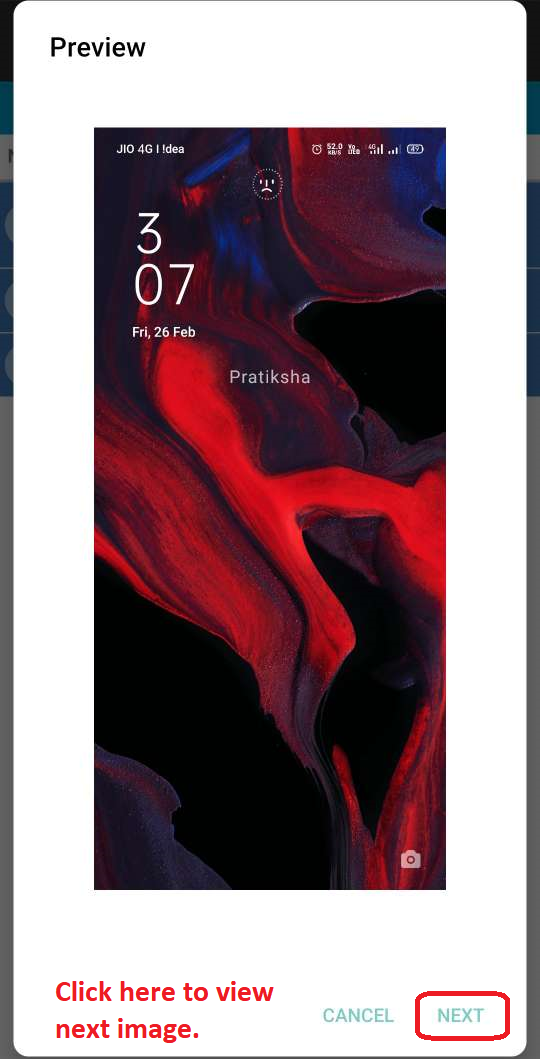
- To preview Single image :
Select a image file you want to preview and click on Preview option.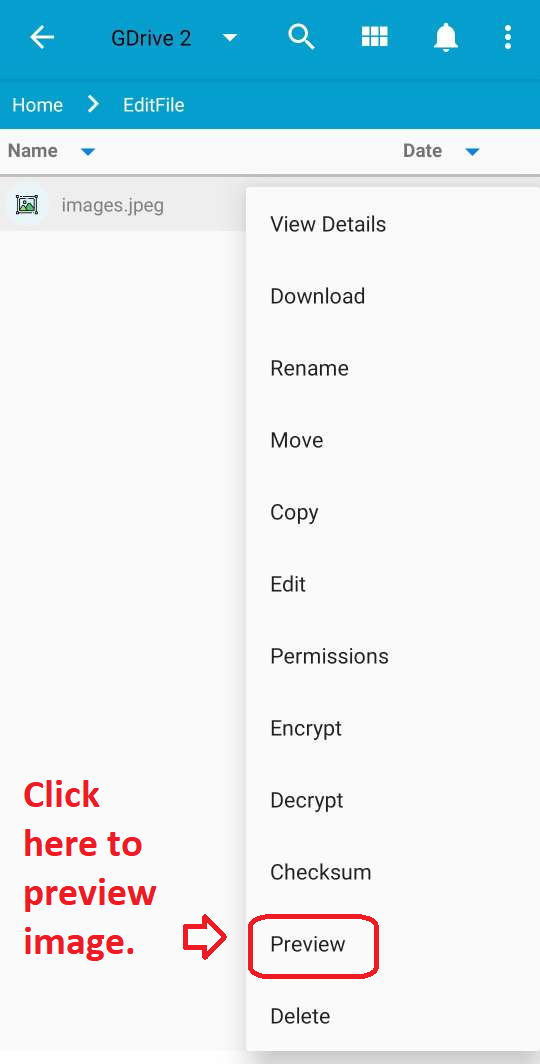
- To preview multiple images :
Long press on image file and select multiple images as shown in below picture.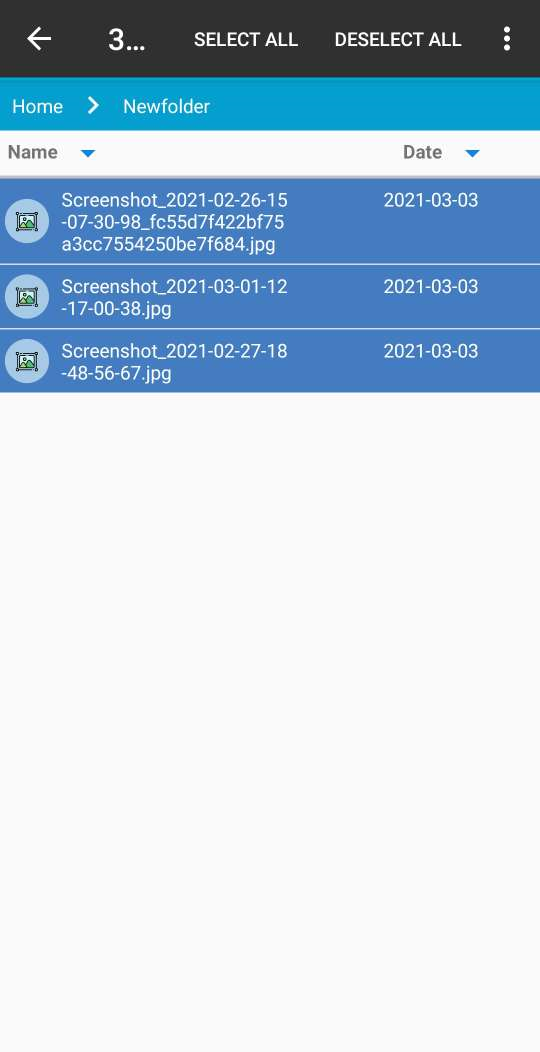
Click on 3 dots at top to open context menu and click on Preview option.

Click Next to preview all the selected images.
Note: You can Convert/Shrink/Export files only from
subscription based android apps (Syndoc
PRO, Syndoc
Business). Once subscribed to premium features via android
apps you can access Convert/Shrink/Export features through
website syndoc.com also.
To Convert/Shrink/Export to different format follow below steps:
To Convert/Shrink/Export to different format follow below steps:
- Make sure you are subscribed to Syndoc PRO or Syndoc Business to enjoy the Convert/Shrink/Export feature.
- Log In to Syndoc PRO or Syndoc Business app or syndoc.com if you are premium user and make sure you already have a Syndoc account subscribed to PRO/Business version and have added drives which has image/video files in it.
- Click on "OPEN" button to open the added drive,
as shown in below picture.
- Select a file you want to Convert/Shrink/Export.

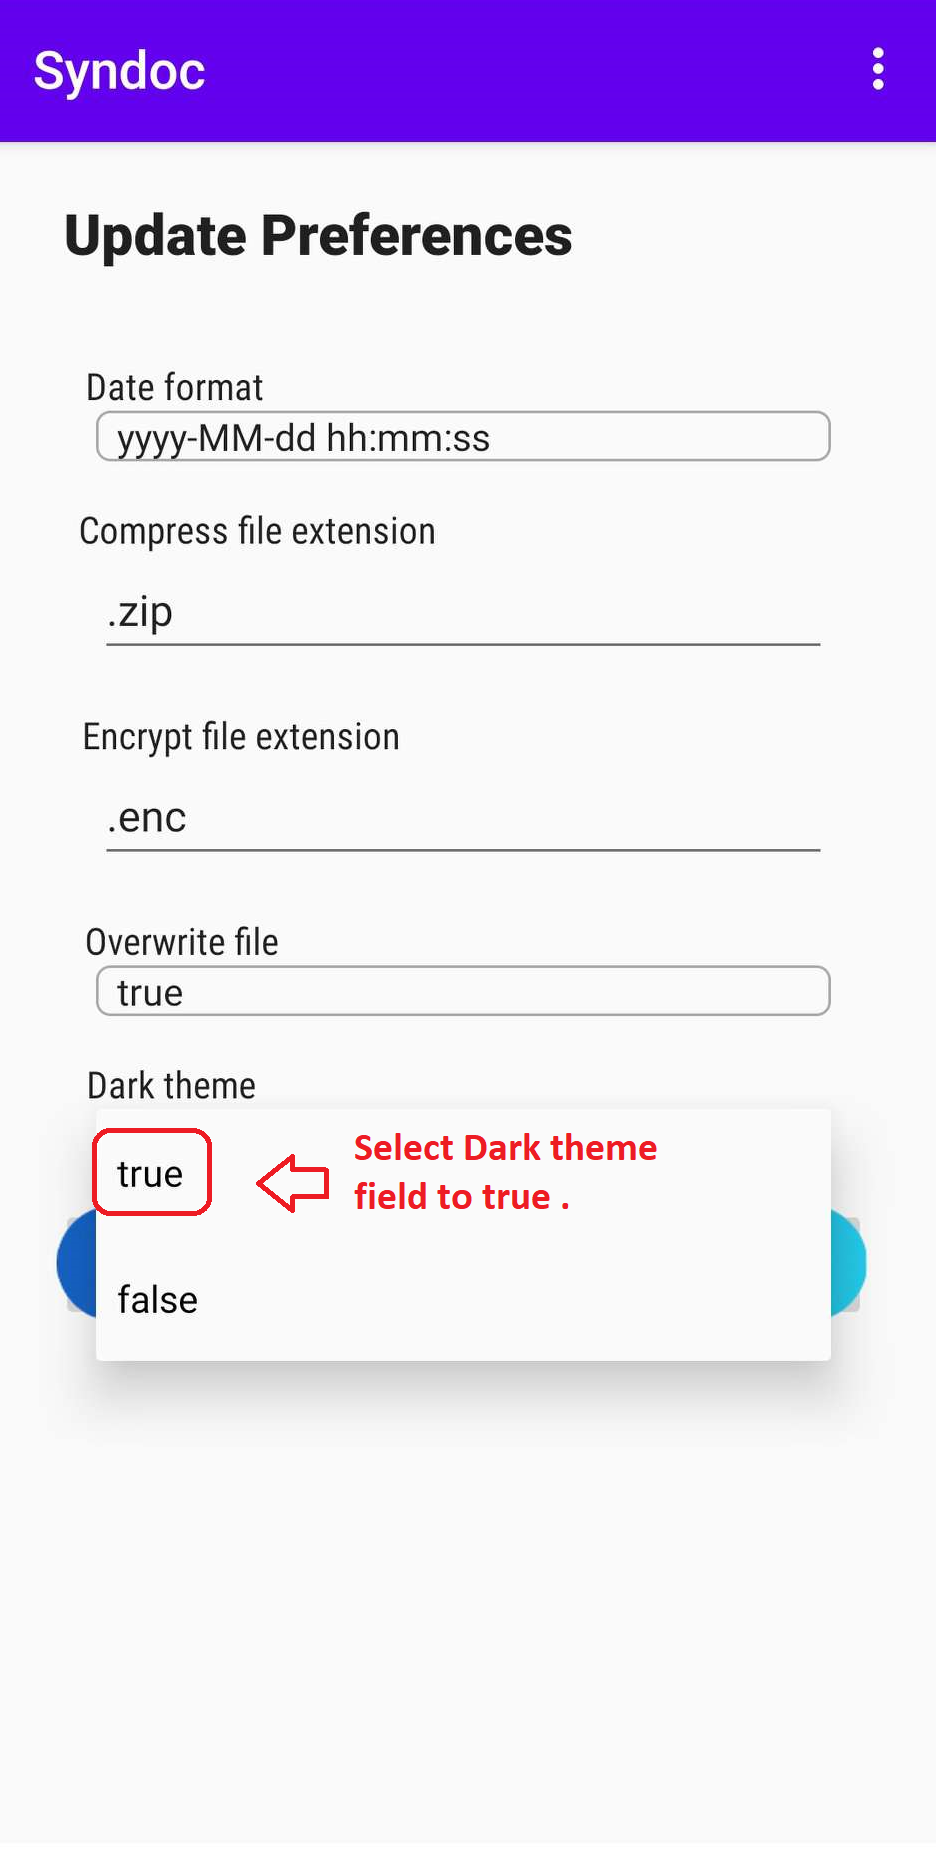
To switch to Dark theme follow below steps:
- Log In to android app.
- Click on Update Preferences.
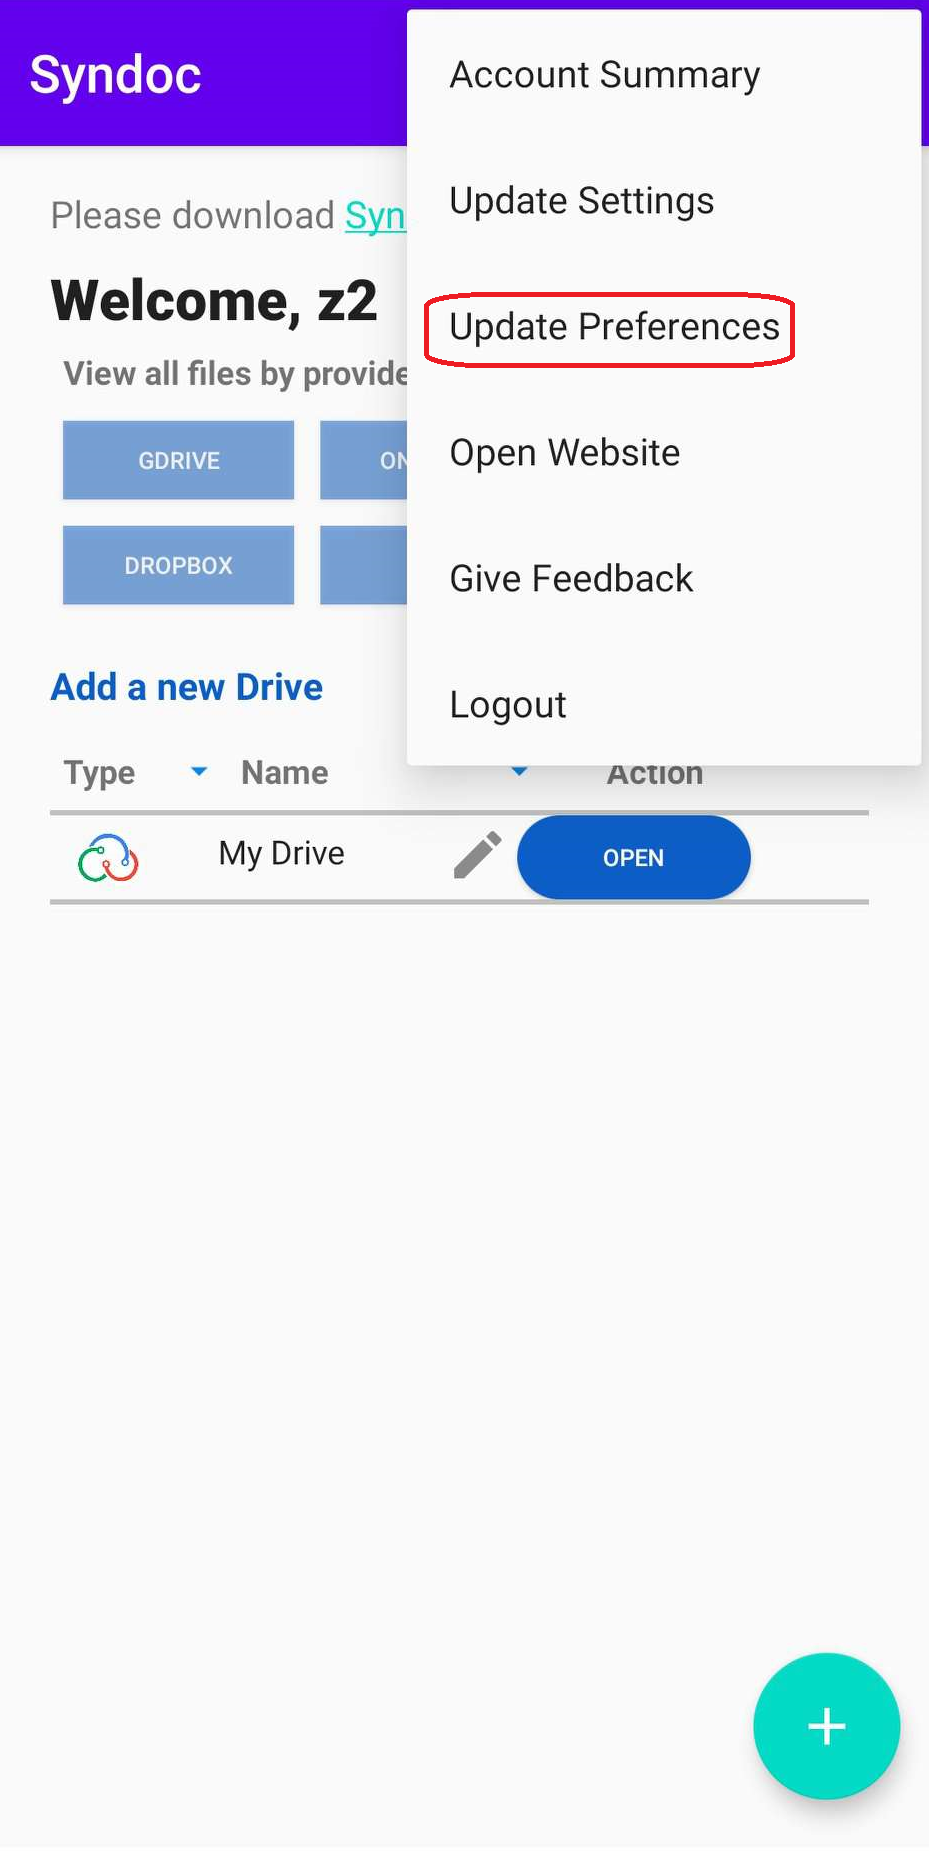
- By default the Dark theme is set to False, so
now select it to True and click on Update
button.
- You will get switched to Dark theme as shown in below
picture.
To switch to Dark theme follow below steps:
- Log In to android app.
- Click on Update Preferences.
- By default the Dark theme is set to False, so
now select it to True and click on Update
button.
- You will get switched to Dark theme as shown in below
picture.
Note: You can upgrade storage only from subscription
based android apps (Syndoc
PRO, Syndoc
Business,Arrangify).
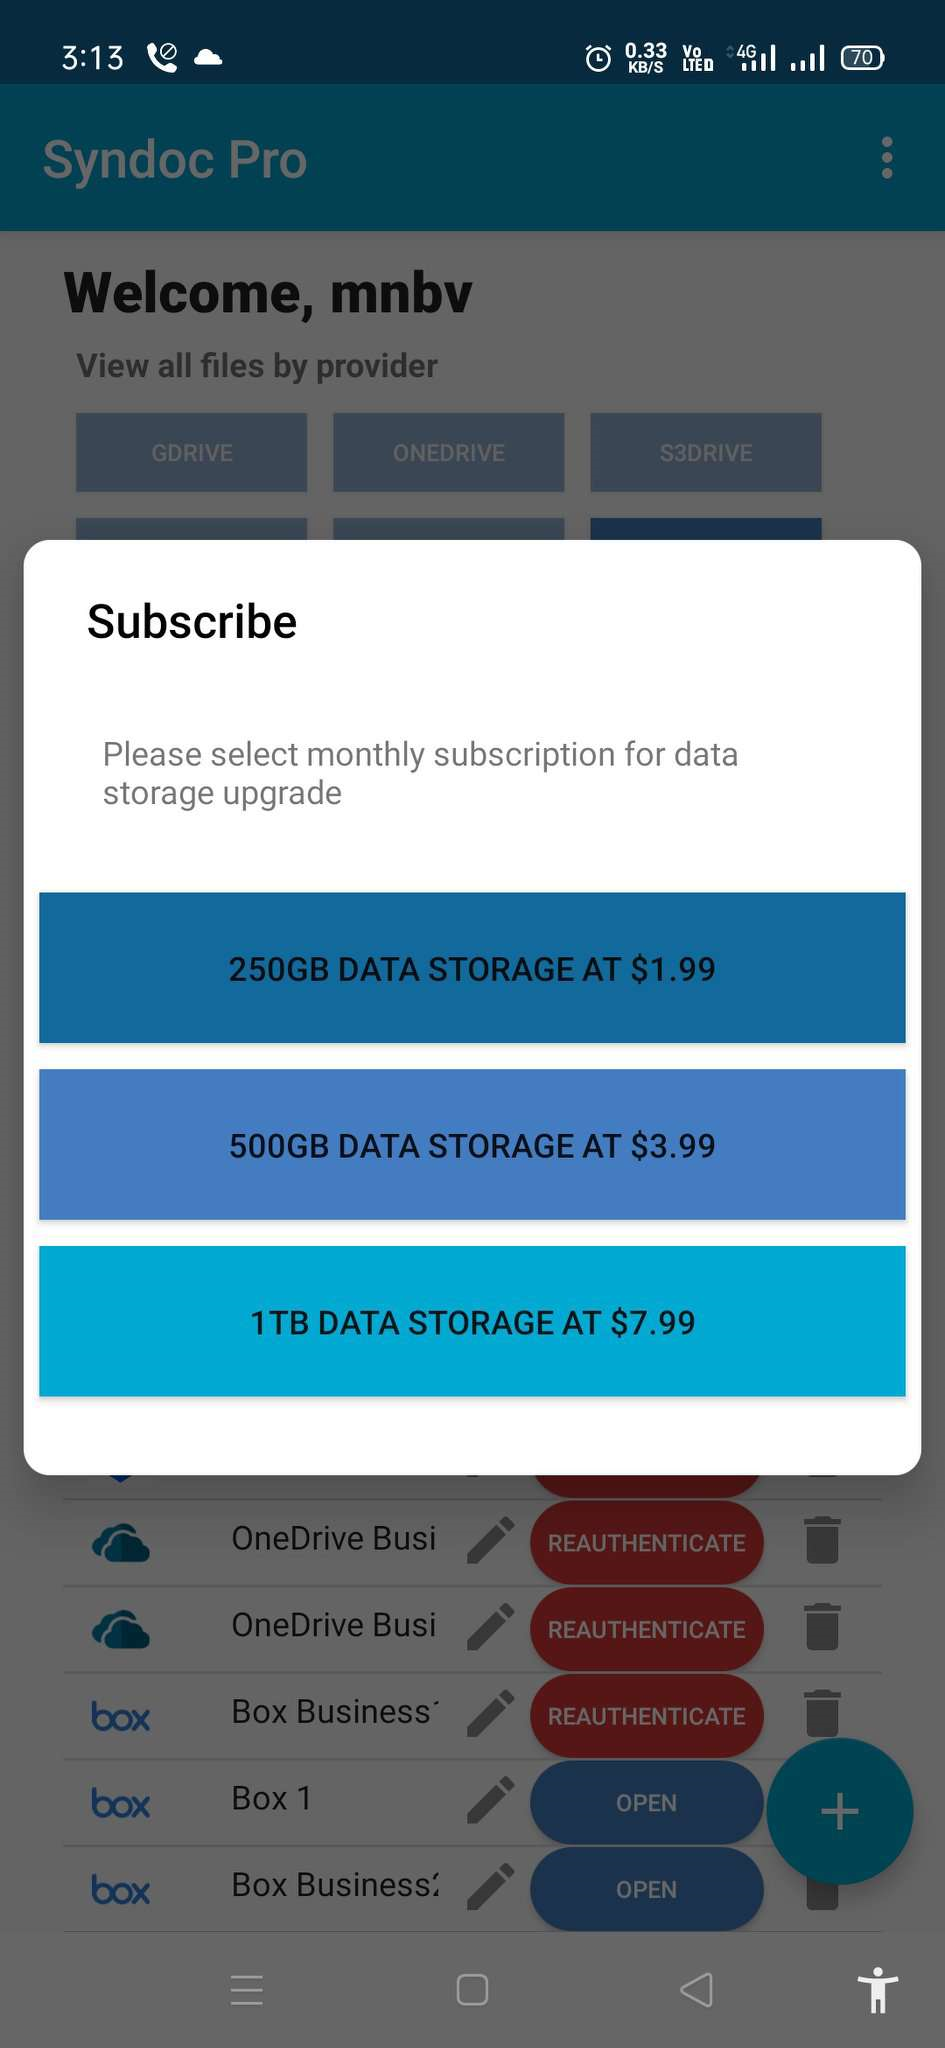
To upgrade storage follow below steps:
To upgrade storage follow below steps:
- login to Syndoc PRO or Syndoc Business
- Click on 3 dots at top to open the menu.
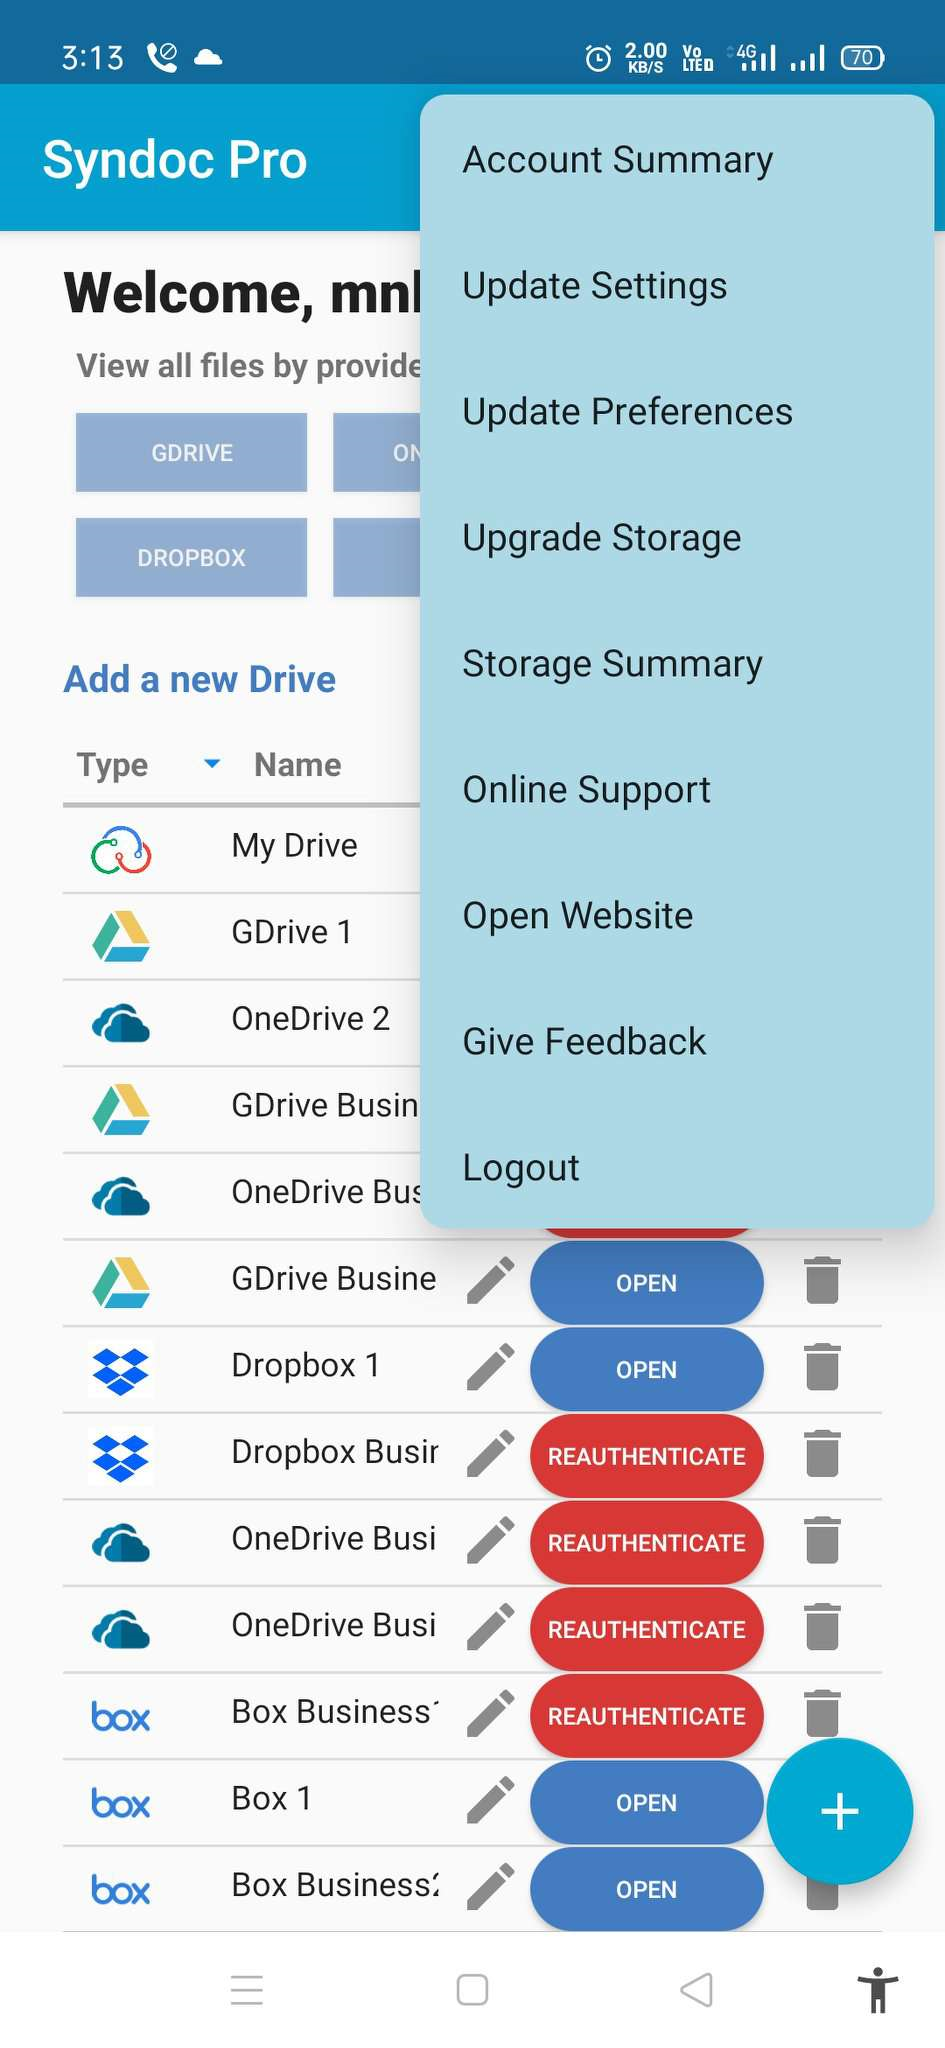
- Click on Upgrade Storage option and select the
subscription plan.
This feature helps you to sorted the file with date, size and
owner. Once you select any one option, syndoc will immediately
sorted with that option. This method will help you save a lot of
time.
To use custom column features, follow the below steps:
To use custom column features, follow the below steps:
- First of all make sure you are subscribed to Syndoc PRO to access the Custom Column feature.
- Log In to Syndoc PRO app and make sure you already have a Syndoc account subscribed to the PRO version.
- Click on "OPEN" button to open a cloud drive,
we will take My drive as an example. You will see the "3
dots"as shown in below picture.
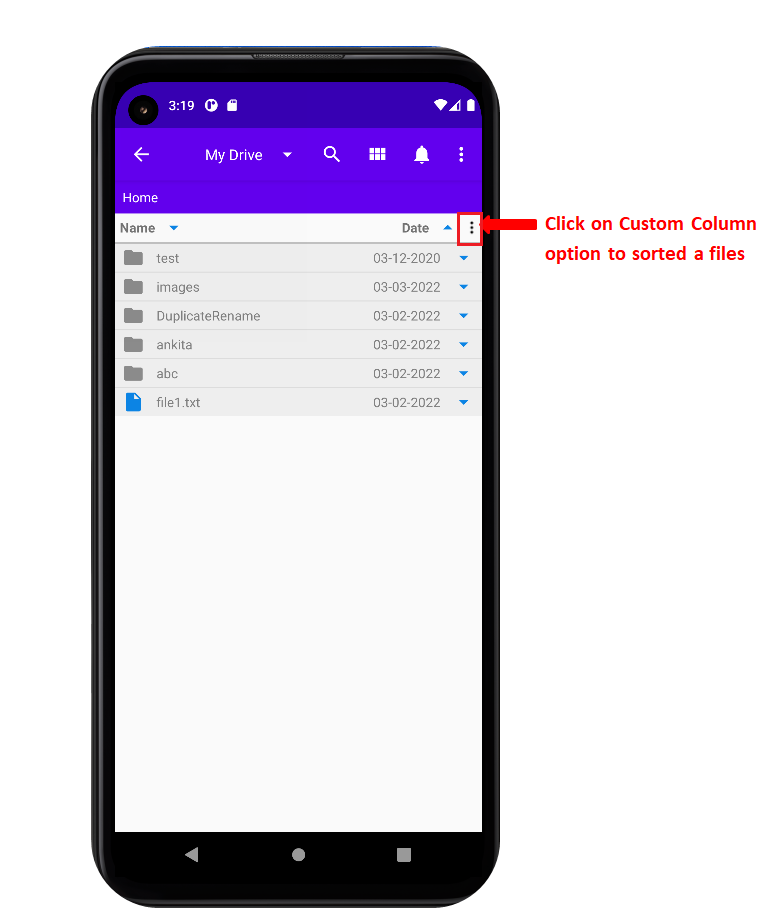
- Now you click on "3 dots", you will see popup
window with date, size and owner options as you can see in
below picture.
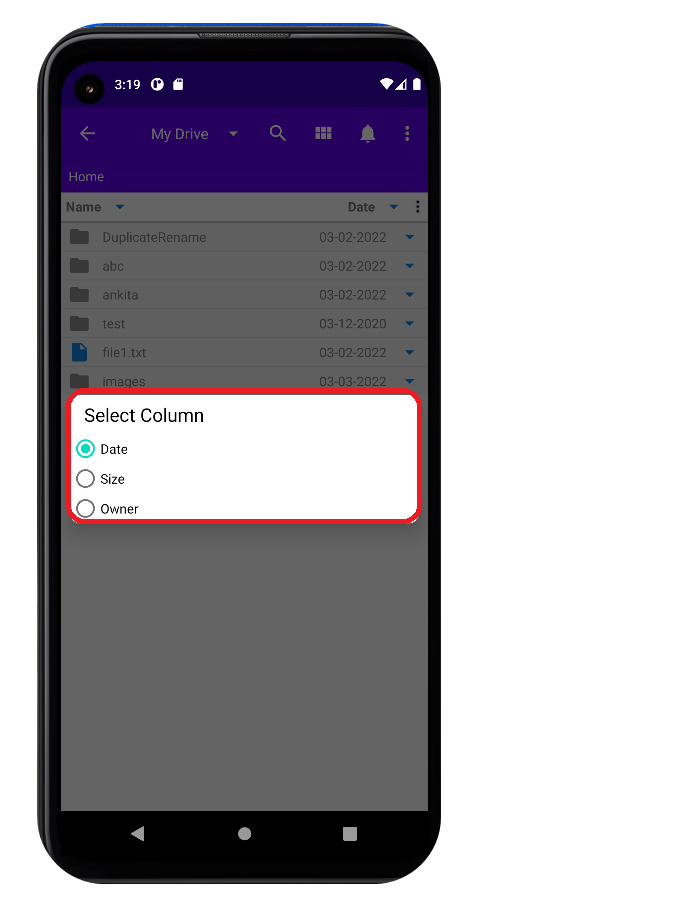
- Select your preferred option.
Note: You can upload files to
any syndoc android apps - Syndoc,
Synodc Pro,
Syndoc Business and
Arrangify.
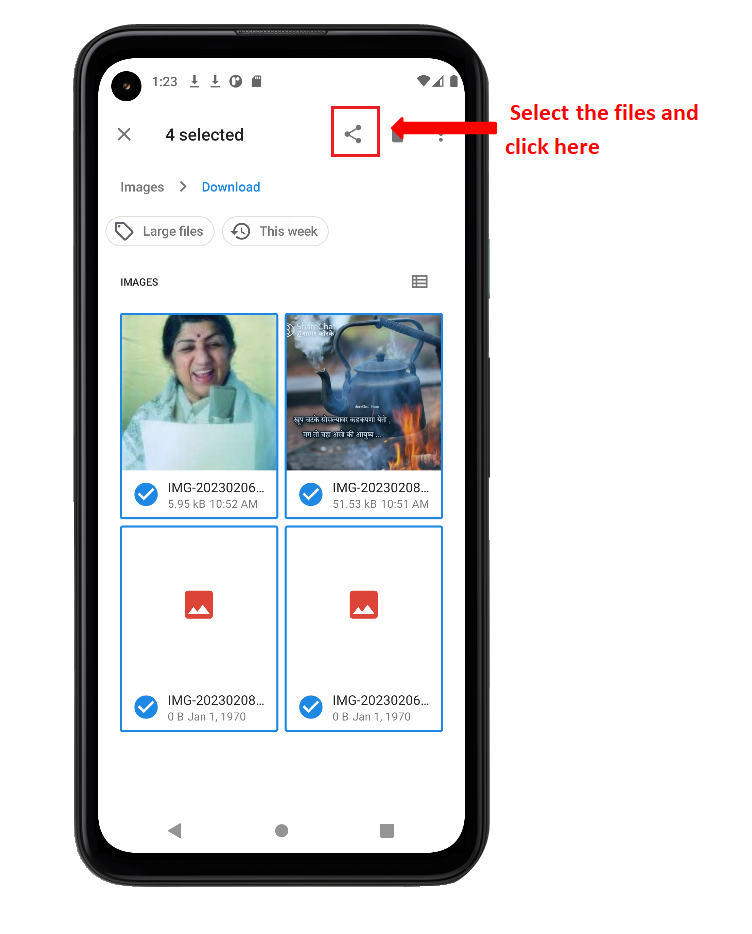
Follow the steps below to upload files directly to Syndoc Apps:
Follow the steps below to upload files directly to Syndoc Apps:
- First, you should ensure that you have either Syndoc, SyndocPro, Syndoc Business or Arrangify account.
- Select the target file,you can select multiple files too.
- Click on "Share" option to upload the selected file.
- In the new dialog box, you have the option to share via email,
or other third-party apps such as Syndoc, Syndoc Pro, Syndoc Business and Arrangify.
Select the app in which you want to upload files.
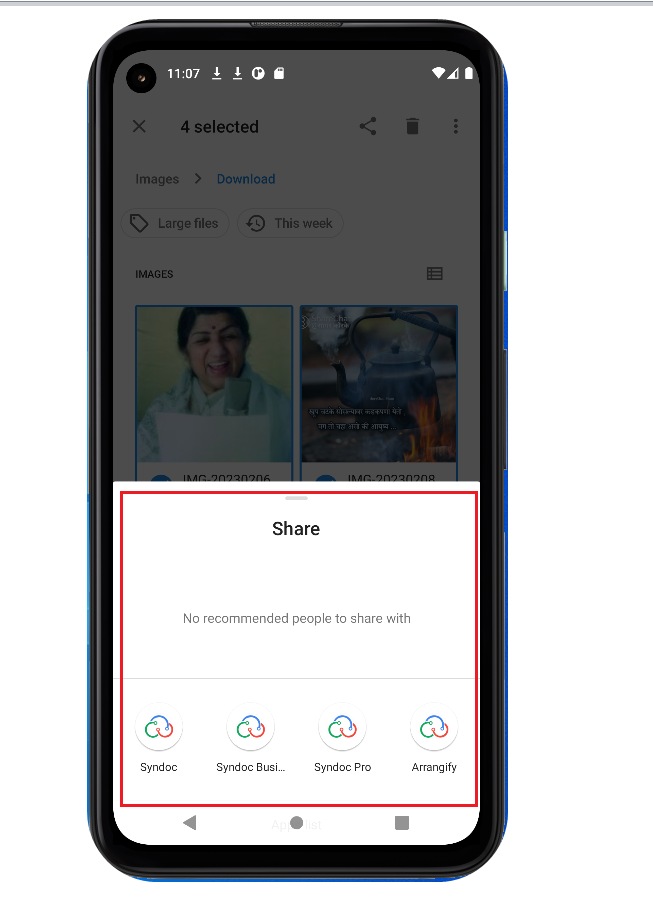
- Tap upload to complete the action.